
Description
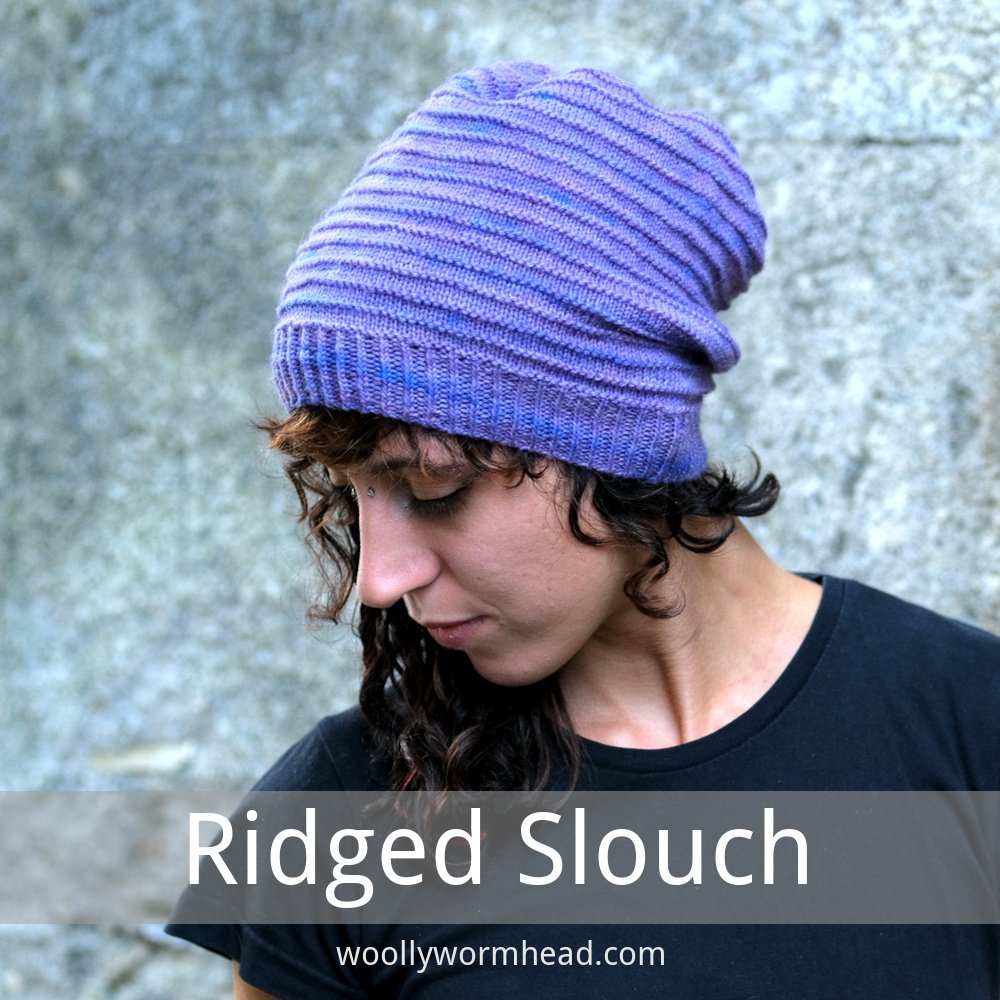
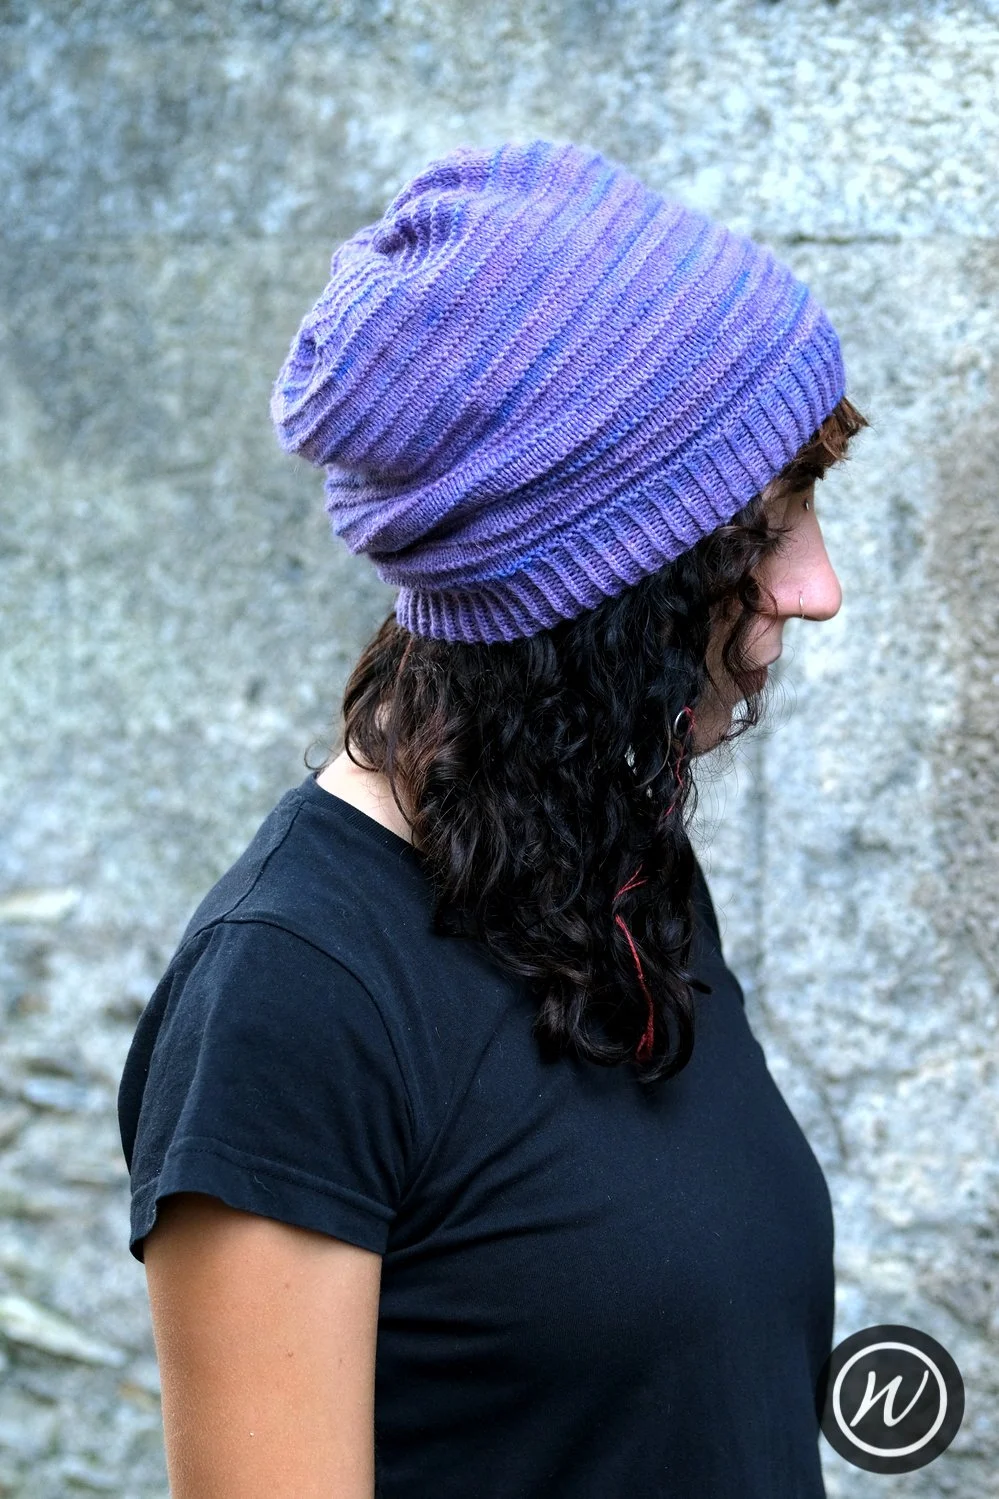
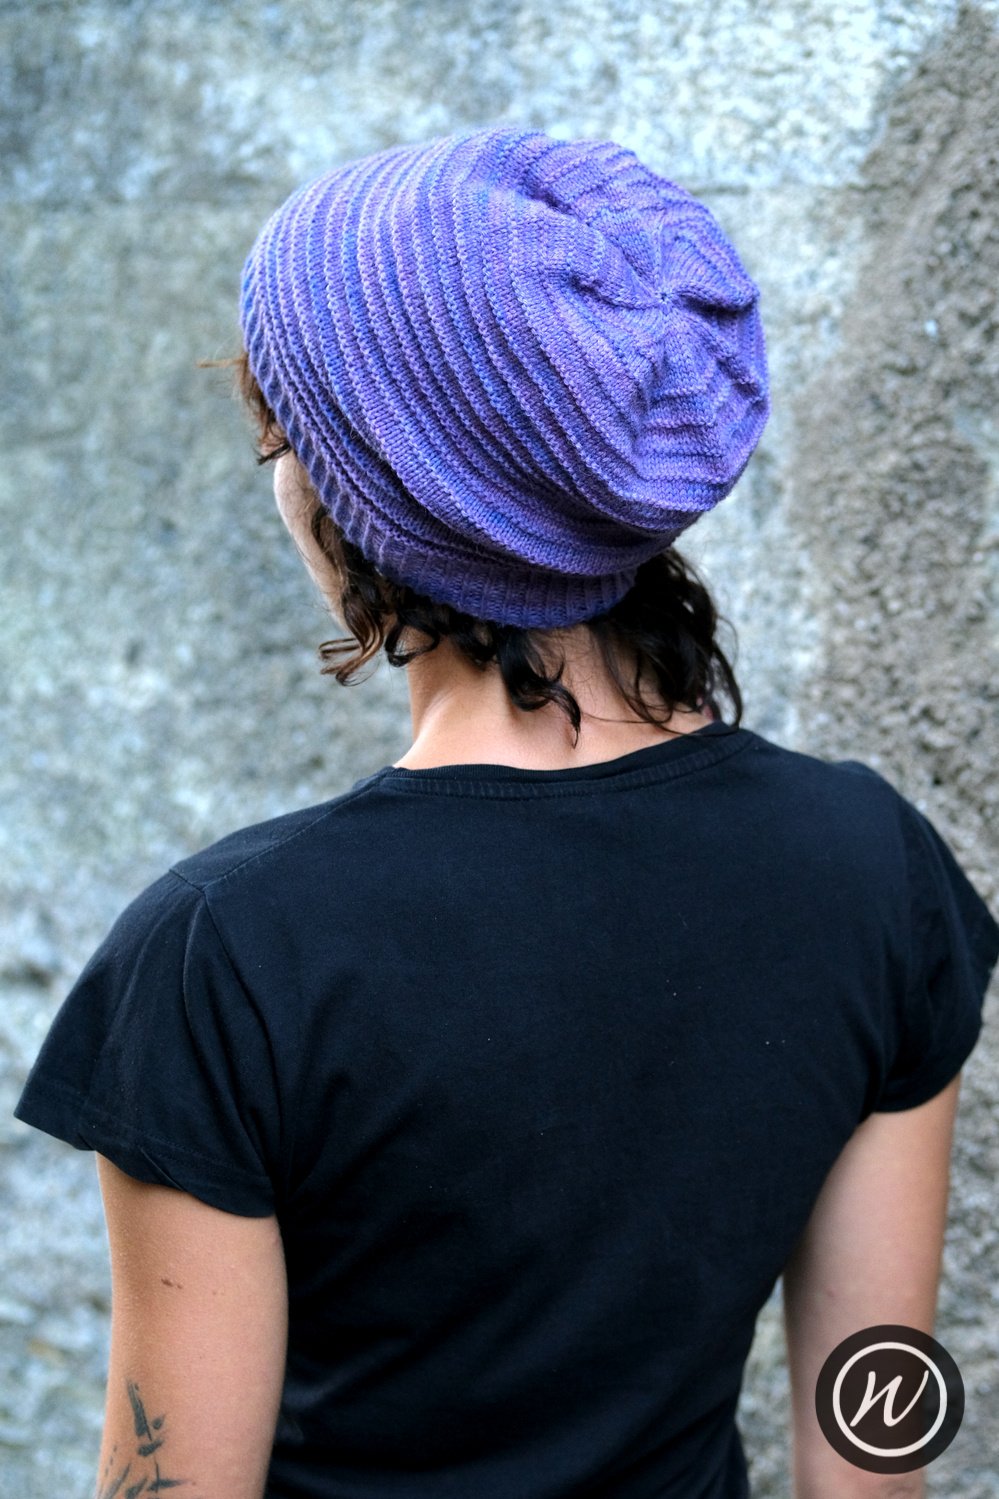
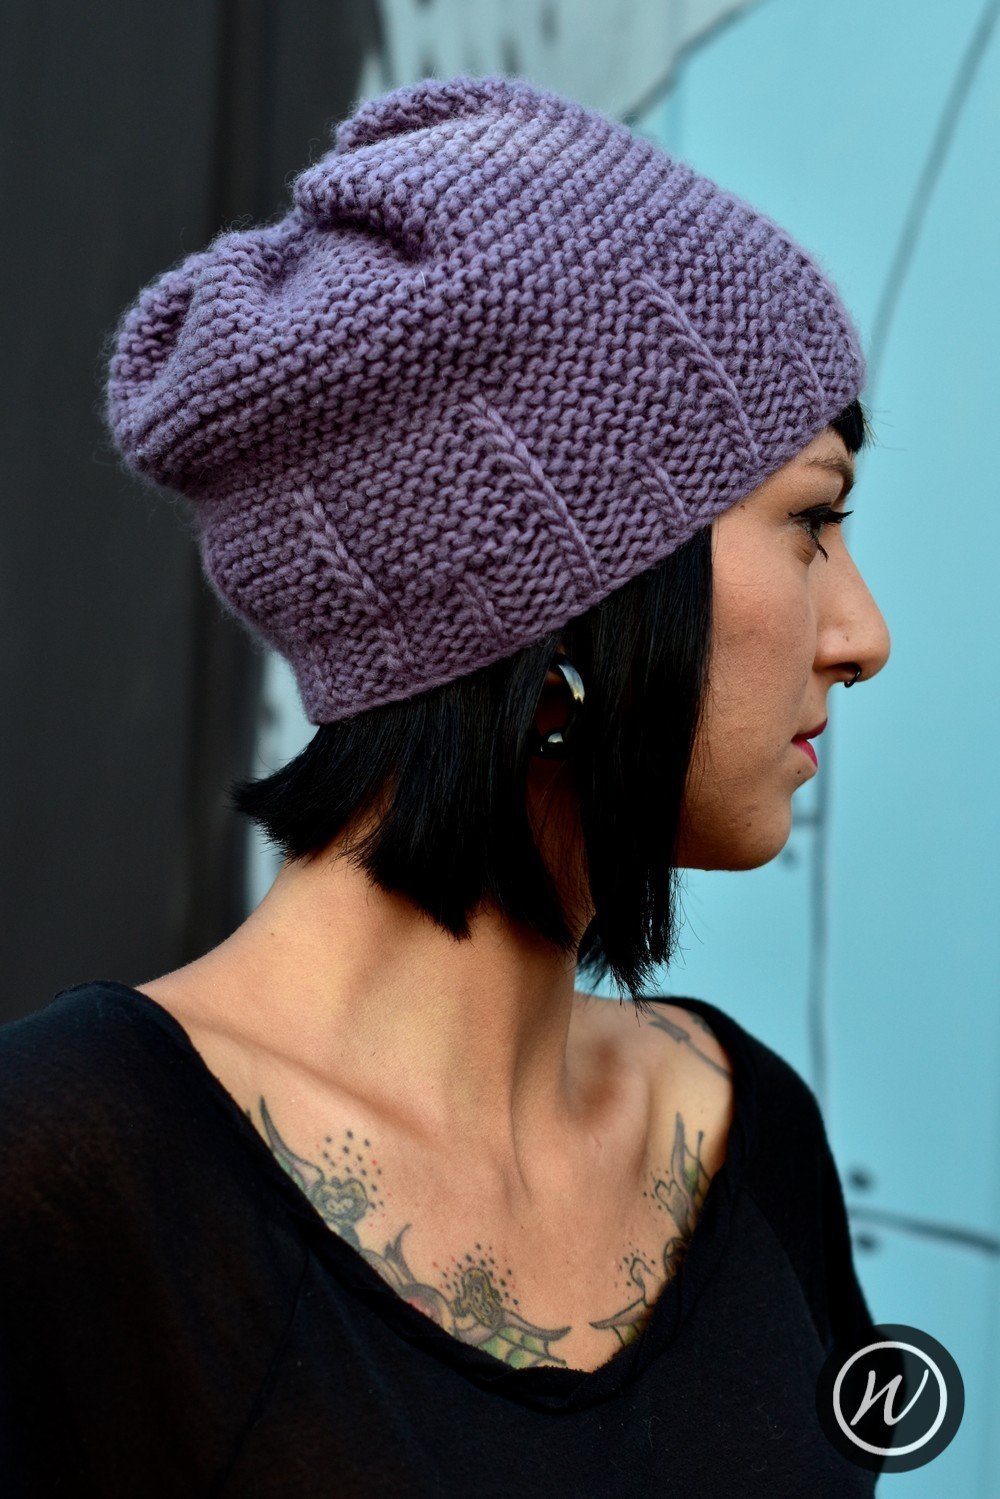
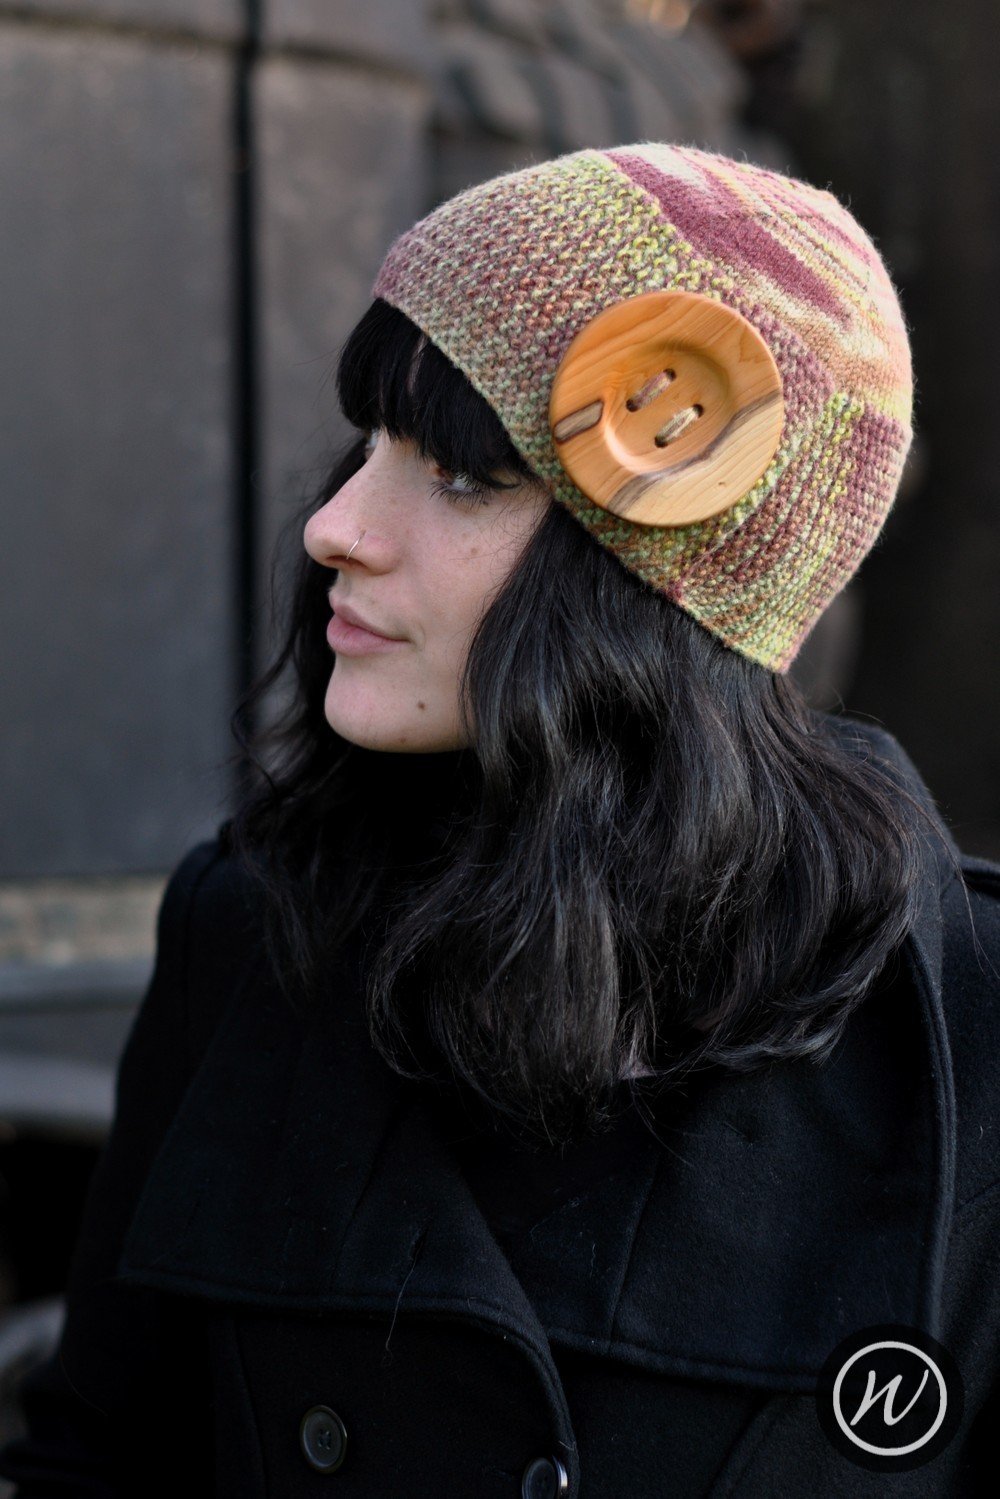
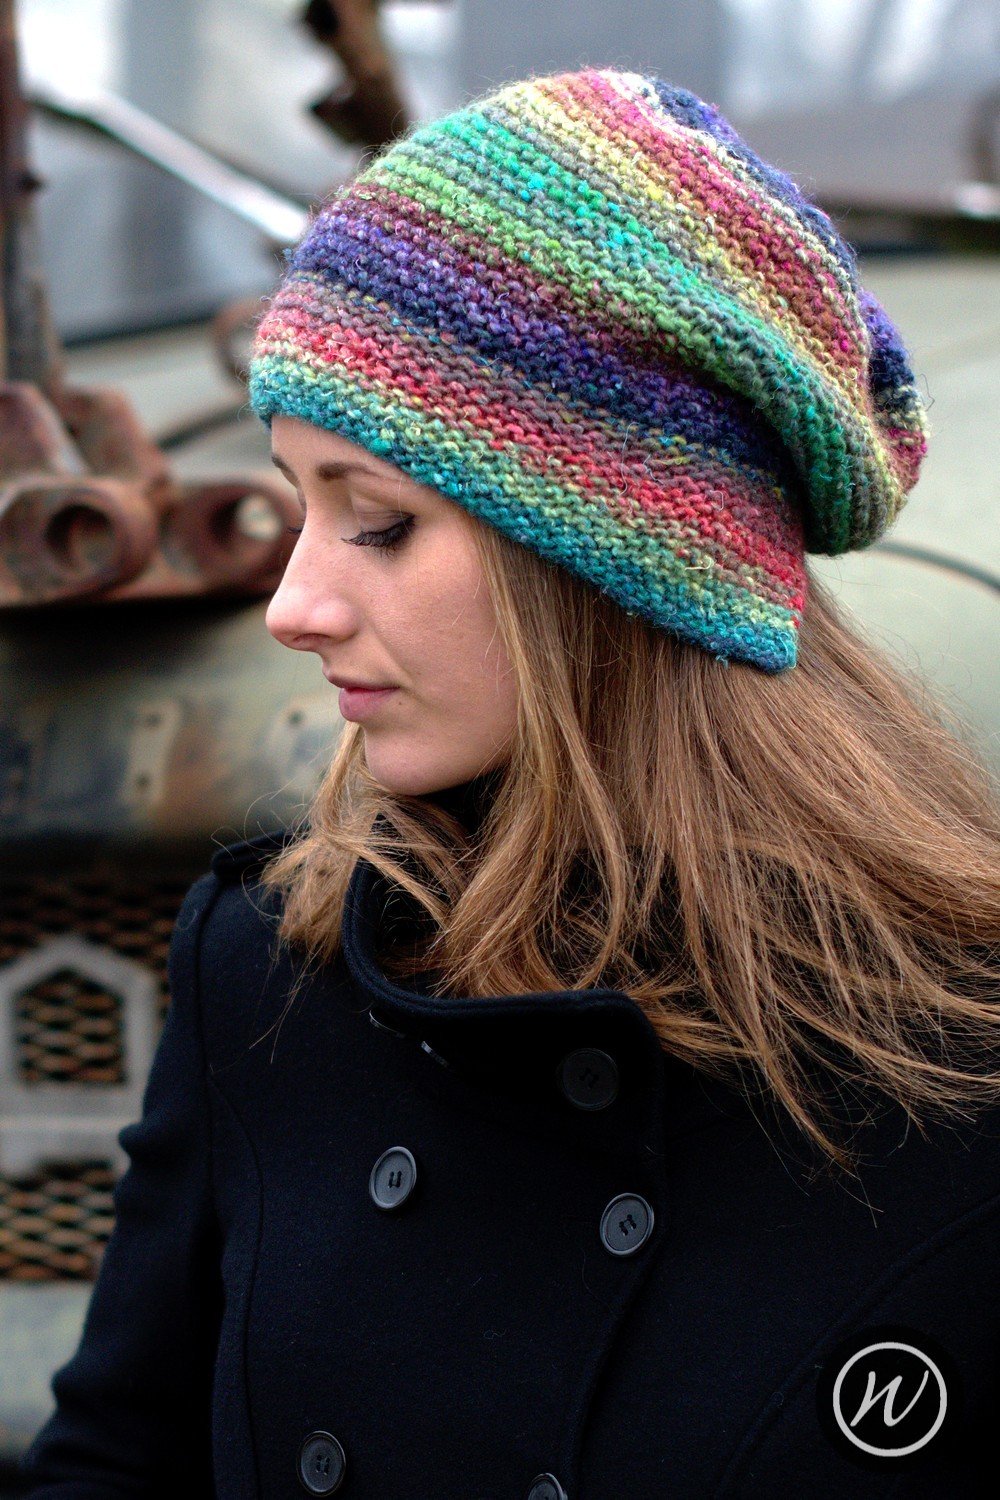
The Ridged Slouch Hat features stripes of purled ridges against a stocking stitch background. It has a twisted ribbed brim and a gently gathered crown.
Availability
My Patreon supporters and members of The Woolly Hat Society get exclusive early access to new free patterns and tutorials. Once the exclusive period is over it’s published here on the blog.
Support
If you have a question about this pattern, pop it in a comment below. Sorry, but I’m unable to help with my free patterns or tutorials via email or private messages.
Social Media
Share your hand-knit Hats online with these hashtags!
#WWRidgedSlouchHat
Yarn
460yd/422m/100g
4ply/Sock weight, single or plied yarn; solid, semi-solid or variegated yarns.
Needles & Notions
Set 2.75mm/UK12/US2 DPNs/Circular or size needed to obtain gauge
Stitch markers as necessary
Tapestry needle
Sample details
Shown in MollyGirl Yarn Unplugged Light [230yd/211m per 50g; 100% Peruvian Wool]
Shown in size 20in/50.75cm on model with 20in/50.75cm circumference head
Note
Smaller sizes, 20in or less, are likely to get a Hat from a single 50g skein of the sample yarn; larger sizes will need 2 x 50g.
Gauge
27 sts x 42 rows to 4in/10cm on 2.75mm needles over Stocking St.
28 sts x 44 rows to 4in/10cm on 2.75mm needles over Twisted Rib
Sizes
To fit size: 17 [19, 20, 21, 23, 24] in/43.25 [48.25, 50.75, 53.25, 58.5, 61] cm
Finished size: 14.75 [16, 17.25, 18.25, 19.5, 20.5] in/37.5 [40.75, 43.75, 46.25, 49.5, 52] cm
Not sure which size to make? Check my handy size and measuring guide!
Skills required
Knitting in the round
Abbreviations
K: knit
K1tbl: knit stitch through the back of loop
P: purl
rpt: repeat
R/rnd(s): rounds
st(s): stitch(es)
M1P: lift the horizontal loop between next 2 sts, place it onto the left needle & purl into the back of it
K2tog: knit next 2 sts together
How to
Using Alternate Cable Cast-on method, cast on 104 [112, 120, 128, 136, 144] sts.
Join in the round, taking care not to twist stitches. Place stitch marker to indicate start of round.
Brim
Brim Rnd: *K1tbl, P1; rpt from * to end
Repeat this round until work measures 1 [1.25, 1.25, 1.5, 1.5, 1.75] in/2.5 [3.25, 3.25, 3.75, 3.75, 4.5] cm, then work increase round once as follows:
Inc. Rnd: *P4, M1P; rpt from * to end [130, 140, 150, 160, 170, 180 sts]
Body
Rnds 1 to 4: Knit all sts
Rnd 5: Purl all sts
Repeat these 5 rounds until work measures approx. 6.5 [7, 7.5, 8, 8.5, 9] in/16.5 [17.75, 19, 20.25, 21.5, 22.75] cm, excluding the Brim, ending after a Rnd 5.
Crown
Place an additional 9 stitch markers so that there are 10 stitch markers evenly around.
Dec Rnd 1: *knit to 2sts before marker, k2tog; rpt from * to end – 10sts decreased
Repeat this rounds until 10sts remain. Break yarn and draw through remaining 10sts, tighten to close.
Finishing
Weave in all ends and block as required.

If you’ve a question about this pattern, please pop it in the comments below and I’ll get back to you as soon as I can!

Description
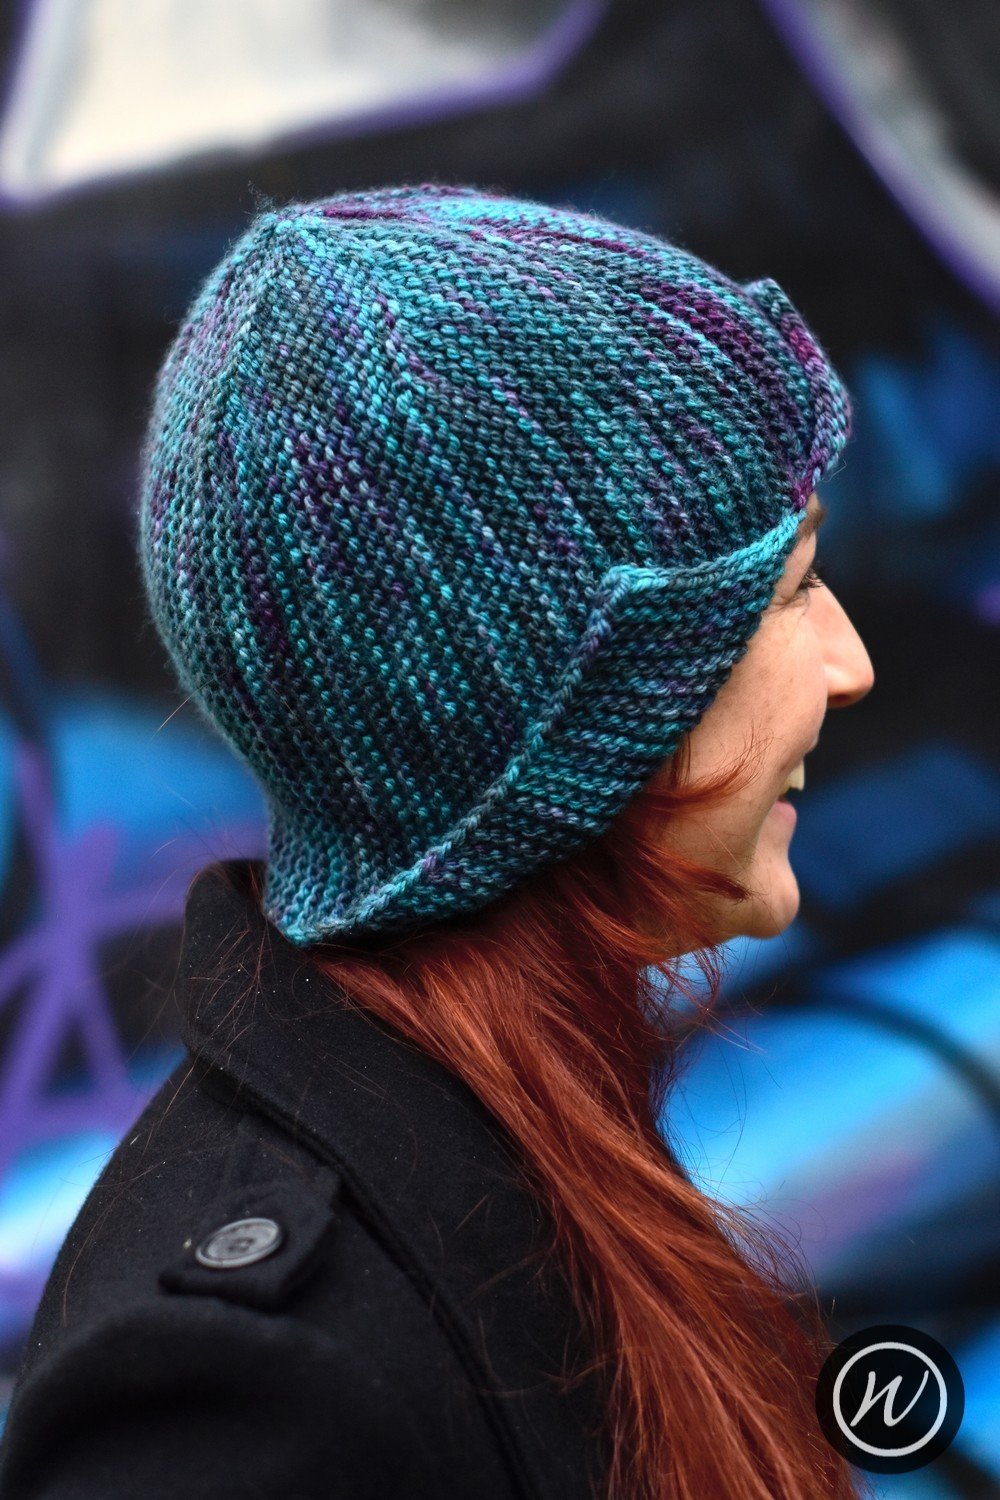
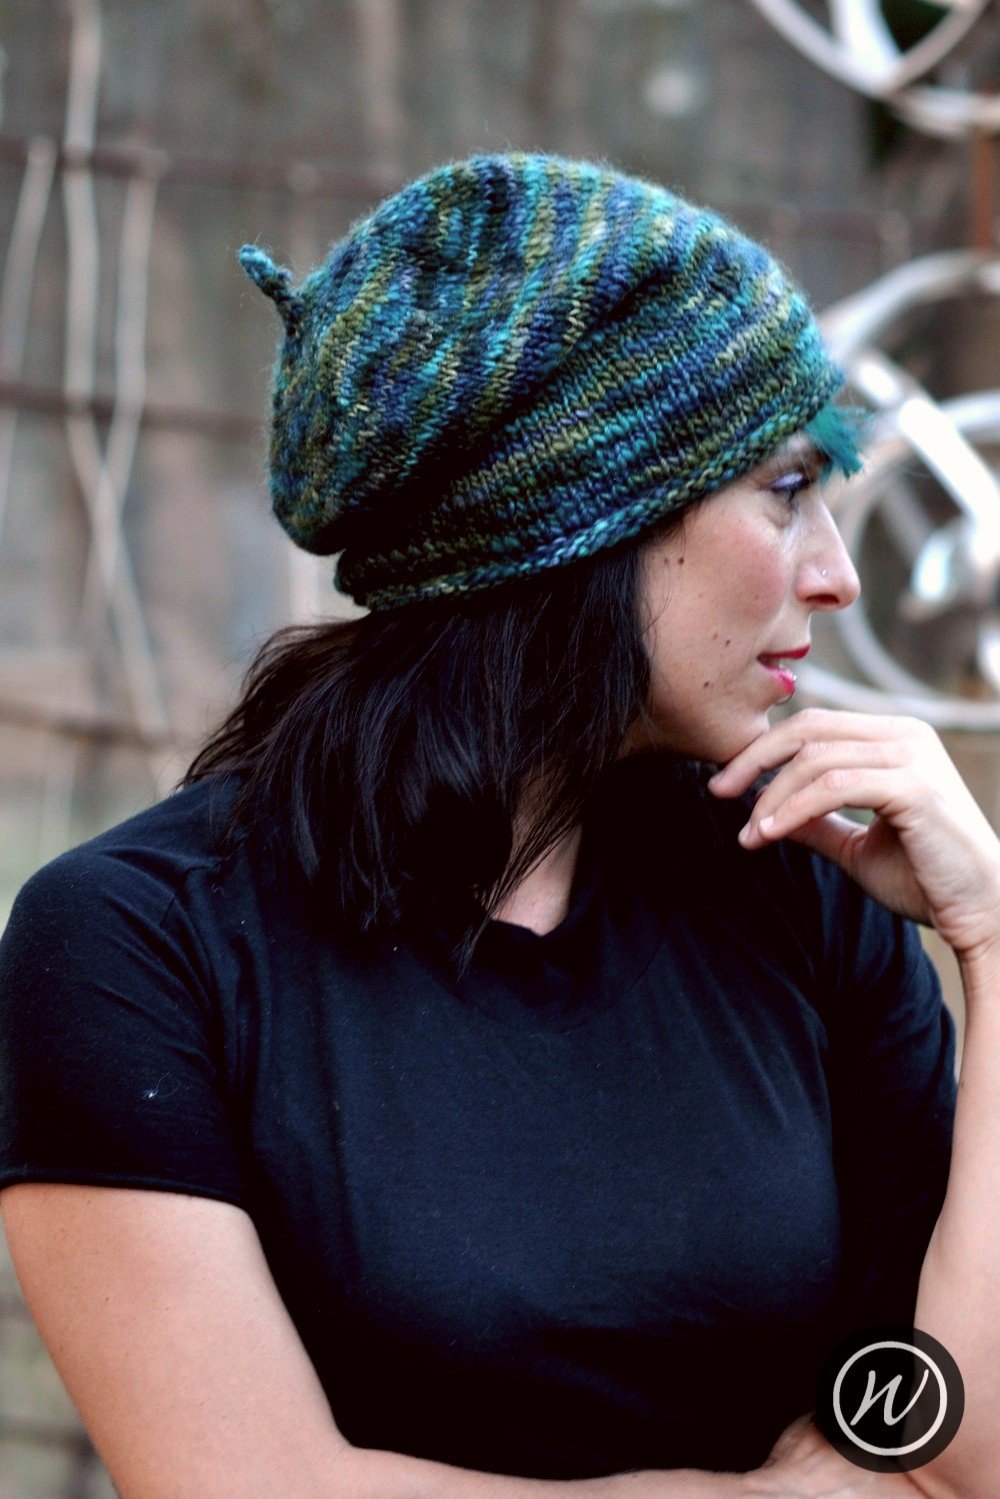
The Striped Slouch Hat features stripes in three colours over a stocking stitch background. It has a twisted ribbed brim and a gently gathered crown.
Availability
My Patreon supporters and members of The Woolly Hat Society get exclusive early access to new free patterns and tutorials. Once the exclusive period is over it’s published here on the blog.
Support
If you have a question about this pattern, pop it in a comment below. Sorry, but I’m unable to help with my free patterns or tutorials via email or private messages.
Social Media
Share your hand-knit Hats online with these hashtags!
#WWStripedSlouchHat
Yarn
Yarn A: 460yd/422m/100g
Yarn B: 230yd/211m/50g
Yarn C: 230yd/211m/50g
4ply/Sock weight, single or plied yarn; solid, semi-solid or variegated yarns.
Needles & Notions
Set 2.75mm/UK12/US2 DPNs/Circular or size needed to obtain gauge
Stitch markers as necessary
Tapestry needle
Sample details
Shown in MollyGirl Yarn Unplugged Light [230yd/211m per 50g; 100% Peruvian Wool]
Shown in size 20in/50.75cm on model with 20in/50.75cm circumference head
Note
Smaller sizes, 20in or less, are likely to get a Hat from a single 50g skein of Yarn A.
Gauge
27 sts x 42 rows to 4in/10cm on 2.75mm needles over Stocking St.
28 sts x 44 rows to 4in/10cm on 2.75mm needles over Twisted Rib
Sizes
To fit size: 17 [19, 20, 21, 23, 24] in/43.25 [48.25, 50.75, 53.25, 58.5, 61] cm
Finished size: 14.75 [16, 17.25, 18.25, 19.5, 20.5] in/37.5 [40.75, 43.75, 46.25, 49.5, 52] cm
Not sure which size to make? Check my handy size and measuring guide!
Skills required
Knitting in the round
Jogless Stripes
Abbreviations
K: knit
K1tbl: knit stitch through the back of loop
P: purl
rpt: repeat
R/rnd(s): rounds
st(s): stitch(es)
M1P: lift the horizontal loop between next 2 sts, place it onto the left needle & purl into the back of it
ssk: slip next 2 sts knitwise then knit them together through the backs of the loops
How to
Using Alternate Cable Cast-on method, cast on 104 [112, 120, 128, 136, 144] sts.
Join in the round, taking care not to twist stitches. Place stitch marker to indicate start of round.
Brim
Brim Rnd: *K1tbl, P1; rpt from * to end
Repeat this round until work measures 1 [1.25, 1.25, 1.5, 1.5, 1.75] in/2.5 [3.25, 3.25, 3.75, 3.75, 4.5] cm, then work increase round once as follows:
Inc. Rnd: *P4, M1P; rpt from * to end [130, 140, 150, 160, 170, 180 sts]
Body
Rnds 1 to 3: With Yarn A, knit all sts
Rnds 4 & 5: With Yarn B, knit all sts
Rnds 6 to 7: With Yarn C, knit all sts
Rnds 8 & 9: With Yarn B, knit all sts
Rnds 10 to 12: With Yarn A, knit all sts
Repeat these 12 rounds until work measures approx. 6.5 [7, 7.5, 8, 8.5, 9] in/16.5 [17.75, 19, 20.25, 21.5, 22.75] cm, excluding the Brim, ending after a Rnd 9, or any Yarn A round.
Crown
Place an additional 9 stitch markers so that there are 10 stitch markers evenly around.
Dec Rnd 1: *ssk, knit to marker; rpt from * to end – 10sts decreased
Repeat this rounds until 10sts remain. Break yarn and draw through remaining 10sts, tighten to close.
Finishing
Weave in all ends and block as required.


If you’ve a question about this pattern, please pop it in the comments below and I’ll get back to you as soon as I can!

Description
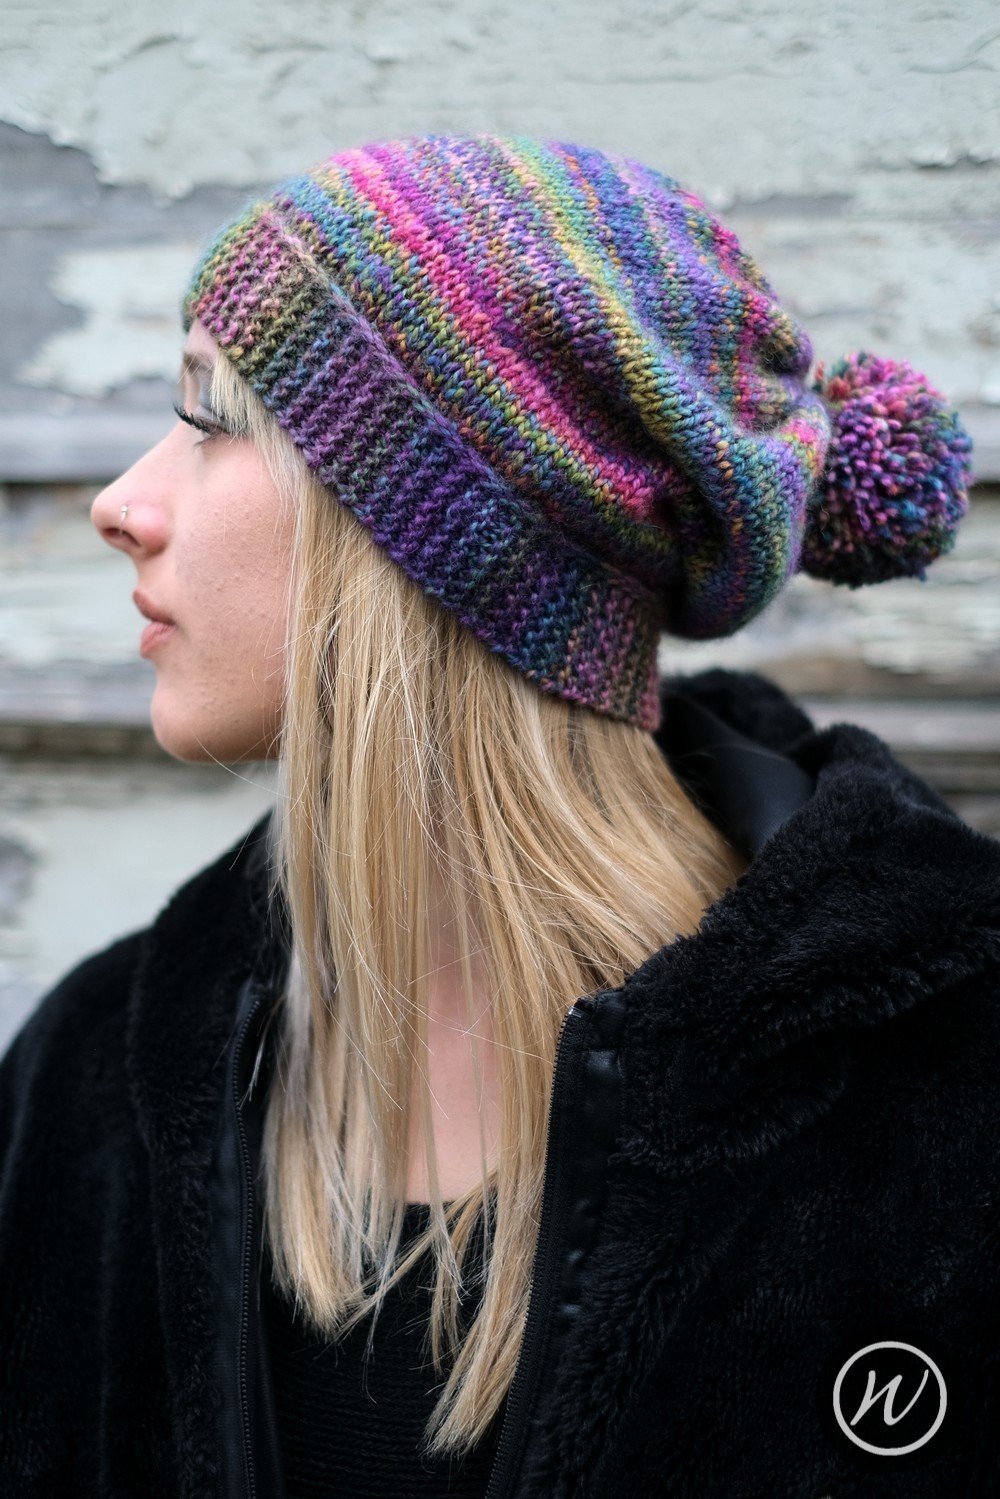
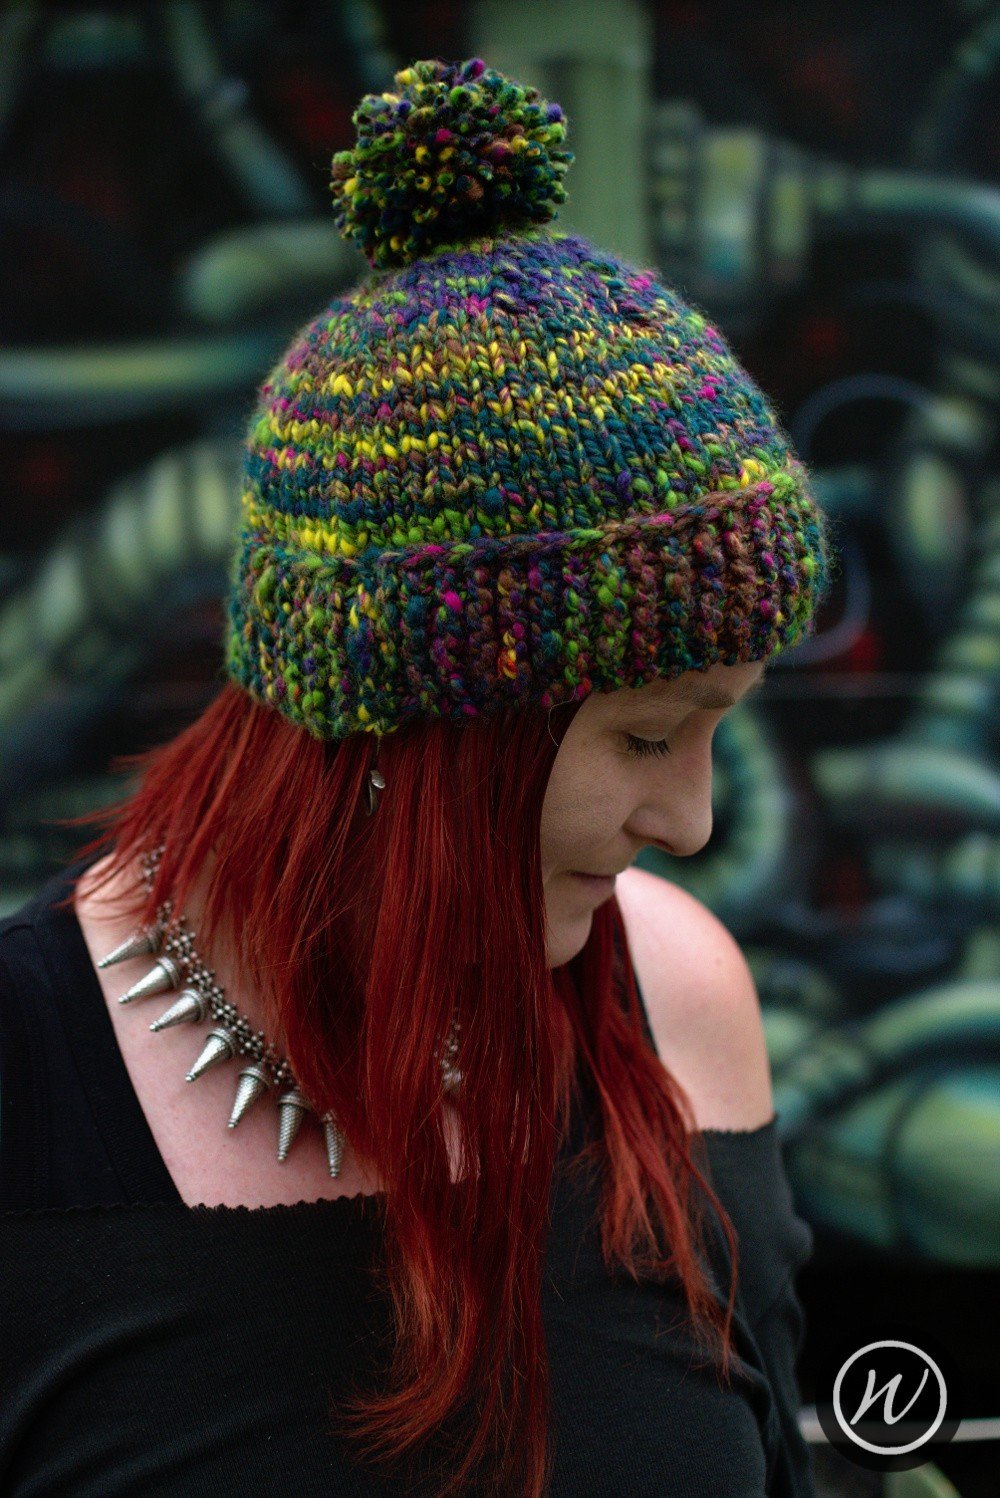
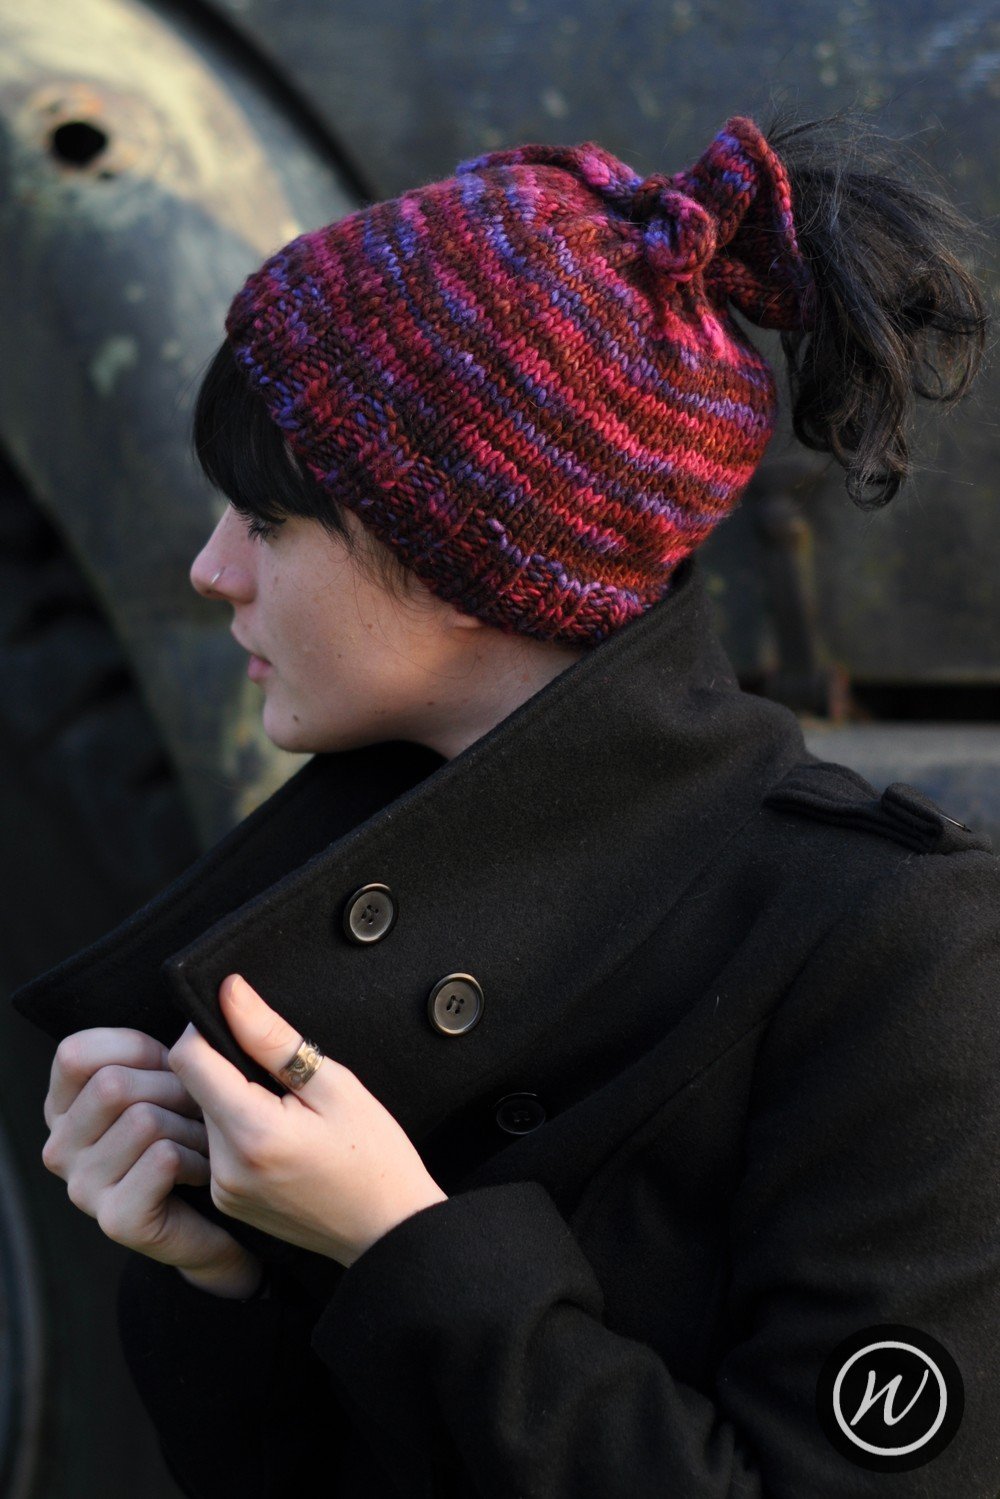
The Simple Slouch is worked in stocking stitch. It’s a roomy Hat featuring a sideways garter stitch brim and a gathered crown. The pompom is optional
Availability
My Patreon supporters and members of The Woolly Hat Society get exclusive early access to new free patterns and tutorials. Once the exclusive period is over it’s published here on the blog.
Support
If you have a question about this pattern, pop it in a comment below. Sorry, but I’m unable to help with my free patterns or tutorials via email or private messages.
Social Media
Share your hand-knit Hats online with these hashtags!
#WWSimpleSlouchHat
Yarn
100g/160yd/147m
Chunky weight, single or plied yarn; solid, semi-solid or variegated yarns.
Needles & Notions
Set 5mm/UK6/US8 DPNS/Circular or size needed to obtain gauge
5mm crochet hook
Approx 1yd/1m waste yarn
Stitch marker as necessary
Tapestry needle
Sample details
Shown in Hand Spun [160yd/147m per 100g; 100% Superwash Merino]
Shown in size 22in/56cm on model with 21.75in/55.25cm circumference head
Gauge
16 sts x 24 rows to 4in/10cm on 5mm needles over Garter St.
Sizes
To fit size: 18 [20, 22, 24] in/ 45.75 [50.75, 56, 61] cm
Finished size: 16.25 [17.5, 18.75, 20] in/ 41.275 [44.5, 47.5, 50.75] cm
Not sure which size to make? Check my handy size and measuring guide!
Skills required
Picking up Stitches from a Slipped Stitch Selvedge
Knitting in the round
Abbreviations
K: knit
P: purl
rpt: repeat
R/rnd(s): rounds
st(s): stitch(es)
M1: lift the horizontal loop between next 2 sts, place it onto the left needle & knit into the back of it
How to
Using waste yarn and Provisional Cast-on method, cast on 7 [8, 9, 10] sts. Change to main yarn.
Brim
Row 1: Knit to last stitch, bring yarn forward, slip stitch purlwise, turn
Row 2: Knit all sts
Repeat these 2 rows, working a Slipped Stitch Selvedge along one edge, until 128 [138, 148, 158] rows, or 64 [69, 74, 79] ridges have been worked.
When counting ridges ensure that the ridge count on both sides of the work is the same, including the ridge created with the provisional cast-on.
Then work Row 1 once more, leaving the yarn at the back. Break yarn leaving a 1yd/1m tail.
Carefully remove Provisional Cast-on stitch by stitch, taking care to keep in pattern, transferring live stitches to 2nd needle. Bring both sets of stitches together and perform Grafting for Garter Stitch across all the stitches.
With the slipped stitch selvedge facing upwards, and using a circular needle, pick up and knit 65 [70, 75, 80] sts along the top edge of the band. You’ll pick up one stitch for each garter ridge, and the stitch will be picked up from behind the selvedge edge - pick up the stitches by slipping the needle underneath the edge of the ridge.
Join in the round. Place stitch marker to indicate start of round.
Inc Rnd: *K5, M1; rpt from * to end [78, 84, 90, 96 sts]
Body
Rnd 1: Knit all sts
Repeat this round until work measures 7 [8, 9, 10] in/ 17.75 [20.25, 23, 25.5] cm, excluding the Brim.
Crown
Using either the Gathered Bind-off or the Modified Gathered Bind-off, transfer all stitches from the needle to yarn and gather to close.
Pompom
Cut 2 circular pieces measuring 2.5in/6.25cm diameter from thin cardboard. The inner circle should be approx. 1.25in/3.25cm. Placing the two pieces of card together, wrap the yarn through the centre and around the outer circle until all the card is covered. Continue wrapping the yarn until either the centre hole has closed or all the yarn has been used.
Carefully cut the yarn along the edge of the circle to reveal the covered card. Cut all of the yarn, then tie a knot between the two layers off card, effectively tying all the pieces of yarn together, before removing the card. Trim pompom before attaching securely to the Hat.
Finishing
Weave in all ends and block as required. Attach pompom after blocking.


If you’ve a question about this pattern, please pop it in the comments below and I’ll get back to you as soon as I can!

Description
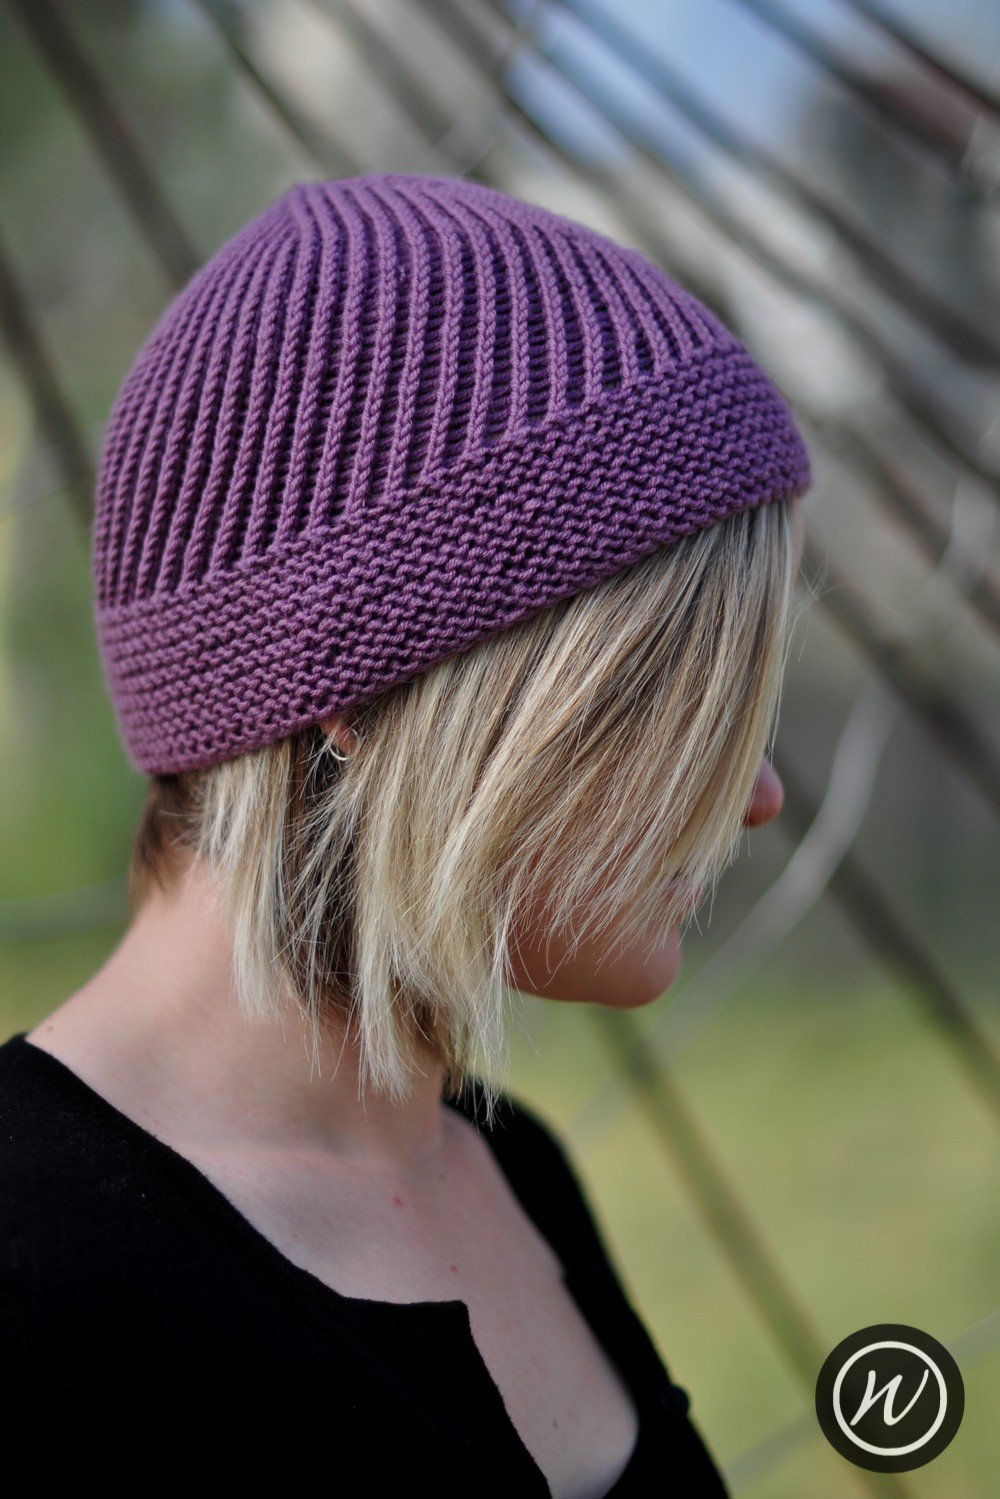
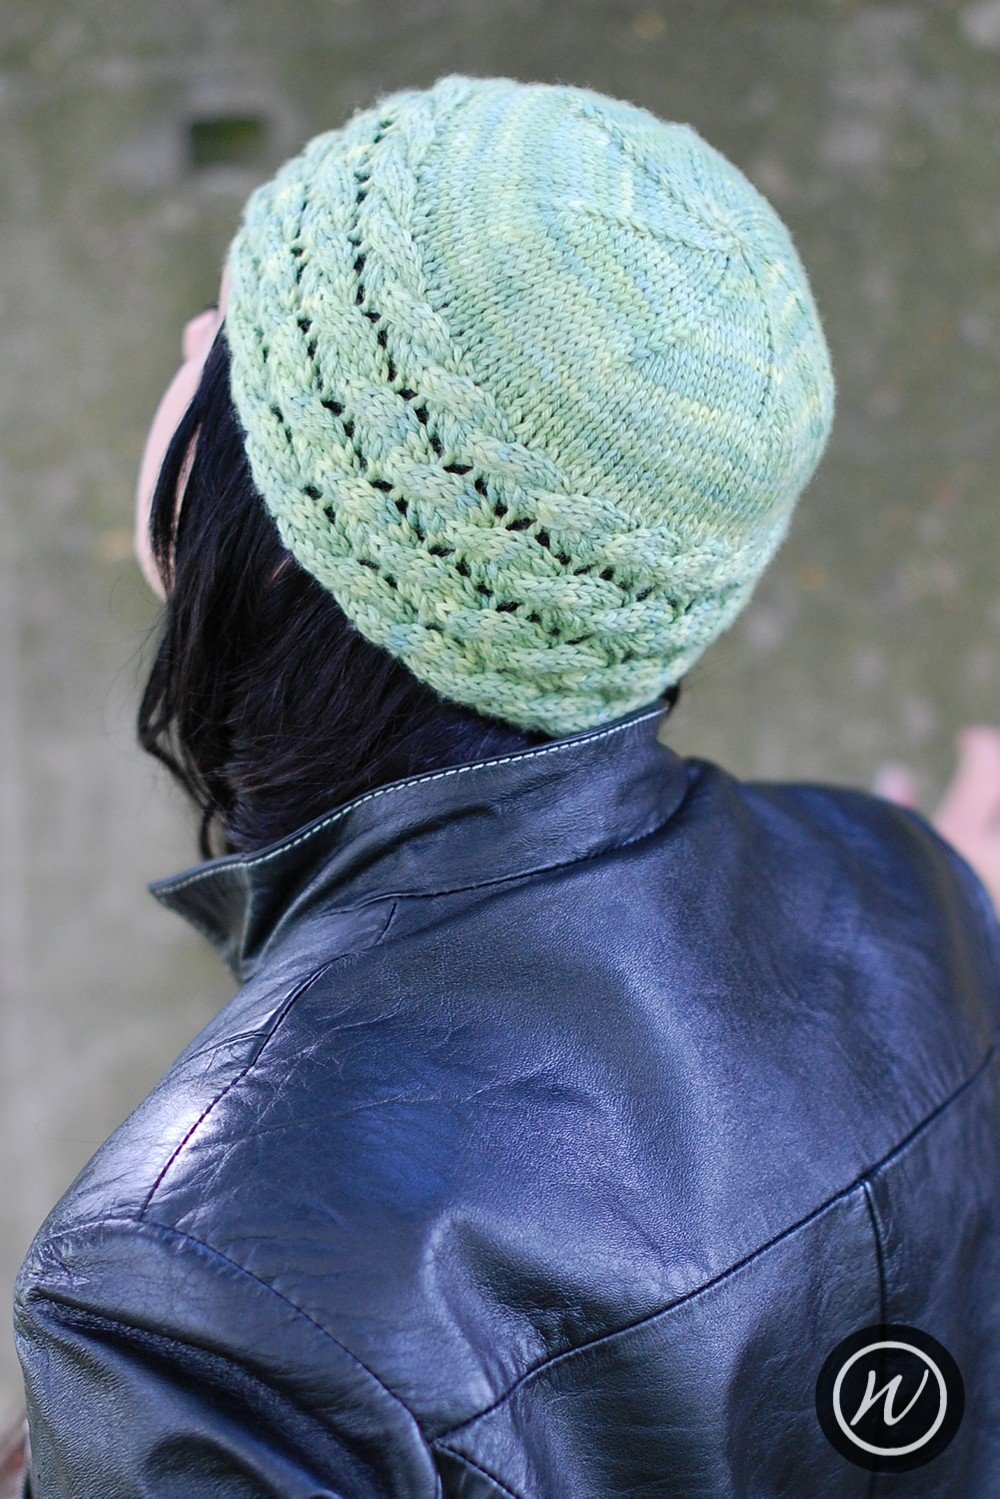
The PentaCap is a close fitting beanie with a deep garter stitch brim, and a chain braid as the body changes to stocking stitch, giving it extra definition. It has a 5-point spiral crown.
Availability
My Patreon supporters and members of The Woolly Hat Society get exclusive early access to new free patterns and tutorials. Once the exclusive period is over it’s published here on the blog.
Support
If you have a question about this pattern, pop it in a comment below. Sorry, but I’m unable to help with my free patterns or tutorials via email or private messages.
Social Media
Share your hand-knit Hats online with these hashtags!
#WWPentaCap
Yarn
200yd/183m/115g
Worsted weight, single or plied yarn.
Needles & Notions
Set 4mm/UK8/US6 DPNs/Circular or size needed to obtain gauge
Spare single needle, 2 sizes larger
Stitch marker as necessary
Tapestry needle
Sample details
Shown in Little Fox Mere Worsted [200yd/183m per 115g; 100% Superwash Merino]
Shown in size 21in/53.25cm on model with 20in/50.75cm circumference head
Gauge
20 sts x 26 rows to 4in/10cm on 4mm needles over Stocking St.
20 sts x 40 rows to 4in/10cm on 4mm needles over Garter St.
Sizes
To fit size: 19 [21, 23, 25] in/48.25 [53.25, 58.5, 63.5] cm
Finished size: 16 [18, 20, 22] in/40.75 [45.75, 50.75, 56] cm
Not sure which size to make? Check my handy size and measuring guide!
Skills required
Knitting in the round
Abbreviations
K: knit
P: purl
rpt: repeat
R/rnd(s): rounds
st(s): stitch(es)
K2tog: knit next 2 sts together
How to
Using smaller needles and Crochet Cast-on method, cast on 60 [70, 80, 90] sts.
Join in the round, taking care not to twist stitches. Place stitch marker to indicate start of round.
Brim
Brim Rnd 1: Knit all sts
Brim Rnd 2: Purl all sts
Repeat these 2 rounds until work measures 2 [2.75, 3.5, 4] in/5 [7, 9, 10.25] cm, ending after a Rnd 1, then work Bind-off Braid as follows:
Braid Rnd 1: With larger spare needle and using Standard Bind-off method, bind off all stitches
Braid Rnd 2: With main needle, pick up but do not knit one loop from the back of each bind-off chain
Alternatively you could work a Lateral Braid in the Round.
Body
Rnd 1: Knit all sts
Repeat this round until work measures approx. 3 [4, 5, 6] in/7.5 [10.25, 12.75, 15.25] cm, or desired length, including the Brim.
Crown
Place an additional 4 stitch markers so that there are 5 stitch markers evenly around.
Dec Rnd 1: *knit to 2sts before marker, k2tog; rpt from * to end – 5sts decreased
Repeat this rounds until 5sts remain. Break yarn and draw through remaining 5sts, tighten to close.
Finishing
Weave in all ends. A gentle wash and blocking is required to help the decrease lines settle in and lay flat.


If you’ve a question about this pattern, please pop it in the comments below and I’ll get back to you as soon as I can!
With the latest free pattern having just gone live on this blog, the Garter Slouch, the free pattern count has reached 90. Which is mighty impressive if I do say so myself!
Here’s a little taster of a few of them…
And it won’t end there!
I’ve 2 more that have already gone to Patreon supporters, that will be going live on this blog in due course, and I’ve 2 more photographed and almost written. I had thought to aim for 100 by the end of 2022 but given the amount of work we’re putting into the new website, the new collection I’m working on and a fresh new secret project, I don’t think I’ll make it. But 2023 should see that milestone and it’ll be worth the wait. Even without that milestone, roughly 25% of my pattern catalogue is free and that’s worth a shout out by itself!
Creating free patterns is important to me, I know many folk can’t afford my premium patterns and I really want to help as much as I can. However, without my Patreon supporters the free patterns wouldn’t be at all possible to produce or support, and I’m so very grateful to them. As you’ll know, I’m the sole wager earner in our family, and our income comes entirely from my little business. We’re not rich by any means, we live pretty frugally, and being able to offer these patterns, courtesy of your support, means an awful lot.


