

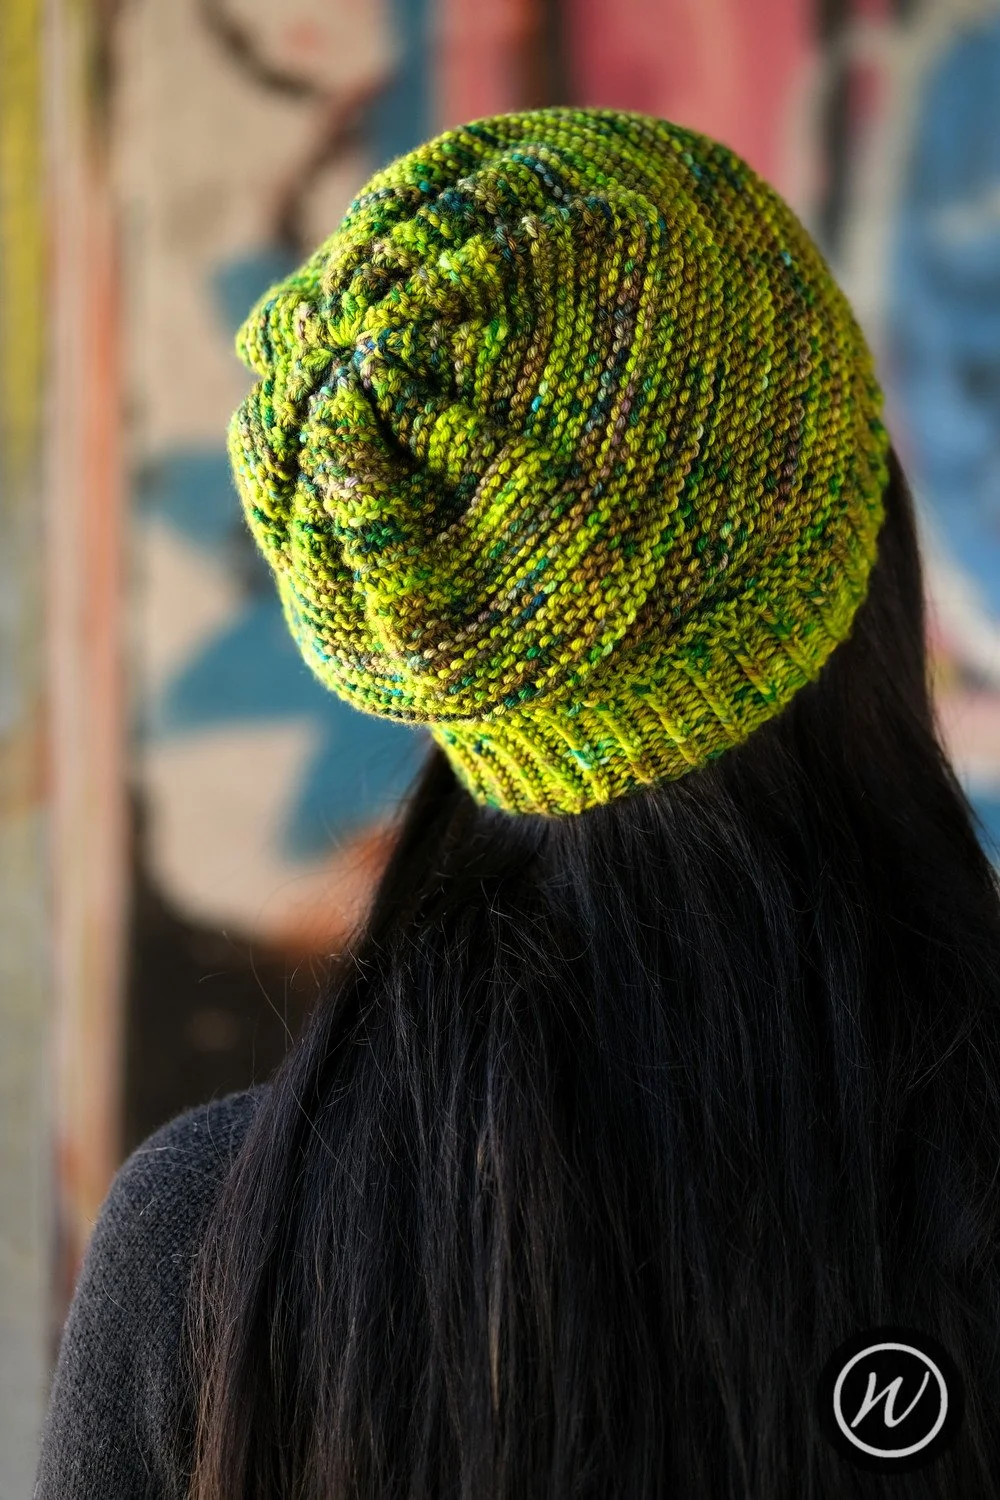
Description
The Garter Slouch is a simple garter stitch slouch Hat. It’s a roomy Hat featuring a ribbed brim and a gathered crown.
Availability
My Patreon supporters and members of The Woolly Hat Society get exclusive early access to new free patterns and tutorials. Once the exclusive period is over it’s published here on the blog.
Support
If you have a question about this pattern, pop it in a comment below. Sorry, but I’m unable to help with my free patterns or tutorials via email or private messages.
Social Media
Share your hand-knit Hats online with these hashtags!
#WWGarterSlouchHat
Yarn
115g/190yd/174m
Aran weight, single ply or plied yarn.
Needles & Notions
Set 4mm/UK6/US8 & 5mm/UK8/US6 DPNs/Circular or size needed to obtain gauge
Stitch marker as necessary
Tapestry needle
Sample details
Shown in Countess Ablaze Grande Merino Aran [190yd/174m per 4oz/115g; 100% Merino]
Shown in size 21in/53.25cm on model with 21.5in/54.5cm circumference head
Gauge
20sts x 28rows to 4in/10cm on 4mm needles over Stocking Stitch
20sts x 30rows to 4in/10cm on 4mm needles over Twisted Rib
Sizes
To fit size: 15 [17, 19, 21, 23, 25] in/ 38 [43.25, 48.25, 53.25, 58.5, 63.5] cm
Finished size: 12.75 [14.5, 16, 17.75, 19.25, 20.75] in/ 32.5 [36.75, 40.75, 45, 49, 52.75] cm
Not sure which size to make? Check my handy size and measuring guide!
Skills required
Knitting in the round
Abbreviations
K: knit
P: purl
rpt: repeat
R/rnd(s): rounds
st(s): stitch(es)
M1P: lift the horizontal loop between next 2 sts, place it onto the left needle & purl into the back of it
How to
Using 4mm needles and Alternate Cable cast-on method, cast on 64 [72, 80, 88, 96, 104] sts.
Join in the round, taking care not to twist the stitches. Place stitch marker to indicate start of round.
Brim
Brim Rnd: *K1tbl, P1; rpt from * to end
Repeat this round until work measures approx. 1.25 [1.25, 1.5, 1.5, 1.75, 1.75] in/3.25 [3.25, 3.75, 3.75, 4.5, 4.5] cm from the cast on edge. Change to larger needles.
Inc Rnd: *P4, M1P; rpt from * to end [80, 90, 100, 110, 120, 130 sts]
Body
Rnd 1: Knit all stitches
Rnd 2: Purl all stitches
Repeat these 2 rounds until work measures approx. 4 [5, 6, 7, 8, 9] in/10 [12.75, 15.25, 17.75, 20.25, 22.75] cm excluding the brim, ending after a Rnd 1.
Crown
Using either the Gathered Bind-off or the Modified Gathered Bind-off, transfer all stitches from the needle to yarn and gather to close.
Finishing
Weave in all ends. A gentle wash and blocking is required to help the decrease lines settle in and lay flat.


If you’ve a question about this pattern, please pop it in the comments below and I’ll get back to you as soon as I can!

Description
Aida’s Slouch is worked in brioche. It’s a comfy, roomy Hat featuring a ribbed brim and a gathered crown.
Availability
My Patreon supporters and members of The Woolly Hat Society get exclusive early access to new free patterns and tutorials. Once the exclusive period is over it’s published here on the blog.
Support
If you have a question about this pattern, pop it in a comment below. Sorry, but I’m unable to help with my free patterns or tutorials via email or private messages.
Social Media
Share your hand-knit Hats online with these hashtags!
#WWAidasSlouchHat
Yarn
115g/190yd/174m
Aran weight, single ply or plied yarn.
Needles & Notions
Set 4mm/UK6/US8 & 5mm/UK8/US6 DPNs/Circular or size needed to obtain gauge
Stitch marker as necessary
Tapestry needle
Sample details
Shown in Countess Ablaze Grande Merino Aran [190yd/174m per 4oz/115g; 100% Merino]
Shown in size 21in/53.25cm on model with 21.5in/54.5cm circumference head
Gauge
20sts x 28rows to 4in/10cm on 4mm needles over Stocking Stitch
20sts x 30rows to 4in/10cm on 4mm needles over Twisted Rib
Sizes
To fit size: 15 [17, 19, 21, 23, 25] in/ 38 [43.25, 48.25, 53.25, 58.5, 63.5] cm
Finished size: 12.75 [14.5, 16, 17.75, 19.25, 20.75] in/ 32.5 [36.75, 40.75, 45, 49, 52.75] cm
Not sure which size to make? Check my handy size and measuring guide!
Skills required
Knitting in the round
Abbreviations
K: knit
P: purl
rpt: repeat
R/rnd(s): rounds
st(s): stitch(es)
K1tbl: knit stitch through the back of loop
K1B: knit stitch through the row below
Pattern Notes
This pattern uses a moving marker, which means the start of the round shifts by one stitch every other round. This is done to avoid a visible seam in the brioche; it’s not entirely invisible but it’s almost, and the stitches appear a whole lot neater than they would otherwise.
How to
Using 4mm needles and Alternate Cable cast-on method, cast on 64 [72, 80, 88, 96, 104] sts.
Join in the round, taking care not to twist the stitches. Place stitch marker to indicate start of round.
Brim
Brim Rnd: *K1tbl, P1; rpt from * to end
Repeat this round until work measures approx. 1.25 [1.25, 1.5, 1.5, 1.75, 1.75] in/3.25 [3.25, 3.75, 3.75, 4.5, 4.5] cm from the cast on edge. Change to larger needles.
Body
Rnd 1: Purl all stitches
Rnd 2: *K1B, K1; rpt from * to end; remove marker, slip next stitch purlwise, replace marker
Repeat these 2 rounds until work measures approx. 5 [6, 7, 8, 9, 10] in/12.75 [15.25, 17.75, 20.25, 22.75, 25.5] cm excluding the brim, ending after a Rnd 2.
Crown
Using either the Gathered Bind-off or the Modified Gathered Bind-off, transfer all stitches from the needle to yarn and gather to close.
Finishing
Weave in all ends. A gentle wash and blocking is required to help the decrease lines settle in and lay flat.


If you’ve a question about this pattern, please pop it in the comments below and I’ll get back to you as soon as I can!

Description
A Slouch For Josie is worked in brioche or fisherman’s rib. It’s a roomy Hat featuring a ribbed brim and a gathered crown.
Availability
My Patreon supporters and members of The Woolly Hat Society get exclusive early access to new free patterns and tutorials. Once the exclusive period is over it’s published here on the blog.
Support
If you have a question about this pattern, pop it in a comment below. Sorry, but I’m unable to help with my free patterns or tutorials via email or private messages.
Social Media
Share your hand-knit Hats online with these hashtags!
#WWASlouchForJosieHat
Yarn
100g/182yd/166m
Aran weight, single ply or plied yarn.
Needles & Notions
Set 4mm/UK6/US8 & 5mm/UK8/US6 DPNs/Circular or size needed to obtain gauge
Stitch marker as necessary
Tapestry needle
Sample details
EweMomma Merino Aran [182yd/166m per 100g; 100% Merino]
Gauge
20sts x 28rows to 4in/10cm on 4mm needles over Stocking Stitch
20sts x 30rows to 4in/10cm on 4mm needles over Twisted Rib
Sizes
To fit size: 15 [17, 19, 21, 23, 25] in/ 38 [43.25, 48.25, 53.25, 58.5, 63.5] cm
Finished size: 12.75 [14.5, 16, 17.75, 19.25, 20.75] in/ 32.5 [36.75, 40.75, 45, 49, 52.75] cm
Not sure which size to make? Check my handy size and measuring guide!
Skills required
Knitting in the round
Abbreviations
K: knit
P: purl
rpt: repeat
R/rnd(s): rounds
st(s): stitch(es)
K1tbl: knit stitch through the back of loop
K1B: knit stitch through the row below
How to
Using 4mm needles and Alternate Cable cast-on method, cast on 64 [72, 80, 88, 96, 104] sts.
Join in the round, taking care not to twist the stitches. Place stitch marker to indicate start of round.
Brim
Brim Rnd: *K1tbl, P1; rpt from * to end
Repeat this round until work measures approx. 1.25 [1.25, 1.5, 1.5, 1.75, 1.75] in/3.25 [3.25, 3.75, 3.75, 4.5, 4.5] cm from the cast on edge. Change to larger needles.
Prep Rnd: Purl all stitches
Body
Rnd 1: Knit all stitches
Rnd 2: *K1B, P1; rpt from * to end
Repeat these 2 rounds until work measures approx. 6 [7, 8, 9, 10, 11] in/15.25 [17.75, 20.25, 22.75, 25.5, 28] cm excluding the brim, ending after a Rnd 2.
Crown
Using either the Gathered Bind-off or the Modified Gathered Bind-off, transfer all stitches from the needle to yarn and gather to close.
Finishing
Weave in all ends. A gentle wash and blocking is required to help the decrease lines settle in and lay flat.


If you’ve a question about this pattern, please pop it in the comments below and I’ll get back to you as soon as I can!

Description
Bóithrín is a fitted striped Hat, with options for a beanie or square top crown. The Hat is worked sideways, with stocking stitch sections in colour A and reverse stocking stitch sections in colour B, and a minimal brim in colour A. The beanie uses short row shaping so that the crown decreases to a centre point in colour A, with alternating sections of colours A and B building out into the stripes of the body. The square top option is worked as a flat tube that is seamed across the top.
Availability
My Patreon supporters and members of The Woolly Hat Society get exclusive early access to new free patterns and tutorials. Once the exclusive period is over it’s published here on the blog.
Support
If you have a question about this pattern, pop it in a comment below. Sorry, but I’m unable to help with my free patterns or tutorials via email or private messages.
Social Media
Share your hand-knit Hats online with these hashtags!
#WWBoithrinHat
Yarn
100g/190yd/178m in both Yarn A and Yarn B
Worsted weight, single ply or plied yarn.
Needles & Notions
Pair 4.5mm/UK7/US7 straight needles or size needed to obtain gauge
4.5mm crochet hook
Approx. 2yd/2m waste yarn
Stitch marker as necessary
Tapestry needle
Sample details
Shown in Ewe Ewe Wooly Worsted [95yd/86m per 50g; 100% Superwash Merino]
Both versions shown in size 20in/50.75cm on model with 20in/50.75cm circumference head
Gauge
20 sts x 26 rows to 4in/10cm on 4.5mm needles over Stocking Stitch
Sizes
To fit sizes: 15 [17, 20] in/38 [43.25, 50.75] cm
Finished size: 12.25 [14.75, 17.25] in/31 [37.5, 43.75] cm
Finished depth: 5.75 [6.25, 6.75] in/14.5 [15.75, 17.25] cm
Not sure which size to make? Check my handy size and measuring guide!
Skills required
Grafting Wrap & Turn Short Rows
Sideways Draw-through Bind-off
Abbreviations
K: knit
P: purl
st(s): stitch(es)
RS: right side
WS: wrong side
w&t: perform short row
How to - Square Top version
Using waste yarn and Provisional Cast-on method, cast on 28 [31, 34] sts. Change to Yarn A and work panel as follows:
Row 1 (WS): With Yarn A, knit to end
Row 2 (RS): With Yarn A, purl to end
Row 3: With Yarn A, knit to end
Row 4: With Yarn A, P3, with Yarn B, purl to end.
Row 5: With Yarn B, P 25 [28, 31], with Yarn A, P3.
Row 6: With Yarn A, K3, with Yarn B, knit to end.
Row 7: With Yarn B, P 25 [28, 31], with Yarn A, P3.
Row 8: With Yarn A, purl across all sts
Repeat these 8 rows a total of 10 [12, 14] times. On the last repeat, omit the final row as this will be replaced by the grafting.
How to - Beanie version
Using waste yarn and Provisional Cast-on method, cast on 28 [31, 34] sts. Change to Yarn A and work panel as follows:
Row 1 (WS): With Yarn A, knit across all sts
Row 2 (RS): With Yarn A, P 27 [30, 33], w&t.
Row 3: With Yarn A, knit to end
Row 4: With Yarn A, P3, with Yarn B, P 23 [26, 29], w&t.
Row 5: With Yarn B, P 23 [26, 29], with Yarn A, P3.
Row 6: With Yarn A, K3, with Yarn B, K 22 [25, 28], w&t.
Row 7: With Yarn B, P 22 [25, 28], with Yarn A, P3.
Row 8: With Yarn A, P 24 [27, 30], w&t.
Row 9: With Yarn A, knit to end
Row 10: With Yarn A, P 23 [26, 29], w&t.
Row 11: With Yarn A, knit to end
Row 12: With Yarn A, P3, with Yarn B, P19 [22, 25], w&t.
Row 13: With Yarn B, P19 [22, 25], with Yarn A, P3.
Row 14: With Yarn A, K3, with Yarn B, K18 [21, 24], w&t.
Row 15: With Yarn B, P18 [21, 24], with Yarn A, P3.
Row 16: With Yarn A, purl across all sts, picking up the wraps as you go.
Repeat these 16 rows a total of 5 [6, 7] times. On the last repeat, omit the final row as this will be replaced by the grafting.
Finishing
Carefully remove Provisional Cast-on stitch by stitch, taking care to keep in pattern, transferring live stitches to 2nd needle.
When grafting across short rows, you will treat the short rows in exactly the same way as you have throughout the pattern.
If you picked up the wrap (from the RS) then worked into the back of the stitch+wrap previously you will need to do the same for the graft – to do this lift both the wrap and stitch off and twist towards you, and then place back on the needle and perform Stocking Stitch Kitchener as normal. If you worked into the front of the stitch+wrap previously you do not need to twist them during the graft.
You will be grafting from the bottom of the Hat up.
Square Top version: once the graft is complete fold work in half and either slip stitch or mattress stitch across, closing the top.
Beanie version: once the graft is complete, thread yarn through edge stitches and pull to tighten to close the crown.
Weave in all ends. Blocking isn't necessary. However, should you wish, gently wash Hat and dry flat.


This pattern was originally published in Petite Purls, Issue 11 Winter 2012.
Bóithrín (pronounced ‘Boreen’) is Irish for ‘a little road’.
My little boy loves cars. And trucks. And bikes. And aeroplanes. And motorbikes. And lorries. And diggers. And cranes. And trains. And buses, which is pretty handy, as we live in a bus. It doesn’t matter whether it’s an old rusty banger or slick stickered racing car, if it moves and makes a noise, he wants one.
And so this Hat, inspired by race tracks, road markings and tyre treads came to be. Bóithrín is the perfect Hat for kids obsessed with vehicles, a modern take on the classic intarsia motif pieces and the perfect project to practice a few new techniques.
If you’ve a question about this pattern, please pop it in the comments below and I’ll get back to you as soon as I can!
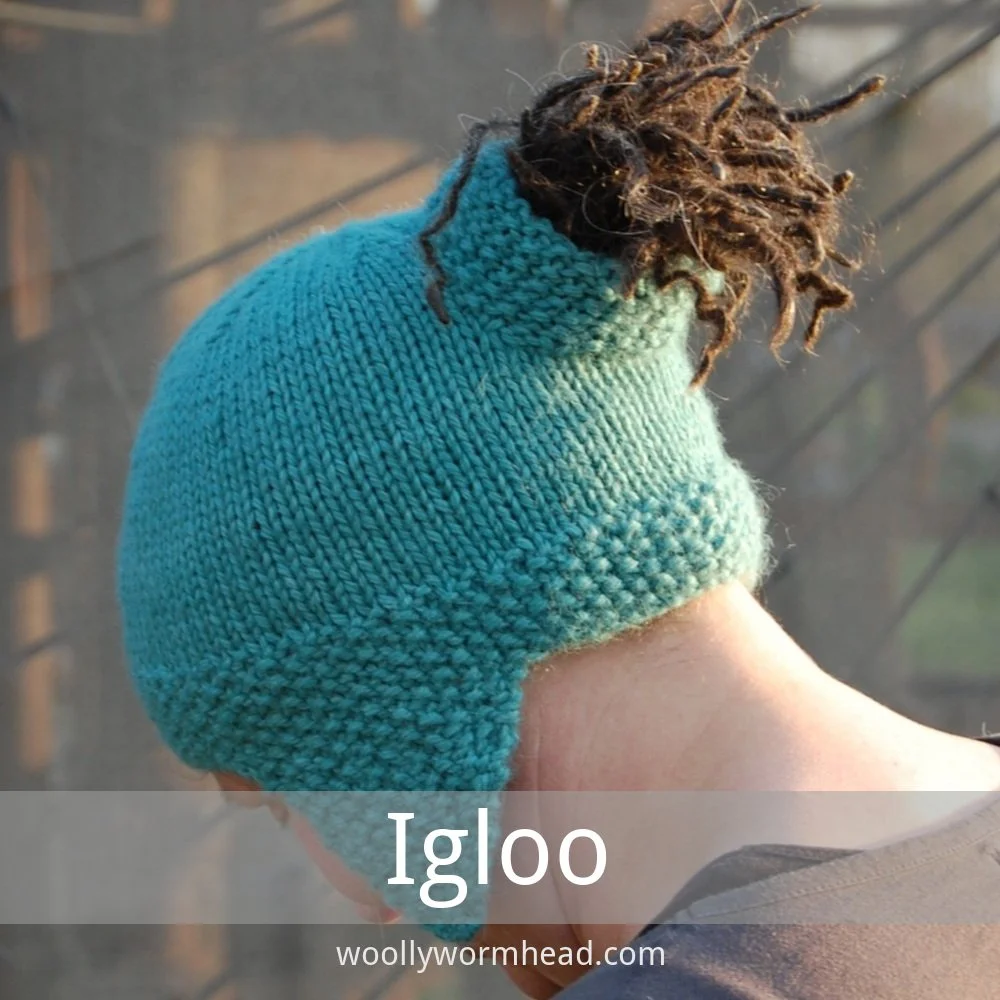
Description
Igloo is a ponytail earflap Hat. Its brim, earflaps and ponytail tunnel are worked in moss (seed) stitch, whilst the rest of the Hat is worked in stocking stitch. The crown is smooth and fitted and has a short tunnel that allows a ponytail to sit comfortably.
Availability
My Patreon supporters and members of The Woolly Hat Society get exclusive early access to new free patterns and tutorials. Once the exclusive period is over it’s published here on the blog.
Support
If you have a question about this pattern, pop it in a comment below. Sorry, but I’m unable to help with my free patterns or tutorials via email or private messages.
Social Media
Share your hand-knit Hats online with these hashtags!
#WWIglooHat
Yarn
100g/174yd/160m
Worsted weight, single ply or plied yarn.
Needles & Notions
Set 4.5mm/UK7/US7 DPNs/Circular or size needed to obtain gauge
Stitch marker as necessary
Tapestry needle
Sample details
Shown in Frog Tree Alpaca Worsted[174yd/160m per 100g; 100% Alpaca]
Shown in size 24in/61cm on model with 24in/61cm circumference head
Gauge
18 sts x 24 rows to 4in/10cm on 4.5mm needles over Stocking Stitch
Sizes
To fit size: 20 [22, 24] in/50.75 [56, 61] cm
Finished size: 18.5 [20.25, 21.75] in/47 [51.5, 55.25] cm
Not sure which size to make? Check my handy size and measuring guide!
Skills required
Knitting in the round
Abbreviations
K: knit
P: purl
rpt: repeat
R/rnd(s): rounds
st(s): stitch(es)
kfb: knit into front then back of next stitch
M1: pick up the horizontal loop between next 2 sts, place it onto the left needle then knit into the back of it
k2tog: knit next 2 sts together
ssk: slip next 2 sts knitwise, then knit these 2 sts together through the backs of the loops
How to
Using Circular Cast-on method, cast on 7sts
Crown
Row 1: *Kfb; rpt from * to end [14 sts]
Join in the round, taking care not to twist sts. Place marker to indicate start of round as necessary.
Rnd 1: *K1, M1, K1; rpt from * to end [21 sts]
Rnd 2: *K1, M1, K2; rpt from * to end [28 sts]
Rnd 3: *K1, M1, K3; rpt from * to end [35 sts]
Rnd 4: *K1, M1, K4; rpt from * to end [42 sts]
Rnd 5: *K1, M1, K5; rpt from * to end [49 sts]
Rnd 6: *K1, M1, K6; rpt from * to end [56 sts]
Rnd 7: *K1, M1, K7; rpt from * to end [63 sts]
Rnd 8: *K1, M1, K8; rpt from * to end [70 sts]
Continue in this manner, increasing 7sts per round, until you have 84 [91, 98] sts
Next work 3 [4, 5] rounds of stocking stitch.
Tunnel Shaping
This section is worked flat, across all the stitches, to create a hole for the tunnel.
Row 1: Cast off 2 sts, knit to end [82, 89, 96 sts]
Row 2: Cast off 2 sts, purl to end [80, 87, 94 sts]
Row 3: k2tog, knit to last 2sts, k2tog [78, 85 92 sts]
Row 4: Purl all sts
Row 5: k2tog, knit to last 2sts, k2tog [76, 83, 90 sts]
Row 6: Purl all sts
Row 7: kfb, knit to last st, kfb [78, 85, 92 sts]
Row 8: Purl all sts
Row 9: kfb, knit to last st, kfb [80, 87, 94 sts]
Row 10: Purl to end then cast on 2sts, turn [82, 89, 96 sts]
Row 11: Knit to end then cast on 2sts [84, 91, 98 sts]
Rejoin work to continue knitting in the round.
Body
Now continue working stocking stitch in the round until work measures 5.25 [5.75, 6.25] in/13 [14.5, 16] cm from tip of crown.
Next Rnd: K 82 [91, 96], K2tog [1, 0, 1] times [83, 91, 97 sts]
Now work Moss (Seed) st as follows:
Rnd 1: *K1, P1; rpt from * to end
Rnd 2: *P1, K1; rpt from * to end
Work Moss (Seed) stitch band for approximately 1.5in/3.75cm
Earflaps
Next Rnd: Cast off 12 [13, 13] sts, work 15 [17, 19] sts in pattern (1st ear-flap), cast off 30 [31, 32] sts, work 15 [17, 19] sts in pattern (2nd ear-flap), cast off 11 [13, 14] sts.
With right side of work facing, rejoin yarn to 1st ear-flap and work as follows:
Rnd 1: ssk, work in pattern to last 2sts, k2tog
Rnd 2: work in pattern (no decrease)
Repeat these 2 rounds until 3sts remain, then:
A) cast off for a regular ear-flap finish, or
B) work in pattern for 9.5in/23.5cm (or desired length) for tie cord on ear flaps then cast off.
2nd earflap
Rejoin yarn to wrong side of work. Starting with a purl row, work exactly the same as first earflap.
Tunnel
With right side of work facing, pick up and knit 4sts along the base of the tunnel 'hole' (where you cast on the extra sts to rejoin in the round), 7sts up the left side of the tunnel, 4sts across the top (where you cast off), and a further 7sts down the right side [22 sts]
Now work Moss (Seed) stitch until tunnel measures 1.5in/3.75cm (or desired length). Cast off loosely.
Finishing
Weave in all ends. A gentle wash and blocking is required to help the decrease lines settle in and lay flat.


If you’ve a question about this pattern, please pop it in the comments below and I’ll get back to you as soon as I can!


