
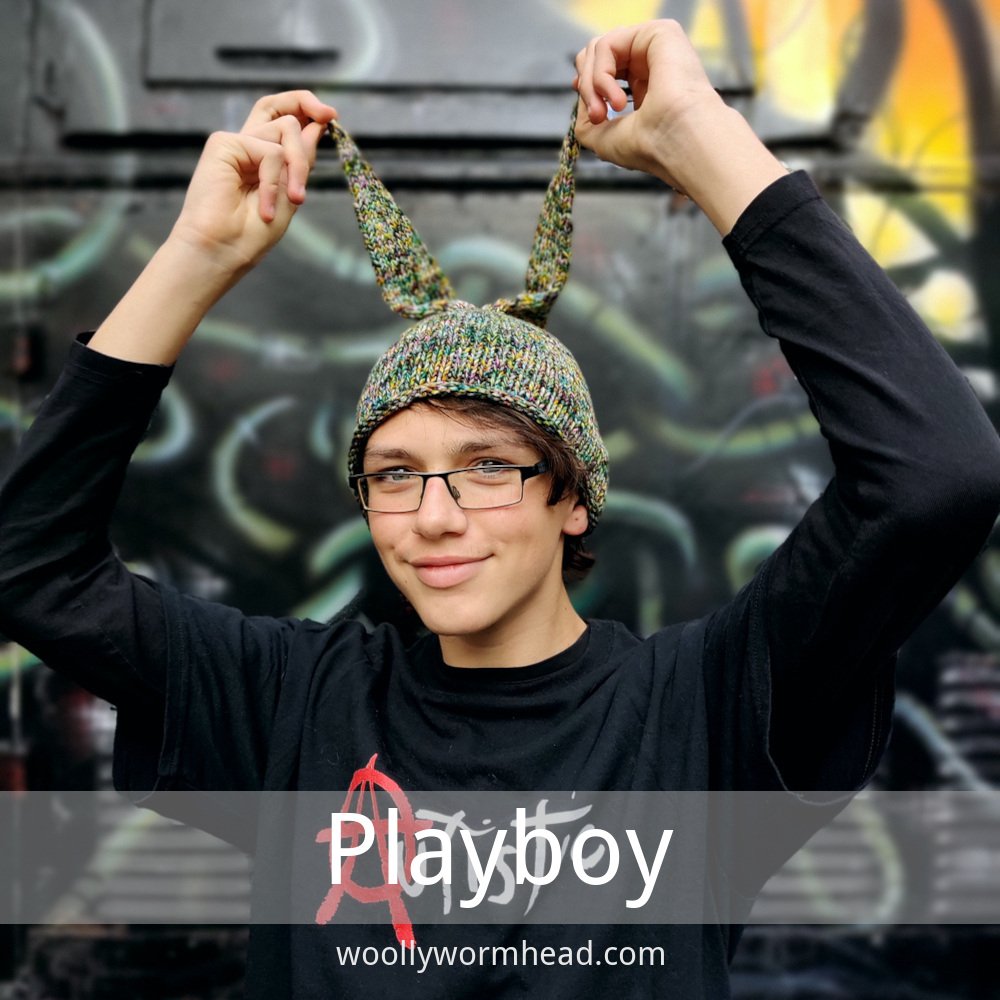
Description
Playboy is a fun take on a kids Hat that can be worn by all ages. Worked in stocking stitch, it has a rolled brim and two long ear-like appendages at the crown.
Availability
My Patreon supporters and members of The Woolly Hat Society get exclusive early access to new free patterns and tutorials. Once the exclusive period is over it’s published here on the blog.
Support
If you have a question about this pattern, pop it in a comment below. Sorry, but I’m unable to help with my free patterns or tutorials via email or private messages.
Social Media
Share your hand-knit Hats online with these hashtags!
#WWPlayboyHat
Yarn
100g/94yd/86m
Chunky yarn
Needles & Notions
Set 5mm/UK6/US8 DPNs/Circular or size needed to obtain gauge
Stitch marker as necessary
Tapestry needle
Sample details
Shown in Malabrigo Arroyo held double [335yd/304m per 100g; 100% Superwash Merino]
Shown in size 22in/56cm on model with 23in/58.5cm circumference head
Gauge
16 sts to 4in/10cm on 5mm needles over Garter St.
Sizes
To fit sizes: 15 [17, 19, 21] in/ 38 [43.25, 48.25, 53.25] cm
Finished size: 13.25 [14.75, 16, 17.25] in/ 33.75 [37.5, 40.75, 43.75] cm
Not sure which size to make? Check my handy size and measuring guide!
Skills required
Stocking Stitch
Knitting in the round
Abbreviations
K: knit
rpt: repeat
R/rnd(s): rounds
st(s): stitch(es)
ssk: slip next 2 sts knitwise, then knit these 2 sts together through the backs of the loops
How to
Using preferred cast-on method, cast on 72 [80] sts. Join in the round, being careful not to twist sts. Place stitch marker to indicate start of round.
Body
Rnd 1: Knit all sts.
Repeat this round until work measures for 5 [5.5] inches/12.75 [14] cm
Crown
22in size only: *K8, ssk; rpt from * to end [72 sts]
Rnd 1: *K7, ssk; rpt from * to end [64 sts]
Rnd 2: *K6, ssk; rpt from * to end [56 sts]
Rnd 3: *K5, ssk; rpt from * to end [48 sts]
Rnd 4: *K4 ssk; rpt from * to end [40 sts]
The Ears
Rnd 5: K20, cast on 10, put remaining 20 sts on holders for working 2nd ear.
Join remaining stitches in the round, work 8 rounds plain, then:
Rnd 6: *K8, ssk; rpt from * to end [27 sts]
Next 7 Rnds: Knit all sts
Rnd 14: *K7, ssk; rpt from * to end [24 sts]
Next 6 Rnds: Knit all sts
Rnd 21: *K6, ssk; rpt from * to end [21 sts]
Next 5 Rnds: Knit all sts
Rnd 27: *K5, ssk; rpt from * to end [18 sts]
Next 4 Rnds: Knit all sts
Rnd 32: *K4, ssk; rpt from * to end [15 sts]
Next 3 Rnds: Knit all sts
Rnd 36: *K3, ssk; rpt from * to end [12 sts]
Next 3 Rnds: Knit all sts
Rnd 40: *K2, ssk; rpt from * to end [9 sts]
Next 3 Rnds: Knit all sts
Rnd 44: *K1, ssk; rpt from * to end [6 sts]
Next 3 Rnds: Knit all sts
Rnd 4: *ssk; rpt from * to end [3sts]
Work 3 rounds as per I-cord (or longer if desired). Break yarn and draw through remaining 3 sts, tighten to close.
Rejoin yarn at beginning of spare stitches of 2nd ear with right side facing then:
K20, pick up and knit 10 sts across base of 1st ear [30sts]
Join in the round and continue as 1st ear.
(if gaps appear when picking up the stitches, pick up extra stitches to avoid holes and decrease them in the next round)
Finishing
Weave in all ends. Gently block and dry flat.
Use the blocking process to decide which way you'd like the ears to sit!


Hasn’t Aran grown and then some? He shot up after his 12th birthday at the start of the pandemic last year and hasn’t stopped since. He’s now the tallest member in our little family!
As folks are bound to ask, you can buy the Actually Autistic t-shirt from here - no affiliation, but whenever I’ve shared this shot of him someone always asks! And if you’re not sure why the logo - us autistics are as punk as it gets; we do things our way, we can’t help it and that needs to be OK.
Aran loves this t-shirt; I bought it for me but he wanted one when he saw it and I wasn’t going to say no ;) We’re still all adjusting to both mine and Aran’s dual ADHD+Autism diagnoses and honestly, I’d really like the daily revelations to stop, they’re exhausting. Battling to get help from local services has really taken it out of us but he’s now - finally - getting support in school and we’re slowly getting access to wider help. It really shouldn’t be this hard but that’s a discussion for another day. Now it’s Tom’s turn to get his formal ADHD diagnosis….

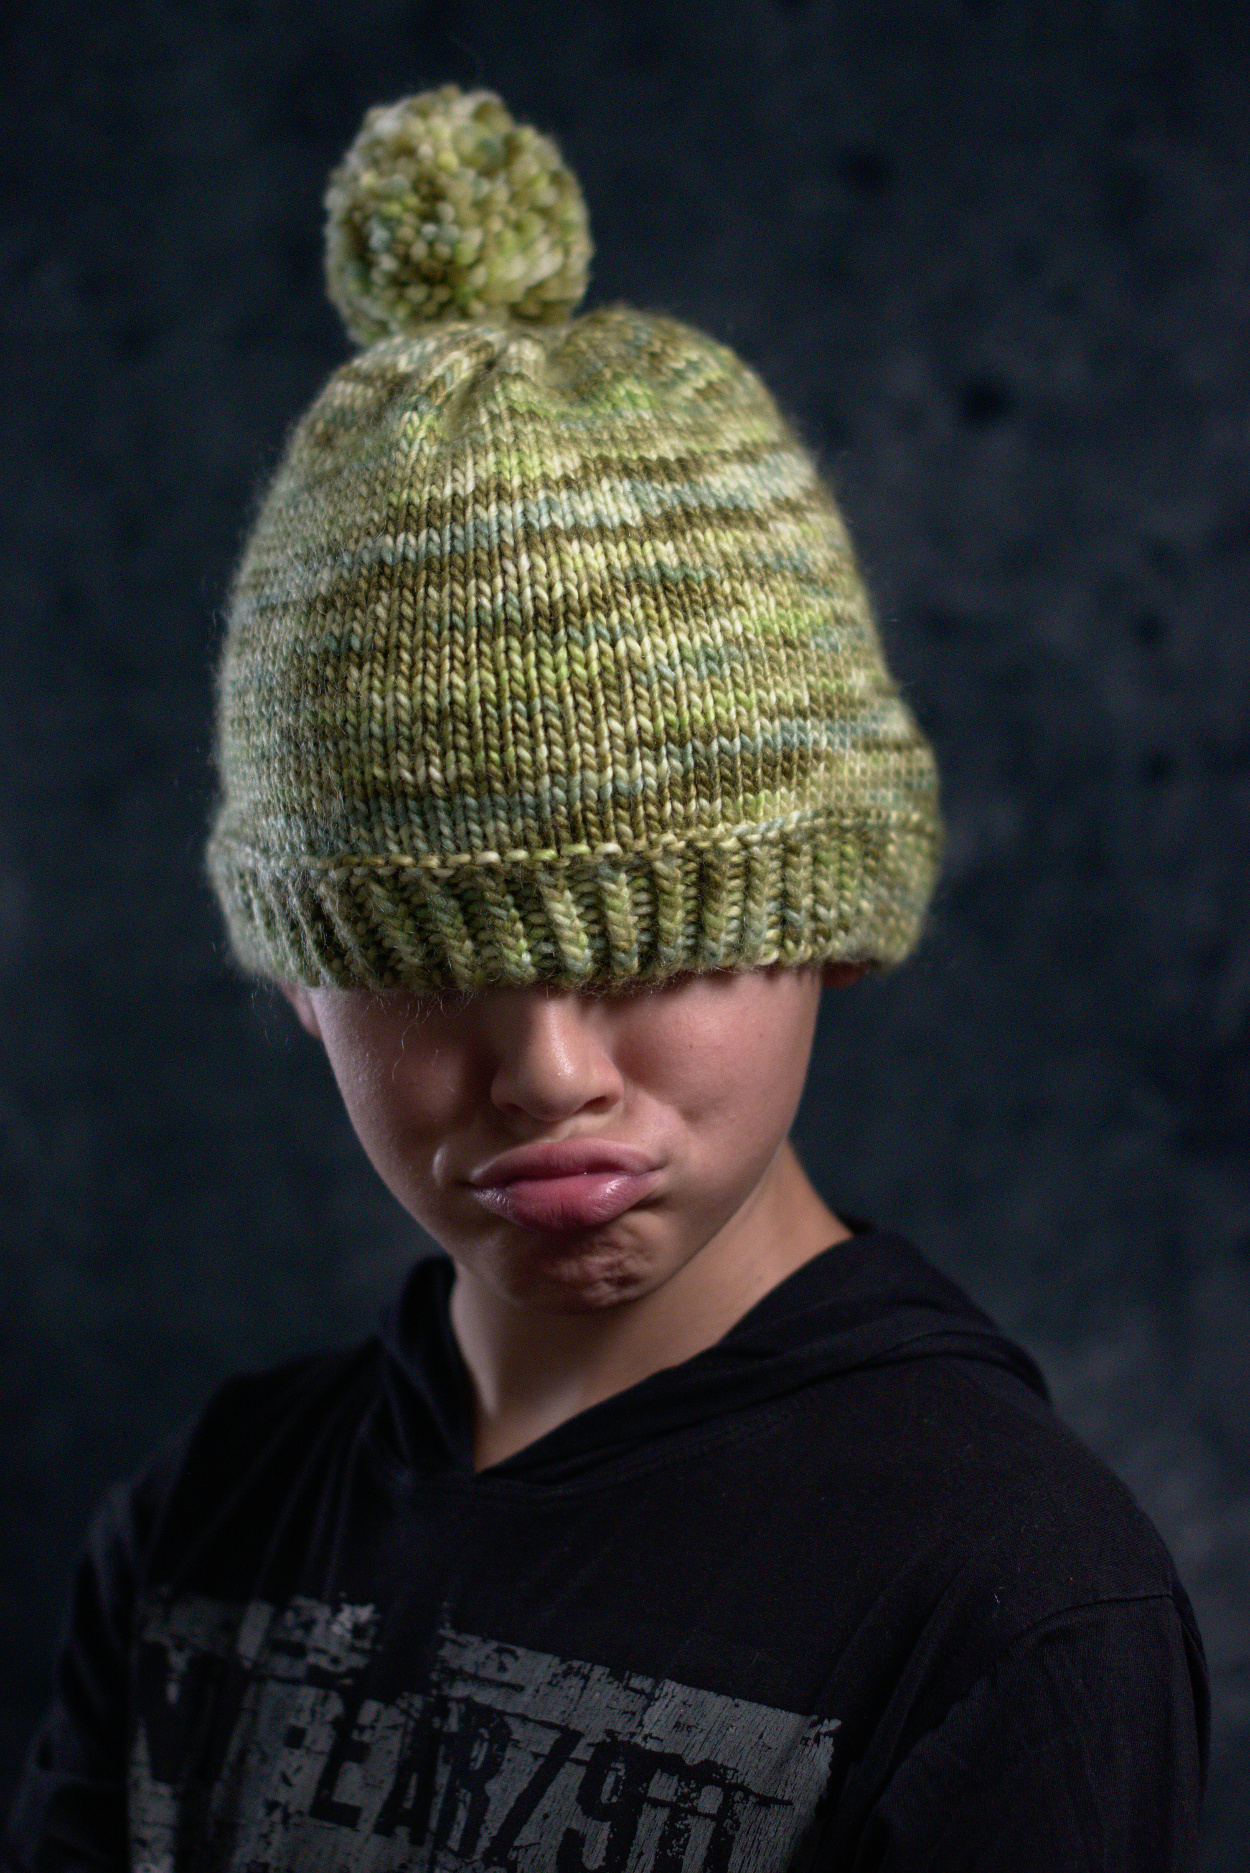
Description
Aran's Slouch is a simple slouchy beanie with a ribbed brim and a stocking stitch body. It has a softly gathered crown and is finished with an optional pompom.
Availability
My Patreon supporters and members of The Woolly Hat Society get exclusive early access to new free patterns and tutorials. Once the exclusive period is over it’s published here on the blog.
Support
If you have a question about this pattern, pop it in a comment below. Sorry, but I’m unable to help with my free patterns or tutorials via email or private messages.
Social Media
Share your hand-knit Hats online with these hashtags!
#WWAransSlouch
Yarn
131yd/120m/100g
Aran weight, single ply yarn.
Needles & Notions
Set 4.5mm/UK7/US7 DPNs/Circular or size needed to obtain gauge
Stitch marker as necessary
Tapestry needle
Sample details
Shown in Cowgirlblues Aran Single [131yd/120m per 100g; 80% Wool, 20% Kid Mohair]
Shown in size 23in/58.5cm on model with 21.75in/55.25cm circumference head
Gauge
18 sts x 24 rows to 4in/10cm on 4.5mm needles over St.St
18 sts x 24 rows to 4in/10cm on 4.5mm needles over Twisted Rib
Sizes
To fit sizes: 17 [19, 21, 23] in/43.25 [48.25, 53.25, 58.5] cm
Finished size: 14.25 [16, 17.75, 19.5] in/36.25 [40.75, 45, 49.5] cm
Not sure which size to make? Check my handy size and measuring guide!
Skills required
Stocking Stitch
Knitting in the round
Abbreviations
K: knit
P: purl
rpt: repeat
st(s): stitches
K1tbl: knit stitch through the back of the loop
k2tog: knit next 2sts together
How to
Using Alternate Cable cast-on method, cast on 64 [72, 80, 88] sts
Join in the round, being careful not to twist the stitches. Place stitch marker to indicate start of round
Brim
Next Rnd: *K1tbl, P1; rpt from * to end
Repeat this round until work measures 1 [1.25, 1.5, 1.75] in/ 2.5 [3.25, 3.75, 4.5] cm (or desired length)
Next Rnd: Purl all sts
Body
Next Rnd: Knit all sts
Repeat this round until work measures approx. 6 [7, 8, 9] in/15.25 [17.75, 20.25, 22.75] cm (or desired length) from cast-on edge.
Crown
Rnd 1: *k2tog; rpt from * to end [32, 36, 40, 44 sts]
Rnd 2: *k2tog; rpt from * to end [16, 18, 20, 22 sts]
Rnd 3: *k2tog; rpt from * to end [8, 9, 10, 11 sts]
Break yarn and draw through remaining 8 [9, 10, 11] sts, tighten to close.
Pompom
Cut 2 circular pieces measuring 2.5in/6.25cm diameter from thin cardboard. The inner circle should be approximately 1.25in/3.25cm. Placing the two pieces of card together, wrap the yarn through the centre and around the outer circle, continuing in this manner until all the card is covered.
Continue wrapping the yarn until either the centre hole has closed or all the yarn has been used.
Carefully cut the yarn along the edge of the circle to reveal the covered card. Cut all of the yarn, then tie a knot between the two layers off card, effectively tying all the pieces of yarn together, before removing the card. Trim pompom before attaching securely to the Hat.
Finishing
Weave in all ends. A gentle wash and blocking is required to help the stitches settle and lay flat. Try to avoid over stretching the brim – you want the Hat to stretch comfortably and be snug when worn. Attach pompom after blocking.
Don’t forget - if you need any help, leave a comment below.


This boy of ours is 11 years old today - happy birthday Aran! To celebrate, I've published this pattern!
5 years ago Aran was living with chronic kidney disease having gone into renal failure a couple of months earlier on new year’s eve. Bronchial pneumonia hit boxing day 2013, which was preceded by impetigo. A post- strep complication led to acute PSGN (poststreptococcal glomerulonephritis) which was then further complicated by HSP (Henoch-Schonlein purpura). He was off school for months (the risk of infection was too great) and it would be at least another 18mths before he went into remission.
Kidney disease can recur and stay for life (it's not something you're ever entirely clear of), with a possibility of end stage kidney disease, so he continues to have his annual checks. We are mighty chuffed that he continues to be in good health and clear of kidney disease for the last 3.5yrs. Acute PSGN and HSP mostly affect children and the year that Aran had acute PSGN 19,000 people died worldwide from the disease... we were the lucky ones.
It's only really now that I can see just how hard this hit all of us. We were also facing eviction and we somehow all had to get through it and keep buoyant for Aran's sake. We got through it. Yet only a year after going into remission and winning the eviction case Brexit went & threw us back into uncertainty again... this week we should finally see some stability again.
Go and enjoy this pattern on us, wish our boy a happy 11th birthday and keep everything crossed for a successful residency application?
I’ve said previously that we’re trying to work at getting our studio photography perfected so that we can work whatever the weather (usually we’re battling the sunshine, rather than the rain) and slowly but surely, we’re getting there.
For me, the biggest hurdle is lighting. We’re gathering a few lights that pack a lot into a small unit (necessary, given the size of my studio) yet somehow I’m rarely content with the lighting effects we get, even when the various set-ups that Tom puts together work well. I am so much happier working with natural light; I’ll always have a diffuser by my side as the natural light here is invariably too strong, but I loathe using reflectors as they always look so false to me - they make light bounce in ways it wouldn’t necessarily bounce. And if I struggle to use a reflector, you can imagine the state of me trying to give a yay or nay to studio lighting.
Slowly, though, we’re getting there. And the one set up that pleases me is dark and moody (quelle surprise). I don’t even care if there’s a lack of light on the face (I much prefer the presence of shadows to their absence) if the light hits the Hat at the right point. As I’m editing the first photoshoot for the Lateralis collection I can tell you there’s some shots where the face is barely visible but the Hat looks a stunner… shots that many people would say are too dark, and to my mind, that’s the point.
Before the shoot we had Monday afternoon we did a few practice shots with Aran for a future free pattern. When he’s in the mood for getting in front of the camera, he goes for it!


Fun as these are, these shots told us that we needed to change the lighting and make it more dramatic… when Aran wasn’t larking around the regular shots looked too much like school photos and there’s no way I’m putting anything like that out, so more shadows on the face it is then, not less.
I suspect in the long run we’ll be inhibited by the pokiness of my studio (compared to that of a the photography studios we usually get a glimpse of) which in turn inhibits our control of light. I know I’ll also get bored of using the same background too often. But it’s a good exercise, and the next plan is try night photography around the Yard, which, if successful, would mean we may never have to battle the sunlight again.

Description
The Classic Beanie is worked seamlessly from the bottom up. It features wide vertical ribs throughout the Hat. Four of the ribs continue straight through the crown, crossing the centre at 90 degree angles. The remaining ribs decrease in pattern.
Availability
My Patreon supporters and members of The Woolly Hat Society get exclusive early access to new free patterns and tutorials. Once the exclusive period is over it’s published here on the blog.
Support
If you have a question about this pattern, pop it in a comment below. Sorry, but I’m unable to help with my free patterns or tutorials via email or private messages.
Social Media
Share your hand-knit Hats online with these hashtags!
#WWClassicBeanie
Yarn
216yd/198m/100g
Aran weight, single ply yarn.
Needles & Notions
Set 4.5mm/UK7/US7 DPNs/Circular or size needed to obtain gauge
Stitch marker as necessary
Tapestry needle
Sample details
Shown in Malabrigo Merino Worsted [216yd/198m per 100g; 100% Merino]
Shown in size 21in/53.25cm on model with 20in/50.75cm circumference head
Gauge
18 sts x 24 rows to 4in/10cm on 4.5mm needles over St.St.
Sizes
To fit sizes: 18 [21, 24] in/45.75 [53.25, 61] cm
Finished sizes: 14.25 [17.75, 21.25] in/36.25 [45, 54] cm
Not sure which size to make? Check my handy size and measuring guide!
Skills required
Ribbing
Knitting in the round
Abbreviations
K: knit
P: purl
rpt: repeat
st(s): stitch(es)
SSK: slip next 2 sts knitwise, then knit these 2 sts together through the backs of the loops
k2tog: knit next 2sts together
How To
Using preferred cast-on method, cast on 64 [80, 96] sts. Join in the round, being careful not to twist sts. Place stitch marker to indicate start of round.
Body
Rnd 1: K1, *[P2, K2]; rpt from * to last 3 sts, P2, K1.
Starting the rib this ways sets the pattern up for the crown shaping. Repeat this round, creating 2x2 rib, until the Body measures 7 [7.75, 8.5] in/17.75 [19.75, 21.5] cm. For a regular beanie without a folded brim work until the Body measures 4 [4.75, 5.5] in/10 [12, 14] cm.
Crown – 18in & 24in sizes
18in size jump to Rnd 9, 24in size start at Rnd 1.
Rnd 1: *ssk, P1, [K2, P2] 4 times, K2, P1, k2tog; rpt from * to end [88 sts]
Rnd 2: *K1, P1, [K2, P2] 4 times, K2, P1, K1; rpt from * to end
Rnd 3: *ssk, [K2, P2] 4 times, K2, k2tog; rpt from * to end [80 sts]
Rnd 4: *K1, [K2, P2] 4 times, K3; rpt from * to end
Rnd 5: *ssk, K1, P2, [K2, P2] 3 times, K1, k2tog; rpt from * to end [72 sts]
Rnd 6: *[K2, P2] 4 times, K2; rpt from * to end
Rnd 7: * ssk, P2, [K2, P2] 3 times, k2tog; rpt from * to end [64 sts]
Rnd 8: *K1, P2, [K2, P2] 3 times, K1; rpt from * to end
Rnd 9: *ssk, P1, [K2, P2] 2 times, K2, P1, k2tog; rpt from * to end [56 sts]
Rnd 10: *K1, P1, [K2, P2] 2 times, K2, P1, K1; rpt from * to end
Rnd 11: *ssk, [K2, P2] 2 times, K2, k2tog; rpt from * to end [48 sts]
Rnd 12: *K1, [K2, P2] 2 times, K3; rpt from * to end
Rnd 13: *ssk, K1, P2, K2, P2, K1, k2tog; rpt from * to end [40 sts]
Rnd 14: *[K2, P2] 2 times, K2; rpt from * to end
Rnd 15: *ssk, P2, K2, P2, k2tog; rpt from * to end [32 sts]
Rnd 16: *K1, P2, K2, P2, K1; rpt from * to end
Rnd 17: *ssk, P1, K2, P1, k2tog; rpt from * to end [24 sts]
Rnd 18: *K1, P1, K2, P1, K1; rpt from * to end
Rnd 19: *ssk, K2, k2tog; rpt from * to end [16 sts]
Rnd 20: Knit all sts
Rnd 21: *ssk, k2tog; rpt from * to end [8 sts]
Break yarn and draw through remaining 8sts, tighten to close.
Crown – 21in size
Rnd 1: *ssk, P1, [K2, P2] 3 times, K2, P1, k2tog; rpt from * to end [72 sts]
Rnd 2: *K1, P1, [K2, P2] 3 times, K2, P1, K1; rpt from * to end
Rnd 3: *ssk, [K2, P2] 3 times, K2, k2tog; rpt from * to end [64 sts]
Rnd 4: *K1, [K2, P2] 3 times, K3; rpt from * to end
Rnd 5: *ssk, K1, P2, [K2, P2] 2 times, K1, k2tog; rpt from * to end [56 sts]
Rnd 6: *[K2, P2] 3 times, K2; rpt from * to end
Rnd 7: * ssk, P2, [K2, P2] 2 times, k2tog; rpt from * to end [48 sts]
Rnd 8: *K1, P2, [K2, P2] 2 times, K1; rpt from * to end
Rnd 9: *ssk, P1, K2, P2, K2, P1, k2tog; rpt from * to end [40 sts]
Rnd 10: *K1, P1, K2, P2, K2, P1, K1; rpt from * to end
Rnd 11: *ssk, K2, P2, K2, k2tog; rpt from * to end [32 sts]
Rnd 12: *K3, P2, K3; rpt from * to end
Rnd 13: *ssk, K1, P2, K1, k2tog; rpt from * to end [24 sts]
Rnd 14: *K2, P2, K2; rpt from * to end
Rnd 15: *ssk, P2, k2tog; rpt from * to end [16 sts]
Rnd 16: *K1, P2, K1; rpt from * to end
Rnd 17: *ssk, k2tog; rpt from * to end [8 sts]
Break yarn and draw through remaining 8sts, tighten to close.
Finishing
Weave in all ends. A gentle wash and blocking is required to help the increase lines settle in and lay flat.
Our wee chap is no longer so wee as he's turned 10 today. 10 years old. Blimey.
We'll be celebrating with pizza tonight and then there's a joint birthday party this coming weekend, as it'll be one of his best friend's birthdays too. They're growing up, and fast.
He still has his love of robots and tech, and there's been a slight indulgence on that front when it comes to gifts! He'll be building and constructing before we know it. I'm mighty chuffed that there's a Raspberry Pi in the mix, too.
The photos for this Hat are a little bit special, as they were shot 5 years ago when Aran was so poorly with acute kidney disease and he's so calm and content in them. It's hard to look back at this time, but it's good to look back and see his strong spirit shining through.
Happy birthday sweet soul. We love you.


It's become a bit of a thing that for Aran's birthday, I publish a new free pattern.
As I was going through my hard-drives recently I found these photos that we took when Aran was ill with chronic kidney disease and I realised that I'd not published this pattern yet! So I've dusted it off and got it ready to go on 13th March.
Members of The Woolly Hat Society get exclusive early access to free patterns, and as the next newsletter is going out this coming thursday (2nd March) you may want to sign up if you haven't already. It's going to be a bumper issue this month!


Can't believe these were 4 years ago - he's grown so much, and is so much better. He'll be 10 this year :s
Gotta love a nicely fitted crown, no?
The Hat comes in 3 sizes and is the sample used about 2/3 of a skein of Malabrigo Merino Worsted.
There's another freebie to come - details tomorrow!


