
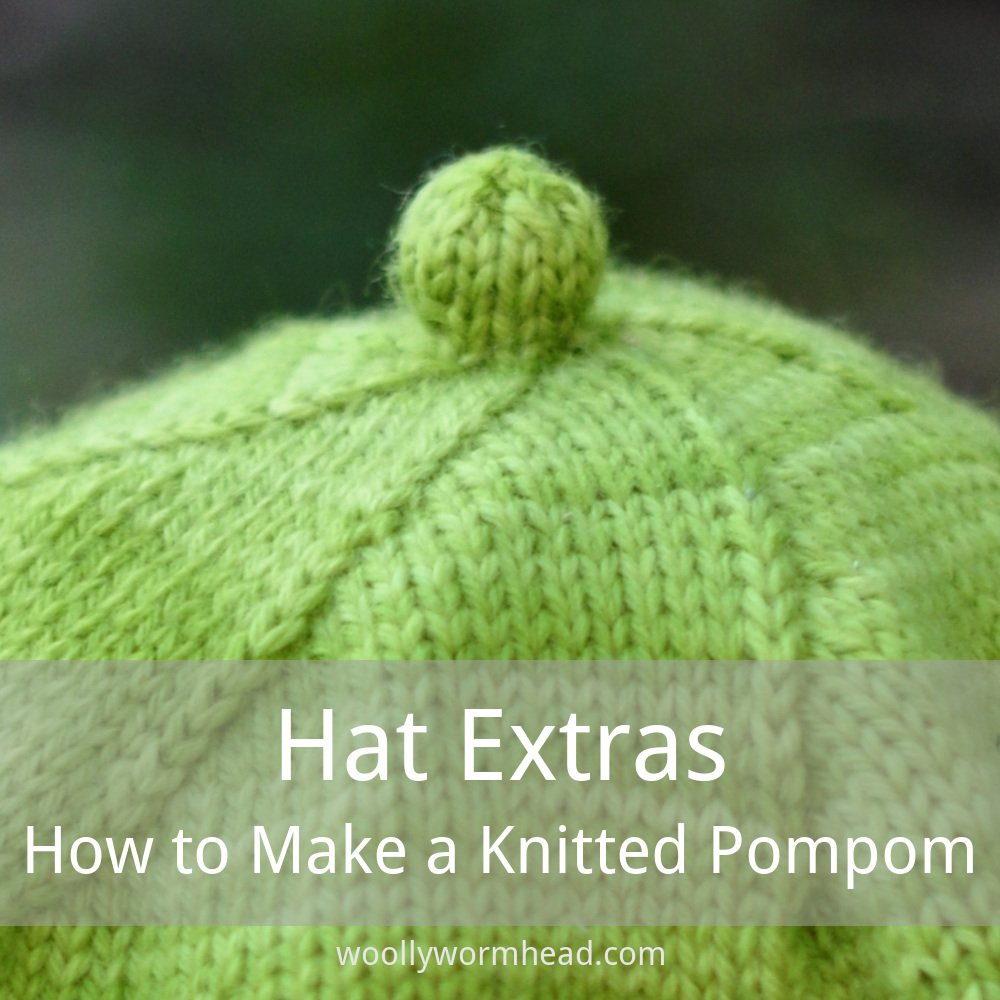
A knitted bobble, or knitted pompom, is a fun crown finishing that adds detail without the faff of making a traditional pompom! They can be worked directly after finishing the crown, as in the Aurora Hat in the title image, or on an I-cord stalk, as shown in the Alveare pattern. You could work several I-cord stalks at the crown and have small bobbles on the end of each for something really playful - it’s up to you!
I tend to call these bobbles as to me, a pompom is distinctive in it’s use of yarn. However the word ‘bobble’ means different things to different people, so I’ve called this tutorial ‘knitted pompoms’. That said, I’ll likely call them bobbles throughout because I can’t help but default in language.
Needles & Notions
Small amount of stuffing - this could be yarn scraps, odd bits of wool felt or roving, or toy stuffing. Yarn scraps will be heavier than toy stuffing and may be more suitable for small bobbles (pompoms) or for ones that’ll hang on the end of an I-cord tail.
Tapestry needle
Skills required
Stocking Stitch
Reverse Stocking Stitch
Knitting in the round
Abbreviations
K: knit
P: purl
rpt: repeat
R/rnd(s): rounds
st(s): stitch(es)
M1: lift the horizontal loop between next 2 sts, place it onto the left needle & knit into the back of it
k2tog: knit next 2sts together
ssk: slip next 2 sts knitwise, then knit these 2 sts together through the backs of the loops

the ‘Aurora’ pattern with a stocking stitch knitted pompom

the ‘Alveare’ pattern with a reverse stocking stitch pompom on a reverse stocking stitch I-cord
Ideally, you’ll want to start the knitted bobble with 6 stitches, as I find that number gives a nice round ball. You could try the same increase formula below with 8 stitches and see how it works or you could just decrease a couple of stitches after finishing the final crown shaping, ready to go straight into a bobble.
How to
Rnd 1: *K1, M1; rpt from * to end [12 sts]
Rnd 2: Knit all stitches
Rnd 3: *K1, M1; rpt from * to end [24 sts]
Rnds 4 & 5: Knit all sts
Rnd 6: *k2tog; rpt from * to end [12 sts]
Rnd 7: Knit all stitches
Now add stuffing at this point, and be sure to add plenty - it will poke out a bit as you’ve not finished the bobble, but that’s ok!
Rnd 8: *k2tog, ssk; rpt from * to end [6 sts]
Break yarn and draw through remaining stitches, tighten to close.
From an I-cord Stalk
If you’ve worked an I-cord stalk at the end of the crown shaping, you’ll likely have 3 stitches left. To ensure you have enough stitches to work the knitted bobble, work this next round once only:
Increase Rnd: *K1, M1; rpt from * to end; join in the round, taking care not to twist the stitches. [6 sts]
Then work the bobble as above!
Ridged or Purl Bobble
You may be working on a Hat that has lots of purl stitches and a knit bobble might look out of place. Thankfully creating a ridged or purl bobble is just as easy as a knit or stocking stitch one.
Simply work a purled I-cord if it’s going to be on a stalk, and then purl all the stitches, including the increases - so they’d be a M1P - and it’s as simple as that!
I think a purled bobble makes an even more unusual finish that a knitted one, so I say go for it even if the only purl stitches in a Hat are in a ribbed brim.
Notes and Adjustments
You don’t have to use the increases and decreases listed, you could use k2tog throughout for a spiral finish to the bobble. Working extra plain rounds - i.e. rounds without shaping - between the increase rounds will make a more elongated shape which could look really cool and it’s worth trying. Just remember that if you want the decoration to be balanced, work the same amount of plain rounds between the decreases, too.
Alternatively, working extra plain rounds between the increases but working the decreases as given above could make more of a droplet or acorn shape - there’s lots of opportunity here to play around!
Support
Have fun with this finish! If you’ve a question about this technique, pop it in a comment below or visit the forum. I’m unable to offer help with patterns or techniques via email. I’d love to see what you do with this!
This tutorial was updated on 1st December 2021 with fresh photos and new links, and was republished from my drafts.


