
Welcome to this series where I discuss various Hat construction methods! I gave an overview in this article and each of these posts will look at each of those constructions methods in more depth. Today I’m going to start with vertically knit bottom-up Hats.
The majority of hand knit Hats are made this way. And to be honest, we’ve probably never given it much thought or even wondered why we make Hats this way! In this article I’d like to delve a little deeper into the whys and wherefores of knitting a Hat from the bottom up.
Knitting a Hat this way is known as a vertical construction method, which means we knit in the direction of the depth of the Hat, from the brim to the crown. Each part of the Hat is worked separately – the brim, then the body and finally the crown; we cast on for the brim, cast off at the crown.
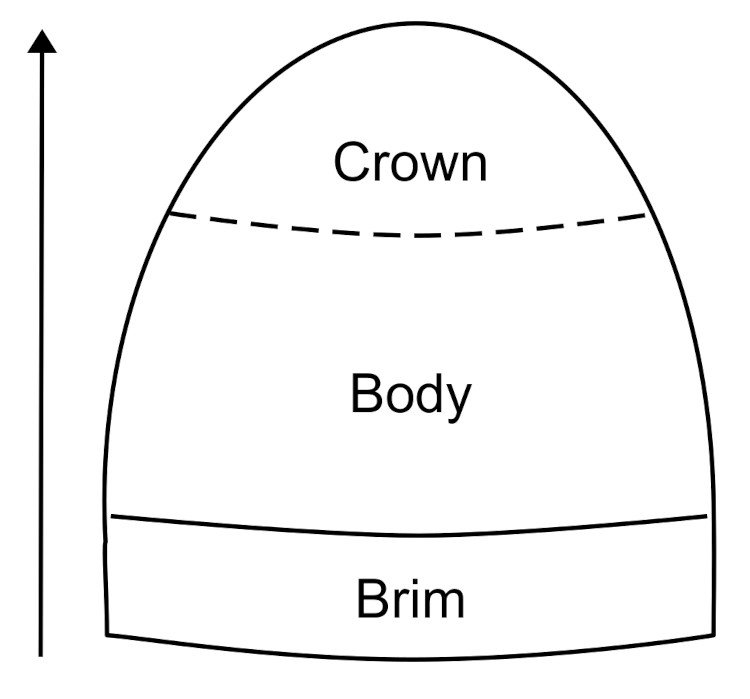
Diagram 1: the schematic shows a beanie shaped Hat with the 3 sections - brim, brim and crown - marked. The arrow points upwards and indicates the direction of knitting.
Bottom up means just that – we start at the bottom of the Hat. To start we would cast on the number of stitches needed to give us the size of brim circumference needed, with negative ease taken into account. If we’re working flat we’d add an extra stitch each end for the selvedge, so that seaming is neater and easier. If we’re working in the round, which most Woolly Wormhead vertical patterns are, you’d join in the round to knit your tube.
The brim is often ribbed but isn’t always, and neither does it have to be. The brim is where the Hat must fit, and depending on the style of Hat, it might be the only part of the Hat where the knitting is snug to the head. This is why ribbing is often used, but there are other stitch patterns and finishes that can provide enough stretch and warmth.
Once the brim is finished, the knitting continues seamlessly into the body. The stitch pattern may change, the shape of this central part of the tube may change. Either way, the body section of the tube is completed before beginning the crown shaping.
The diagram above shows the overall shape of a beanie, with a dotted line where the body transitions to the crown section but in reality, it too is entirely seamless.
A Glance at the Internal Structure of a Hat
Let’s have a closer look at Hat construction for a moment, because when we knit a Hat the shape we actually knit is a little different from the Hat-shape shown in the first diagram.
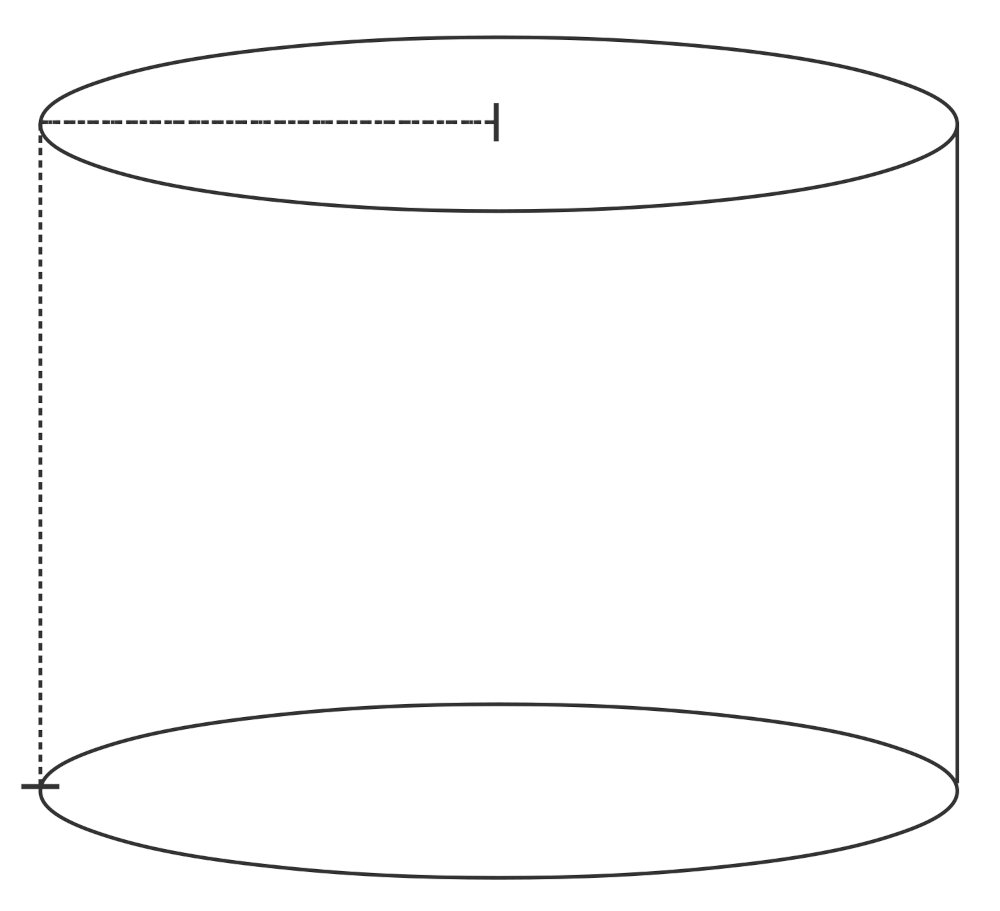
Diagram 2: this schematic shows a cylinder with a circle on top. The dashed lines indicates the full length of the Hat, from the brim to the crown.
This diagram shows what we actually knit when we knit a beanie – it’s a tube with a circle on top. The brim + the body together are the tube, the circle closing the tube is the crown. It’s really important to remember to include the radius of the circle in the overall length measurement!
When we cast on for the brim, we cast on enough stitches to start the opening of the tube, and that’s where it’ll sit around the head. We knit round and round or back and forth, adding height to the tube as it grows into the body. If we’re making a beret or slouch Hat, we may increase after the brim - different Hat styles would have a different arrangement of tubes. Once the desired length of the brim+body has been achieved, we start decreasing for the crown.
Although we’re aiming for a circular shape with the decreasing, that’s not how it’ll look when the Hat is finished - the circle smooths off as we wear the Hat, and if there isn’t enough negative ease the lines of decreasing can look quite sharp or angular.
Sometimes the crown decreasing is more rapid, or even gathered. Yet the internal structure will be pretty much the same – a tube or cylinder that’s closed at the top.
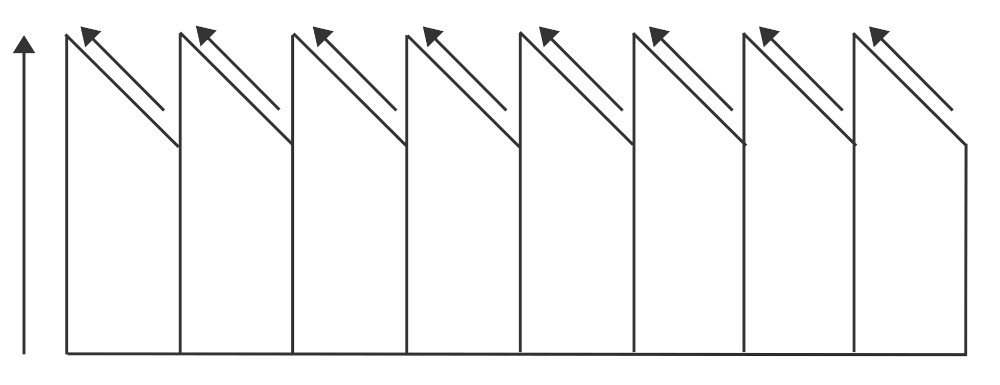
Diagram 3: this schematic shows a bottom-up beanie deconstructed. Although we don’t usually see panels in a vertically knit Hat, they are there internally and they’re dictated by the crown maths or multiples.
This next diagram shows how our Hat may look when the tube is taken apart. It’s how it’ll look if it’s worked flat. Those triangles at the top are there within the Hat when we work the crown shaping, but because the sections are all worked in one row or round, we don’t see them as separate sections – the triangles are worked consecutively as you work through the crown shaping.
This example uses a left-leaning decrease like an ssk, but a crown worked with a right-leaning or k2tog decrease would be the same, only the triangles would lean the other way. If the crown shaping is more rapid, the angle of the triangles will change and they’ll become shorter; if we’re making a pixie Hat and the decreasing is less frequent then the triangles will become taller. Pixie Hats are still a tube closed at the top, except they’re finished with a cone instead of a circle.
the ‘Adiantum’ slouch Hat

the ‘Daedalus’ stranded Hat

the ‘Laccio’ Hat
Why Bottom-up Hats are Popular
The choice of decreases is one reason why I prefer a bottom-up Hat to a top-down one. In my opinion, decreases are so much more varied and prettier than increases. My general approach to shaping in knitting is that if you can’t hide it, make a feature of it. And decreases can be so striking and architectural, especially when stacked or otherwise carefully placed. They can also be completely hidden within the pattern too.
Then there are other reasons to choose this method, besides the aesthetics of decreases. When we decrease in knitting we use stitches that are already made and knit the decreases, adding in fresh yarn. Our decreases rarely impact the tension of the fabric. Yet with the exception of a few, increases require us to create stitches from the existing fabric, which can make them a little tighter. It’s not something that’s especially noticeable in larger garments, but when increases are worked frequently in the same place, as they would be in the crown of a Hat, it can make the fabric tighter or even pucker in places.

the ‘Pebbles’ Hat

the ‘Rennie’ Hat

the ‘Sumner’ Hat
Besides increases and decreases, there are other knit tech reasons why bottom-up Hats are favoured over top-down – casting off and casting on methods. Cast-off methods can be a little tight, or not as stretchy, and generally cast-off methods are not as varied as cast-on methods. That’s not to say that they can’t be as practical or as easy to execute as cast-on methods, just that they’re not as varied or as well known. You can use any cast-on if you wanted to make a bottom-up Hat, and the draw-through bind-off for closing a top of a Hat is easy enough. Yet it’s not always as easy the other way round.
One drawback of the bottom-up method is that the circumference of the Hat isn’t adjustable after we’ve cast on, but one advantage of it is that the depth is adjustable and we can make our Hat as tall or as short as needed. You’ll always want to make sure you’ve enough yarn to finish your crown, but otherwise the depth is pretty adjustable.
There are lots of reasons why bottom-up vertically knit Hats are great, and I hope this article has helped explain why they’re so popular, as well as give a little bit of background info to the inner structure of a Hat! In the next article I’ll talk about working a Hat from the top-down.


