

Having looked at the bottom-up method of knitting a Hat, in this article I’m going to talk about knitting a Hat the other way round. It’s still knit vertically; we just start at the top and work down.
Just as in the bottom-up method, each part of the Hat is worked separately – only we cast on for the crown, work our way into the body, then down into the brim, where we cast off for the brim edge.
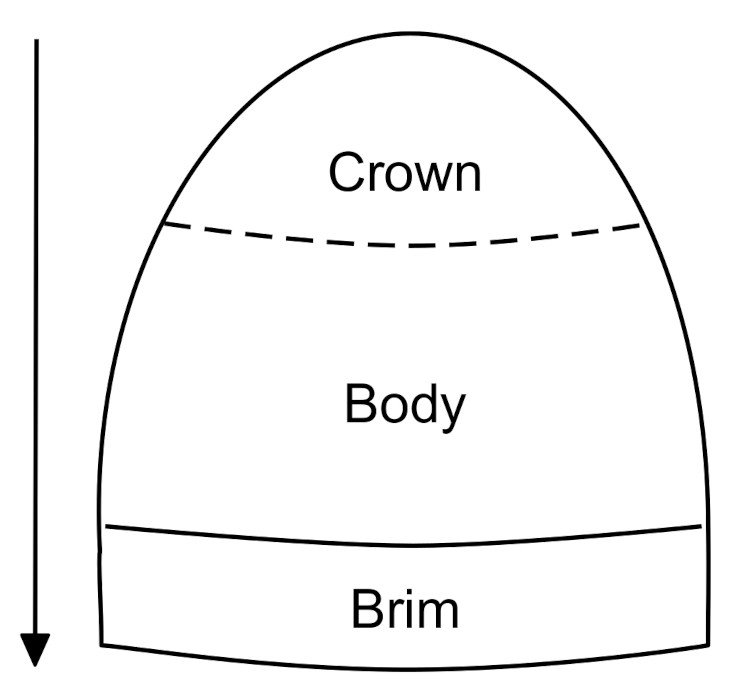
Diagram 1: the schematic shows a beanie shaped Hat with the 3 sections - crown, brim and body, marked. The arrow points downwards and indicates the direction of knitting.
Top down means just that – we start at the top of the Hat, at the very centre of the crown. To start, we would cast on the minimum number of stitches needed to begin the crown shaping. Because we’re working top-down, we’d create the crown shaping with increases, not decreases as we would when working bottom-up. Once the crown shaping is finished and the circumference of our Hat is the intended size, allowing for negative ease, we’ll continue seamlessly into the body of the Hat. The body is usually the part of a vertically knit Hat with minimal shaping, although that will depend on the style and stitch pattern.
Once the body of the Hat is finished, we’ll then start knitting the brim. If there’s a difference in circumference between the body and the brim of our Hat, then we’ll want to decrease the number of stitches on our needles to get the right size. Or if our Hat has a wide brim, we’d increase for that. Whereas with a bottom-up beret we’d increase from the brim into the body, with a top-down beret we’d decrease as we transition from the body into the brim. Top-down means we’re working the same Hat, only upside down, so everything is done in reverse – increases become decreases and vice versa.

the ‘Sette Vele’ Hat

the ‘Álfur’ Hat

the ‘Concentricity’ Hat
The brim of a top-down Hat is the last part of the Hat we’ll knit before binding off. As with any Hat, the brim may be ribbed, but it doesn’t have to be. The brim may be the only area of the Hat that needs to fit snugly around the head, which is why a ribbed brim is a popular choice – it’ll fit snugly, yet still have enough stretch for putting a Hat on or taking it off. But ribbing isn’t always a first choice for a top-down brim, as there aren’t as many options for binding off in ribbing as there are for casting on, and I personally like the challenge of finishing a top-down brim with something other than ribbing.
In my article about bottom-up vertically knit Hats, we looked a little at the internal structure of a Hat, and a top-down Hat is made up of the same parts. The diagram above shows the overall shape of a beanie, with a dotted line where the crown transitions to the body section before finally heading into the brim. It’s worth reminding ourselves that although this is how a Hat may look, what we knit is closer to a cylinder or tube that’s closed at the top – and the top of the tube is the crown shaping.
Increases vs Decreases
As we did in the bottom-up Hat article, let’s deconstruct the Hat and look at the way the crown is shaped. Although we’re aiming for a circular shape with the crown increasing, that’s not how it’ll look when the Hat is finished, because the circle smooths off as we wear the Hat.
Like the bottom-up Hat, if there isn’t enough negative ease, the lines of shaping can look quite sharp or angular. And sometimes the crown increasing is more rapid. Yet the internal structure will be pretty much the same – a tube or cylinder that’s closed at the top, and open at the bottom where it’ll sit around the head.
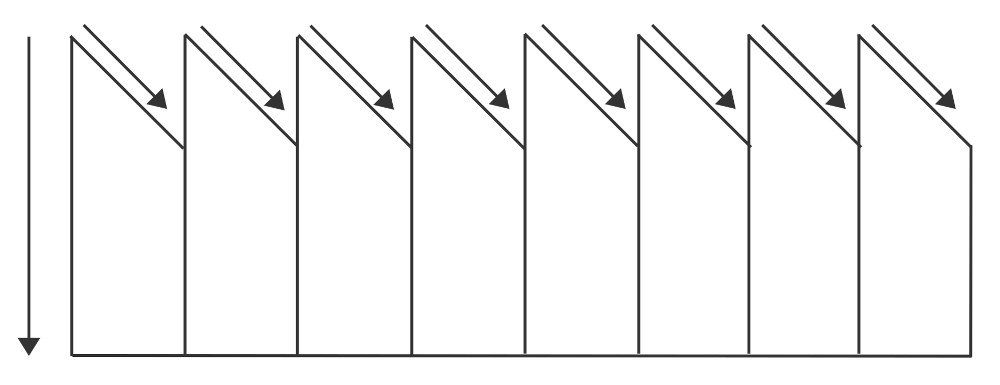
Diagram 2: this schematic shows a vertically knit Hat deconstructed. Although the panels are usually invisible, they relate to the numbers used in the crown shaping. The arrows indicate the direction of the knitting.
This next diagram shows how our Hat may look when the tube is taken apart. It’s how it’ll look if it’s worked flat. Those triangles at the top are there within the Hat when we work the crown shaping, but because the sections are all worked in one row or round, we don’t see them as separate sections – the triangles are worked consecutively as you work through the crown shaping.
This example uses a left-leaning increase like a M1L, but a crown worked with a right-leaning increase would be the same, only the triangles would lean the other way. If the crown shaping is more rapid, the angle of the triangles will change and they’ll become shorter; if we’re making a pixie Hat and the decreasing is less frequent, then the triangles will become taller.
The Pros and Cons of a Top-down Hat
I’ve said previously that the choice of decreases is one reason why I prefer a bottom-up Hat to a top-down one. In my opinion, decreases are much more varied than increases. Furthermore, decreases use existing stitches, whereas increases create stitches where there were none, and this can affect the tension of the fabric or the stitch pattern. And as briefly mentioned a few paragraphs back, the choice of bind-off methods – or at least those commonly known – isn’t as wide or as varied as cast-on methods.
All that said, top-down Hats offer lots of potential and the fact that they’re worked in reverse to a bottom-up Hat means that some of the challenges we faced previously are no longer an issue, or can even work to our advantage.
The one advantage that’s most commonly mentioned in favour of a top-down Hat is that you can keep going until you run out of yarn. Even if your brim isn’t quite as deep as intended, you can still finish the Hat without ripping back and adjusting the length of the body. This is a huge plus when you’re working with stash yarn that’s lost its ball-band, or oddments, or your handspun. And it really is a big plus – running out of yarn before you’ve finished your knitting is mighty frustrating.
Another key point is that the finished circumference of the Hat isn’t set in stone with the cast-on. Sure, if you’re part-way through the body when you discover that the Hat is too small or too big, it can be a little frustrating, but you only need to unpick to the last crown shaping rounds to change it – you don’t have to start over from scratch.
the ‘Sloochie’ Hat

the ‘Cabled Cap’ Hat

the ‘Bimple’ Hat
And that leads rather nicely into the next point – you can try the Hat on as you go – within reason. Because the increases can often be a little tighter, particularly pre-blocking, than the decreases in the crown of a bottom-up Hat, you won’t really get an accurate idea of how big the Hat is until you’ve worked a few inches or so of the body section once the shaping has finished. But at least you can try it on, and there’s less work involved in getting the right size. Heck, you could even cast on a top-down Hat before you know who it’s intended to fit and what size it should be!
A top-down Hat also makes the most common type of knit-Hat surgery easier to manage. Because the brim is the one place where a Hat has to fit, but is also the place that sees the most wear and tear, it can often need replacing. Whether it’s too big or too small, or not stretchy enough or has become overstretched over time, or it’s simply uncomfortable or itchy, you can just unpick the brim and rework it. I’m often asked how to fix a brim that’s become overstretched, either during blocking or through daily use, and if the brim is the last part of the Hat knit, it’s so much easier to modify.
The challenges to a top-down Hat – in particular the cast-on versus bind-off challenges – can also be used to our advantage. Not sure what stitch pattern to use for the brim because you’re not familiar with any ribbed bind-off methods? Then why not switch up the stitch pattern – try something different instead of ribbing! Or why not learn a new bind-off method to finish your ribbed brim? A top-down Hat can encourage us to be more creative, think outside the box, or learn new skills.
There are plenty of techniques that mirror the finishes you’d be familiar with in a bottom-up Hat. The circular cast-on, for instance, gives exactly the same finish as the draw-through bind-off that’s used at the top of a classic bottom-up crown. A tubular bind-off may sound off-putting or fiddly with its grafted edge, yet it’s a perfect mirror to a tubular cast-on and gives a mighty fine edge to ribbing, not to mention being very satisfying to finish!
Some examples of top-down Woolly Wormhead Hats are Cabled Cap, Alfur and Sette Vele.
I hope this has helped explain some of the similarities and differences between top-down and bottom-up vertically knit Hats. Each has benefits and drawbacks; there isn’t one method that’s better than the other. In the next few articles, I’m going to explore a few other ways of making the humble knit Hat, since once we break outside of the vertical methods there’s a whole other Hat construction world to explore.


