

Description
Meret is a lace beret with a rolled stocking stitch brim. The allover lace pattern creates columns of nested arches that reach all the way to the centre of the crown. The shaping is incorporated into the stitch pattern and creates a classic beret finish.
Availability
My Patreon supporters and members of The Woolly Hat Society get exclusive early access to new free patterns and tutorials. Once the exclusive period is over it’s published here on the blog.
Support
If you have a question about this pattern, pop it in a comment below. Sorry, but I’m unable to help with my free patterns or tutorials via email or private messages.
Social Media
Share your hand-knit Hats online with these hashtags!
#WWMeretHat
Yarn
223yd/204m/100g
Aran weight, multi-plied yarn.
Needles & Notions
Set 4.5mm/UK7/US7 DPNs/Circular or size needed to obtain gauge
10 [11, 12] Stitch markers
Tapestry needle
Sample details
Shown in Patons Classic Wool [223yd/204m per 100g; 100% Wool]
Shown in size 20in/51cm on model with 21.5in/54.5cm circumference head
Gauge
18 sts x 24 rows to 4in/10cm on 4.5mm needles over St.St.
Sizes
To fit sizes: 18 [20, 22] in/46 [51, 56] cm
Finished size: 16 [17.75, 19.5] in/40.75 [45, 49.5] cm
Not sure which size to make? Check my handy size and measuring guide!
Skills required
Stocking Stitch
Knitting in the round
Abbreviations
K: knit
P: purl
rpt: repeat
Rnd(s): rounds
st(s): stitch(es)
K1tbl: knit stitch through the back of the loop
yo: yarnover
M1: pick up the horizontal loop before the next stitch, place it onto the left needle and knit into the back of it
k2tog: knit next 2sts together
SSK: slip next 2 sts knitwise, then knit these 2 sts together through the backs of the loops
sk2po: slip next stitch, then knit following two stitches together, then pass slipped stitch over
Alteration Notes
This pattern can be made more slouchy by knitting one or two extra lace repeats – one extra repeat will make a regular slouch beret, two extra repeats will make it really slouchy! You can also mix and match the different sizing options, by starting the lace chart in different places than those given.
Over time, this pattern has been through many incarnations & been worked with so many variations! The current sample in the photos – the orange Meret – was added recently (autumn 2011) and was knitted with a combined rolled+ribbed brim, and has 2 full repeats of the stitch pattern in the body. It is the 20in/51cm size.
How to – Rolled Brim
Using Cable Cast-on method, cast on 72 [80, 88] sts. Join in the round, taking care not to twist the stitches. Place stitch marker to indicate start of round.
Brim Rnd: Knit all sts
How to – Ribbed Brim
Using Alternate Cable Cast-on method-cast-on, cast on 72 [80, 88] sts. Join in the round, taking care not to twist the stitches. Place stitch marker to indicate start of round.
Brim Rnd: *K1tbl, P1; rpt from * to end
Brim – both versions
Repeat the Brim round until work measures 2in/5cm then work increase round once as follows:
Inc. Rnd: *[K1, M1] twice, [K2, M1] 3 times; rpt from * to end [117, 130, 143 sts] (there will be 13 sts between each stitch marker)
It's a good idea to change to a circular needle for the main body, then change back to DPN's during the crown shaping when stitches are fewer.
Body
18in size: work rounds 5-10 once, then rounds 1-10 once [16 rnds]
20in size: work rounds 2-10 once, then rounds 1-10 once [19 rnds]
22in size: work rounds 9-10 once, then rounds 1-10 twice [22 rnds]
Rnd 1: *K2, yo, K3, sk2po, K3, yo, K2; rpt from * to end
Rnd 2 & all even rounds: knit all sts
Rnd 3: *K3, yo, K2, sk2po, K2, yo, K3; rpt from * to end
Rnd 5: *K4, yo, K1, sk2po, K1, yo, K4; rpt from * to end
Rnd 7: *K5, yo, sk2po, yo, K5; rpt from * to end
Rnd 9: *K1, yo, K4, sk2po, K4, yo, K1; rpt from * to end
Rnd 10: knit all sts
Note about Slouchiness
For extra slouch, work one extra repeat of rounds 1-10. For even more slouch, work two extra repeats of rounds 1-10. The one shown is extra slouchy.
It's very important to end the body section after a Round 10 – this leaves the pattern in the correct place for the crown shaping. If you choose to work additional repeats for slouchiness, work them in the middle part of the instructions given for each size, or start at a different point in the repeat.
Crown
Rnd 11: *ssk, yo, K3, sk2po, K3, yo, K2tog; rpt from * to end [99, 110, 121 sts]
Rnd 12: *ktbl, K10; rpt from * to end
Rnd 13: *ssk, yo, K2, sk2po, K2, yo, K2tog; rpt from * to end [81, 90, 99 sts]
Rnd 14: *ktbl, K8; rpt from * to end
Rnd 15: *ssk, yo, K1, sk2po, K1, yo, K2tog; rpt from * to end [63, 70, 77 sts]
Rnd 16: *ktbl, K6; rpt from * to end
Rnd 17: *ssk, yo, sk2po, yo, K2tog; rpt from * to end [45, 50, 55 sts]
Rnd 18: *ktbl, K4; rpt from * to end
Rnd 19: *ssk, yo, K1, yo, K2tog; rpt from * to end
Rnd 20: *ssk, K1, K2tog; rpt from * to end [27, 30, 33 sts]
Rnd 21: *ktbl, K2; rpt from * to end
Rnd 22: *sk2po; rpt from * to end [9, 10, 11 sts]
Break yarn and thread through remaining 9 [10, 11 ] sts and tighten to close.
Finishing
Weave in all ends. This Hat will require blocking to appreciate the fullness of the shape. It is best to block this Hat flat, as a circle with the crown at the centre. Encourage the eyelets to open out during the process but avoid stretching the brim of the Hat.
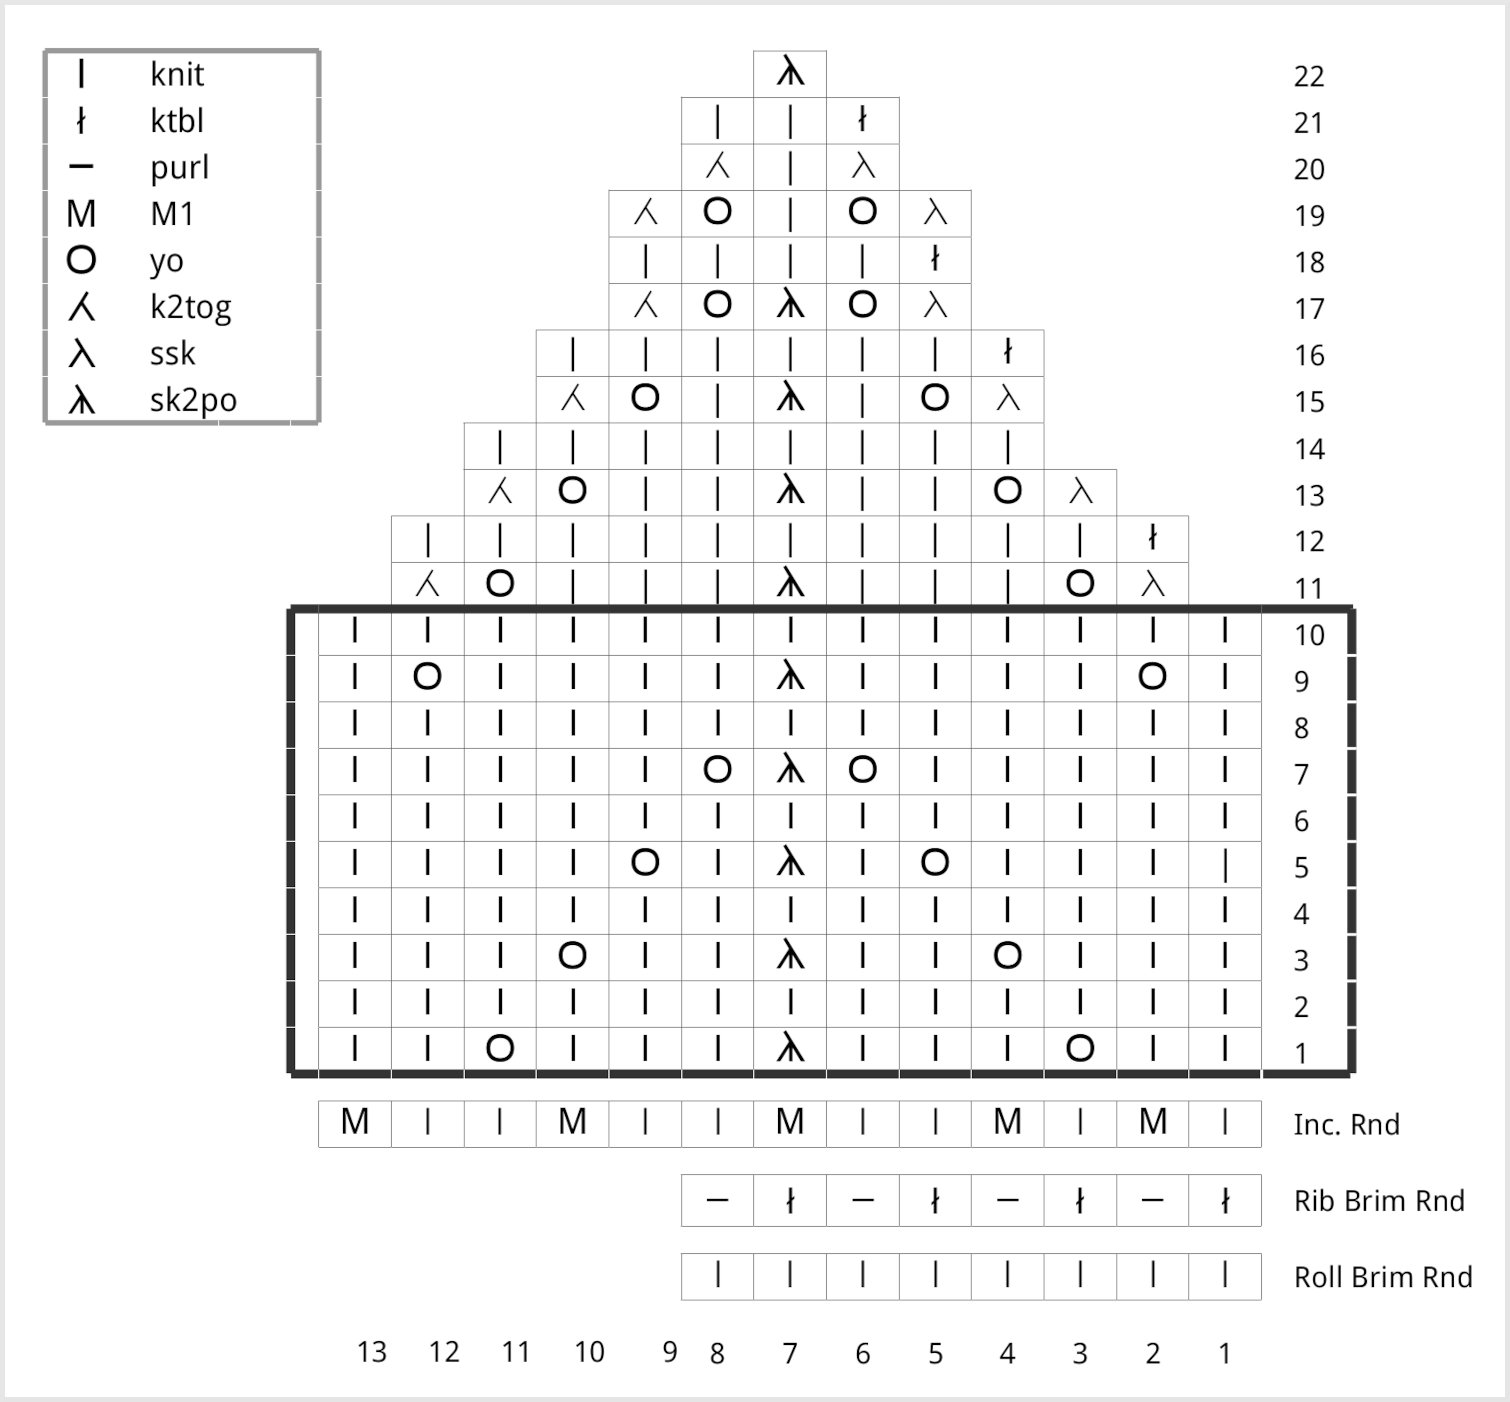
Knitting chart for one vertical panel within the Meret. The Hat is cast-on with a multiple of 8 stitches and is increased to a multiple of 13sts for the body. The 10 row lace repeat is marked within the black box.


This page was updated on 5th February 2022 to add a chart for the pattern, and to re-write the written lace repeats to match the chart. The pattern hasn’t changed, just how the repeats are presented!


