

Description
Lumossity is a moss (seed) stitch square top Hat. It's worked in the round in a bulky weight yarn.
Availability
My Patreon supporters and members of The Woolly Hat Society get exclusive early access to new free patterns and tutorials. Once the exclusive period is over it’s published here on the blog.
Support
If you have a question about this pattern, pop it in a comment below. Sorry, but I’m unable to help with my free patterns or tutorials via email or private messages.
Social Media
Share your hand-knit Hats online with these hashtags!
#WWLumossityHat
Yarn
150g/82yd/75m
Super bulky weight, plied yarn
Needles & Notions
Set 8mm/UK0/US11 DPNs/Circular or size needed to obtain gauge
Stitch marker as necessary
Tapestry needle
Sample details
Shown in Schachenmayr Lumio [82yd/75m per 150g; 91% Acrylic, 9% Polyester]
Shown in size 22in/55cm on model with 20.5in/52cm circumference head.
Sample weighs 102g.
Gauge
8 sts x 12 rows to 4in/10cm on 8mm needles over Moss (Seed) Stitch
Sizes
To fit size: 18 [20, 22, 24] in/45.75 [50.75, 55, 61] cm
Finished size: 15.5 [17.5, 19.5, 21.5] in/39.5 [44.5, 49.5, 54.5] cm
Not sure which size to make? Check my handy size and measuring guide!
Skills required
Moss (Seed) Stitch
Knitting in the round
How to
Using Alternate Cable cast-on method, and treating the slip knot as the first stitch cast on (i.e. a purl stitch) cast on 31 [35, 39, 43] sts. The last stitch cast on will also be a purl stitch.
Foundation Row: K1, *P1, K1; rpt from * to end
Join in the round, being careful not to twist sts. Place stitch marker to indicate start of round.
Body
Rnd 1: P1, *K1, P1; rpt from * to end
Rnd 2: K1, *P1, K1; rpt from * to end
These 2 rounds create Moss (Seed) Stitch in the round. The pattern is worked across an odd number of stitches as knitting in the round is akin to knitting in a spiral; this then keeps the pattern continuous (a knit stitch always follows a purl stitch, and vice versa)
Repeat these 2 rounds until work measures 6 [7, 8, 9] in/15.25 [17.75, 20.25, 22.75] cm.
Crown
Fold work in half so that WS are together and perform Crochet bind-off to close the top.
Finishing
Weave in all ends. A gentle wash and blocking is recommended; avoid over-stretching the Hat.


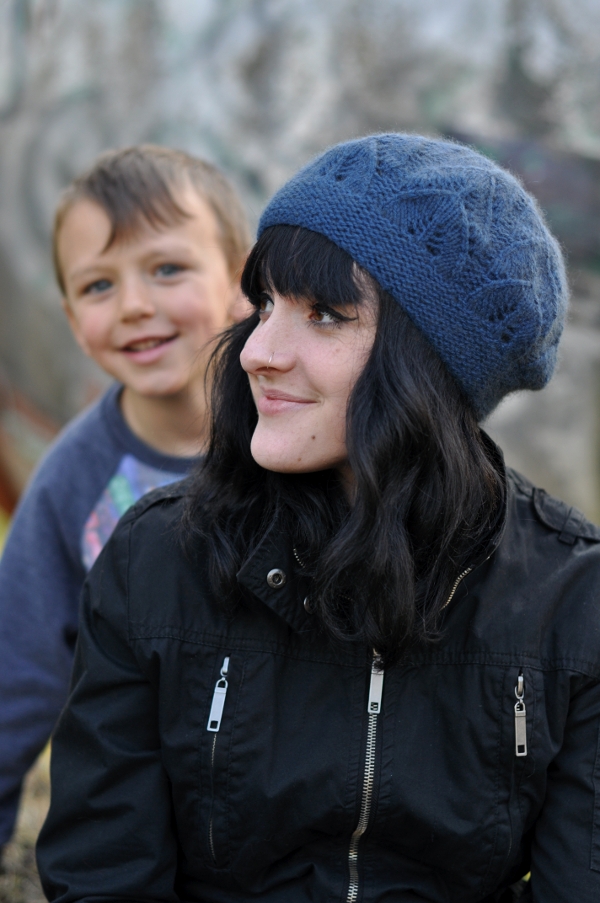
Our boy turns 7 today - seven! And he's growing up fast.
In digging around for the perfect photos to share today, I found these, and these are some of my favourite shots of Aran from last year. They were taken 5 months after he went into renal failure, and despite still being underweight and still being on kidney-watch and still going back and forth to hospital for continual tests, he was still smiling and larking around.
This Hat was one of my sanity knitting projects when we were in Bologna hospital last January, and it was the Hat he wore when we were allowed off ward for the first time for a few hours, to walk a little, see the sky and get some fresh air. Lots of memories wrapped up in this Hat.
And as I sat here this morning looking at these shots, I remembered I hadn't yet published the pattern for it - and figured that today's a good a day as any!
Happy birthday Aran, our young hero x
ps/ if you knit this Hat, would you please consider donating to your national kidney charity? In the UK you could consider Kidney Research UK, and in the US you might consider the National Kidney Foundation. We don't know yet whether Aran will have chronic kidney disease for life; there are so many variables to consider... they tell us his chances are good but they can't rule it out. Having lived with acute kidney disease for these last 14 months, with 2 uncommon conditions that each consultant that we've seen knows relatively little about, it became pretty clear that more research is needed. Every penny helps :)

Description
Headcase is a tubular Hat, worked in the round, in twisted 1x1 rib that's finished with a square top. The brim can be worn folded up.
Availability
My Patreon supporters and members of The Woolly Hat Society get exclusive early access to new free patterns and tutorials. Once the exclusive period is over it’s published here on the blog.
Support
If you have a question about this pattern, pop it in a comment below. Sorry, but I’m unable to help with my free patterns or tutorials via email or private messages.
Social Media
Share your hand-knit Hats online with these hashtags!
#WWHeadCaseHat
Yarn
100g/459yd/420m
Sock weight, plied yarn.
Needles & Notions
Set 2.25mm/UK13/US1 DPNs/Circular or size needed to obtain gauge
Stitch marker as necessary
Tapestry needle
Sample details
Shown in Schoppel-Wolle Zauberball [459yd/420m per 100g; 75% Wool, 25% Nylon]
Shown in size 19.5in/49.5cm on model with 20.5in/52cm circumference head
Sample weighs 51g.
Gauge
40 sts x 52 rows to 4in/10cm on 2.25mm needles over Twisted Rib
Sizes
To fit sizes: 14 [17, 19.5, 22] in/35 [43.25, 49.5, 56] cm
Finished size: 12 [14, 16, 18] in/30.5 [35.5, 40.75, 45.75] cm
Not sure which size to make? Check my handy size and measuring guide!
Skills required
Ribbing
Knitting in the round
3-needle bind-off or crochet bind-off
Abbreviations
K: knit
P: purl
rpt: repeat
st(s): stitch(es)
P1tbl: purl stitch through the back of the loop
K1tbl: knit stitch through the back of the loop
Alteration notes
It is really easy to adjust this Hat to fit different sizes or accommodate different gauges of yarn. All you need is to cast-on with a multiple of 4 sts – check your gauge, measure the head of the recipient, and allow an inch or two of negative ease (i.e make the Hat smaller than required so it fits snuggly)
General note
The Hat is worked in K1tbl, P1tbl rib which is tight to knit, and tight as a fabric. This is deliberate and is done so that the tube can be folded up, and the inside of the Brim be the same fabric as the Body.
You may prefer to work a K1tbl, P1 rib, which is kinder on the hands and provides more give, but the fabric will look different if you go for a folded Brim option.
How to
Using Alternate Cable cast-on method cast on 120 [140, 160, 180] sts.
Join in the round, being careful not to twist sts.
Place stitch marker to indicate start of round.
Brim & Body
Rnd 1: *K1tbl, P1tbl; rpt from * to end
Repeat this round until work measures approx. 8 [9, 10, 11] in/20.25 [22.75, 25.5, 28] cm
Crown
Fold work in half so that WS are together and perform either 3-Needle bind-off or Crochet bind-off to close the top.
Finishing
Weave in all ends. A gentle wash and blocking is recommended; avoid over-stretching the Hat.
Enjoy!


I mean, a Hat is a head case, yes? As in, it's a case for a head?
Here's Aran doing his best teenager impression.
This Hat was my sanity knitting whilst I had my surgery last autumn. After what felt like a ridiculously long wait for my general anaesthetic, I then had to try and be horizontal for at least a few days by way of recovery (I failed. I'm a bad patient). And it took all of that time to knit this Hat.
I'd wanted to post this as a free pattern sooner, except I couldn't find my notes, and then the Hat disappeared. Thankfully it reappeared so I could glean everything I needed to know, and here it is.
It's pretty normal to suddenly discover Aran in the frame when we're doing a photoshoot...
... even if at times he gets a little help from his Dad.

And there are days when I wonder.....

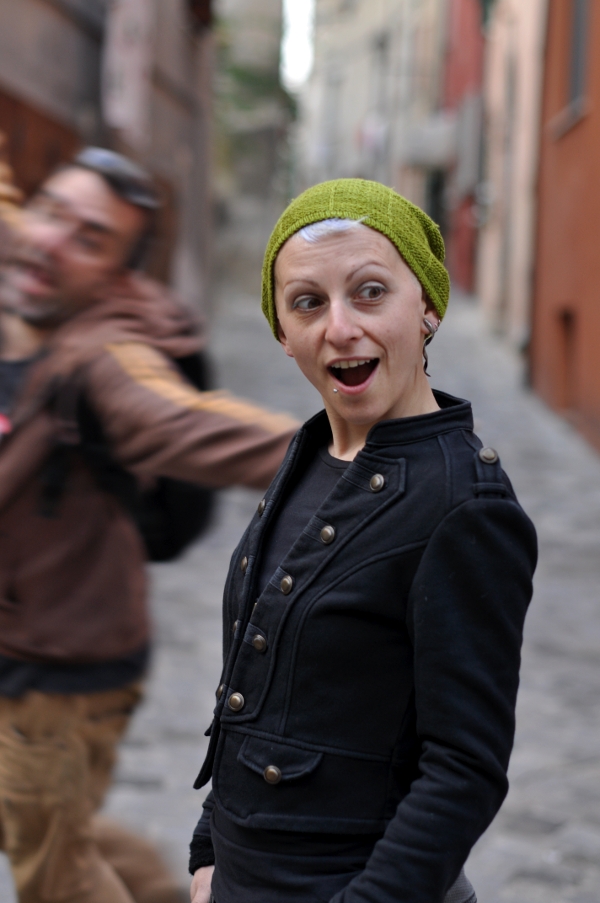
... whether I've got two kids, not one.


Description
Cornered is worked in garter stitch from the bottom up. The pattern is designed to highlight the patterning of self-striping or variegated yarn. The crown has two decrease lines directly opposite each other, both sitting at 45 degrees. The decreases angle upwards to create corners and the top of the Hat is seamed. When laid flat, the crown shape looks like a classic sock toe.
Availability
My Patreon supporters and members of The Woolly Hat Society get exclusive early access to new free patterns and tutorials. Once the exclusive period is over it’s published here on the blog.
Support
If you have a question about this pattern, pop it in a comment below. Sorry, but I’m unable to help with my free patterns or tutorials via email or private messages.
Social Media
Share your hand-knit Hats online with these hashtags!
#WWCorneredHat
Yarn
350yd/120m/100g
Sock weight, multi-plied yarn.
Needles & Notions
Set 2.75mm/UK12/US2 DPNs/Circular or size needed to obtain gauge
Stitch marker as necessary
Tapestry needle
Sample details
Shown in Koigu PPPM [175yd/160m per 50g; 100% Merino] – the sample shown used approx. 60g.
Shown in size 22in/56cm on model with 23in/58.5cm circumference head
Gauge
26 sts x 48 rows to 4in/10cm on 2.75mm needles over Garter St.
Sizes
To fit sizes: 19 [22] in/48.25 [56] cm
Finished size: 16 [18.5] in/43.75 [47] cm
Not sure which size to make? Check my handy size and measuring guide!
Skills required
Garter Stitch
Knitting in the round
Garter Stitch Kitchener stitch OR 3-needle bind-off
Abbreviations
K: knit
P: purl
rpt: repeat
st(s): stitch(es)
SSK: slip next 2 sts knitwise, then knit these 2 sts together through the backs of the loops
k2tog: knit next 2sts together
Body
Using Cable cast-on method, cast on 104 [120] sts. Join in the round, taking care not to twist the stitches. Place stitch marker to indicate the start of the round. (hint: I generally work a purl row flat onto a cable cast-on then join in the round - gives a nicer edge to the garter stitch)
Rnd 1: Knit all sts
Rnd 2: Purl all sts
Work these 2 rounds, creating garter stitch in the round, until work measures 4.75 [5.5]in/12 [14]cm from cast on edge, ending after a purl round.
For this Hat I used a fairly equal mix of brown and blue sock yarn, in pretty random stripes. I didn't follow a specific striping formula, I simply changed colour when I felt like it. The only thing I did was to change colour on a purl round, as I like the effect it gives. For your Hat you could use one colour or five - it's entirely up to you!
On the last round of the Body it might be helpful to add an additional stitch marker at the 60st/halfway point - this will allow you to work the crown shaping with less counting.
Crown
19in size start at Rnd 9; 22in size start at Rnd 1.
Rnd 1: [k2tog, K56, ssk] twice (116 sts)
Rnd 2 & all even rounds: Purl all stitches
Rnd 3: [k2tog, K54, ssk] twice (112 sts)
Rnd 5: [k2tog, K52, ssk] twice (108 sts)
Rnd 7: [k2tog, K50, ssk] twice (104 sts)
Rnd 9: [k2tog, K48, ssk] twice (100 sts)
Rnd 11: [k2tog, K46, ssk] twice (96 sts)
Rnd 13: [k2tog, K44, ssk] twice (92 sts)
Rnd 15: [k2tog, K42, ssk] twice (88 sts)
Rnd 17: [k2tog, K40, ssk] twice (84 sts)
Continue in this manner, decreasing 4 sts every other round, until you have decreased half the stitches - and have 52 [60] sts remaining - ending after a decrease round.
The Crown can get rather awkward, as you're creating angled flat corners - you may find it easier to work the stitches parallel on 2 circs or 3 DPNs rather than try to continue working on a more circular set up.
Finish
To close the top, K 26 [30] and lay the Hat flat. Then proceed to work kitchener for garter stitch to close the top. You only work half the stitches before closing the top, as this sets up the stitches perfectly for garter stitch grafting. If you don't fancy grafting, you could turn the work inside out and use a 3-needle bind-off, or alternatively, I think a crochet bind-off looks pretty neat with garter stitch.
Weave in all ends. Blocking isn't necessary.

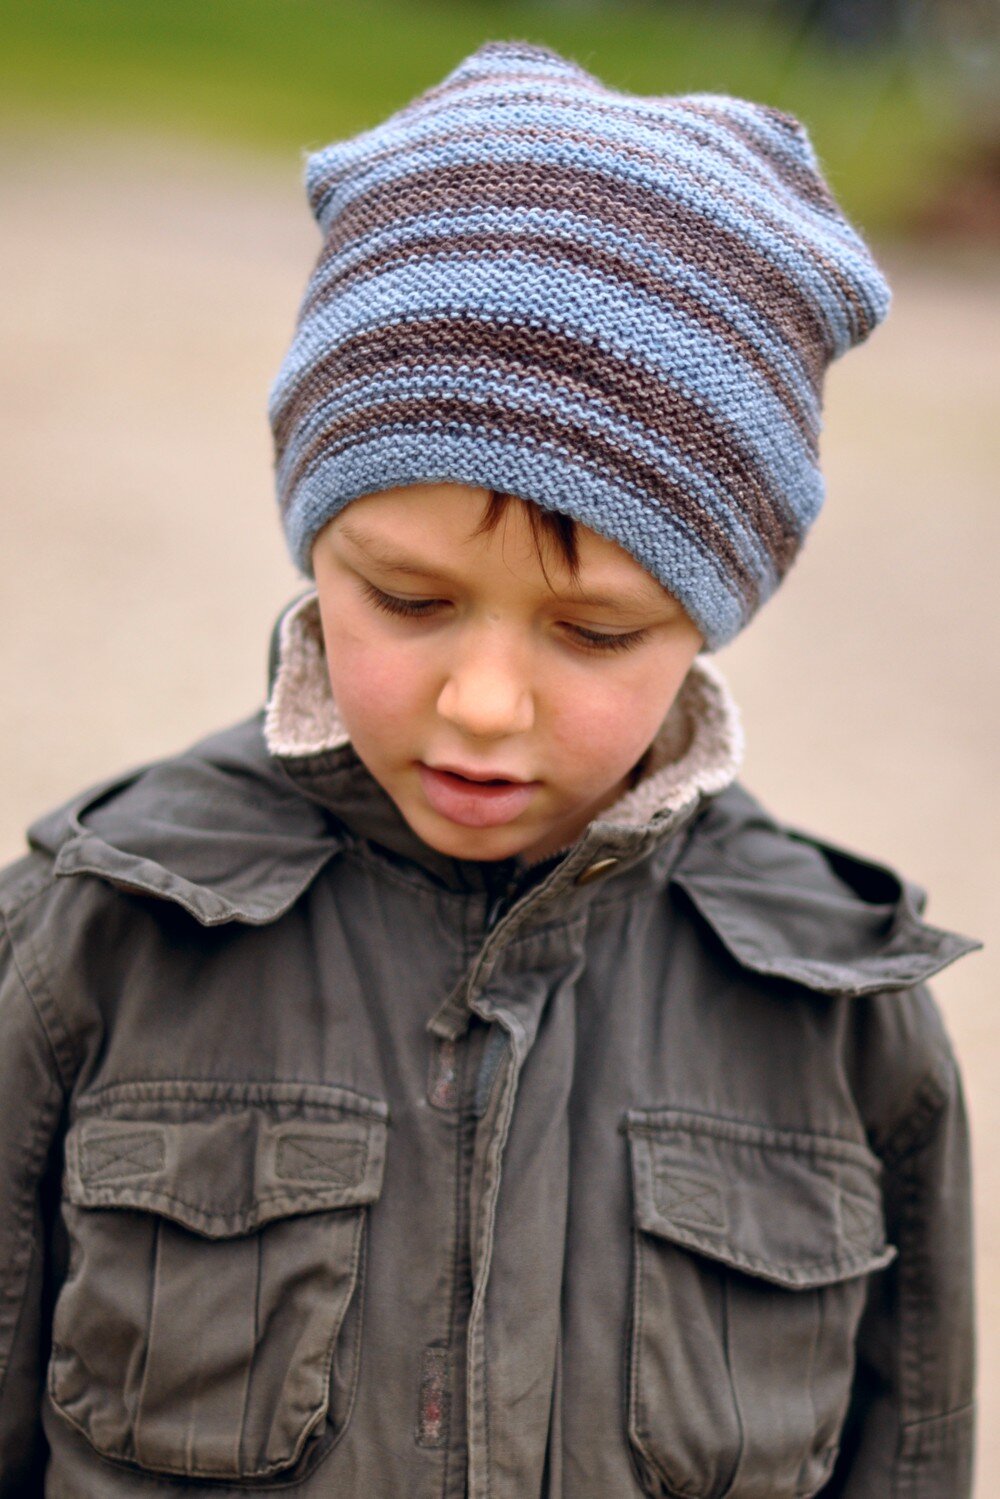

Life has continued to be turbulent, and has required yet more sanity knitting. And you know what sanity knitting means, yes? Yup indeedy, it means Aran has another new Hat and there's another freebie pattern to be published.
Not that Aran needs any more Hats.
Garter stitch has to be one of the most soothing and relaxing stitches going, and it was the perfect choice for this Hat and my sanity. Given that it's knit in sock yarn then it's the perfect knitting for a night or two infront of the TV. 'Cos we all need those from time to time.
This is the quick version of the pattern: the fuller version (with other sizes) is coming in the near future!
This finished Hat is a little big for Aran, but that's cool, he'll grow into it. As there are sharp corners on a garter stitch ground he does get that little 'ears' effect. However, with more negative ease, the Hat will be stretched out and the pattern at the Crown becomes much more evident, a hint of which can be seen in the photo above.
It's a very simple construction but pretty effective, methinks. The ideal way to use up odds and ends of sock weight yarn.
Changing the size is super easy - you want a multiple of 4 sts, and don't forget to factor in a fair bit of negative ease; 3+in is ideal for this Hat. I'd still check your gauge and if it alters, a quick bit of maths will set you straight :)
Although Aran is much better, he's still off school as his kidneys aren't functioning 100% yet and his immune system is still compromised. It's been a long recovery; we were discharged from hospital on 7th January, a whole month ago. He's been having weekly tests, and this thursday he's another bunch of blood and urine tests, and we're hoping they'll give us the OK for him to start hanging out with the hoards of little people again.
I'm still working part time while Aran is off; I've managed to conquer my pile of pattern writing and now a mountain of admin awaits. Methinks I'm only about 6 weeks behind now? It's always tough trying to balance working from home and a poorly kid, but we're getting through it.

Description
Mister Hat is a pixie Hat worked from the top down. It starts with an I-cord and the body is knitted in stocking stitch. It has a rolled brim.
Availability
My Patreon supporters and members of The Woolly Hat Society get exclusive early access to new free patterns and tutorials. Once the exclusive period is over it’s published here on the blog.
Support
If you have a question about this pattern, pop it in a comment below. Sorry, but I’m unable to help with my free patterns or tutorials via email or private messages.
Social Media
Share your hand-knit Hats online with these hashtags!
#WWMisterHat
Let's make a Mister Hat!
Yarn
220yd/201m/100g
Aran weight, single ply yarn.
Needles & Notions
Set 4.5mm/UK7/US7 DPNs/Circular or size needed to obtain gauge
Stitch marker as necessary
Tapestry needle
Sample details
Shown in Cascade Souk [220yd/201m per 100g; 55% Wool. 45% Silk]
Shown in size 21in/53.25cm on model with 21in/53.25cm circumference head. Sample shown weighs 46g.
Gauge
18 sts x 24 rows to 4in/10cm on 4.5mm needles over St.St.
Sizes
To fit sizes: 18 [21, 24] in/45.75 [53.25, 61] cm
Finished sizes: 16 [18.75, 21.5] in/40.75 [47.75, 54.5] cm
Not sure which size to make? Check my handy size and measuring guide!
Skills required
Stocking Stitch
Knitting in the round
Abbreviations
K: knit
P: purl
rpt: repeat
st(s): stitch(es)
SSK: slip next 2 sts knitwise, then knit these 2 sts together through the backs of the loops
Brim/Body
Using the cast-on method of your choice, cast on 72 (84, 96) sts. Join in the round, taking care not to twist the stitches. Place stitch marker to indicate the start of the round.
Knit every round, creating stocking stitch in the round, until work measures 5 (6, 7) in/ 13 (15.25, 17.75) cm from cast on edge.
Crown
18in size jump to Rnd 9, 21in size jump to Rnd 5 & 24in size start from Rnd 1
Rnd 1: *K14, ssk; rpt from * to end (90 sts)
Rnd 2 and all even rounds: Knit all stitches
Rnd 3: *K13, ssk; rpt from * to end (84 sts)
Rnd 5: *K12, ssk; rpt from * to end (78 sts)
Rnd 7: *K11, ssk; rpt from * to end (72 sts)
Rnd 9: *K10, ssk; rpt from * to end (66 sts)
Rnd 11: *K9, ssk; rpt from * to end (60 sts)
Rnd 13: *K8, ssk; rpt from * to end (54 sts)
Rnd 15: *K7, ssk; rpt from * to end (48 sts)
Rnd 17: *K6, ssk; rpt from * to end (42 sts)
Rnd 19: *K5, ssk; rpt from * to end (36 sts)
Rnd 21: *K4, ssk; rpt from * to end (30 sts)
Rnd 23: *K3, ssk; rpt from * to end (24 sts)
Rnd 25: *K2, ssk; rpt from * to end (18 sts)
Rnd 27: *K1, ssk; rpt from * to end (12sts)
Rnd 29: *ssk; rpt from * to end (6 sts)
Rnd 31: *ssk; rpt from * to end (3sts)
Now work an I-cord for approximately 2.5in/ 6.25cm. Break yarn and draw through remaining 3sts, tighten to close.
Finish
Sew down I-cord to form loop at Crown. Weave in all ends. Blocking isn't necessary, however should you wish, a light blocking will help the stitches settle. However, do note that to ensure a good fit, the gauge above should be treated as a post-blocking gauge if you intend to block your Hat.
I've been back a few days now from my long trip and UK tour, and while I'm still settling back in and unpacking and gathering together all the brilliant things that happened and the photos to prove it, I thought I'd share a quick free pattern.
This Hat uses a skein of Cascade 'Souk' that was given to me by the lovely Katya Frankel at the first Rocking Kitchen retreat (organised by Ruth Garcia-Alcantud and Joeli Caparco). It was pretty evident what this skein wanted to be, and so it became my sanity knitting towards the end of my trip (it was needed; almost a month away from Tom and Aran was *too* long)
And there we have the Mister Hat!
I was in two minds about writing this one up, as there are tonnes of simple beanies like this out there. But a) it's my habit to write up every Hat I knit, and it's a hard habit to break. And b) having recently taught my Increases/Decreases class, I thought this was a good example of how different placement of decreases affects the style and structure of a decrease pattern, especially when stacked like this. And also having recently taught my Hat Design workshop, this Hat is a good example of how a slight change to the decreases ratio affects the overall shape. So there!
I've lots to share from my trip, and still lots of unpackcing and admin to do. With any luck some sense of normality should be with me sometime next week. This pattern will eventually be available as a PDF download, as I know how valuable that is to folks who don't have regular internet access, but that's going to have to wait a while, I'm afraid :)
In the meantime, the Mystery Hat-A-Long is in it's last week! Next week I send out the final pattern, and with that it will revert to it's full price. If you want a bargain pattern, with extras that *won't* be included in the final file, then you'd want to grab yourself a copy of the Mystery Hat by next Tuesday, 26th (official end of MKAL is 27th November). There are some notable extras, including a bonus Crown option and notes on how to work an after-thought Brim, as well as all the formulas for size vs gauge when using different yarns.


