

My favourite cast-on for ribbing is absolutely the Alternate Cable cast-on. Since I've been teaching it, and including it in my patterns, I've learnt that it isn't a very well known method, which surprises me, especially as it is so much quicker and easier than any of its tubular cast-on cousins.
I think one reason for it being relatively unknown is that it's related to the Cable cast-on, which often seems to get a bad press. Why, I'm not really sure, but I've heard many knitters complain that it's strong edge is too rigid (especially for Hats) but that's so not true! Give it a gentle tug and it slackens up to the same tension as the knitting it supports. It might not stretch through 5 inches, but would you really want it to? Personally, I think the Cable cast-on has so many merits – it's strong, neat, can be used to cast on mid-row, is the perfect technique for picot cast-ons and much more.
I digress :) So yeah, I'll always recommend the Alternate Cable cast-on for 1 by 1 ribbing. It's fab, quick, stretchy and gives a wonderfully neat edge.
But what about a 2 by 2 ribbing?
Well, we can use the Alternate Cable cast-on for that, too.
Essentially, with the AC cast-on, we're casting on consecutive knits and purls, creating the 1 by 1 pattern directly into the cast-on. Which is why it's so quick and easy, as it eliminates the need for all those other steps. So, you may think, shouldn't a 2 by 2 ribbing simply be a matter of casting on 2 stitches knitwise, then 2 stitches purlwise, and so on and so forth? Well, let me show you what happens if you do that....
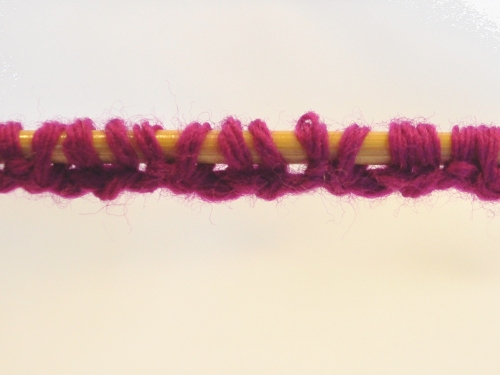
These are the cast-on sts, whereby 2 stitches have been cast on each knitwise then purlwise consecutively. They don't look very neat, do they? No rib pattern emerging.
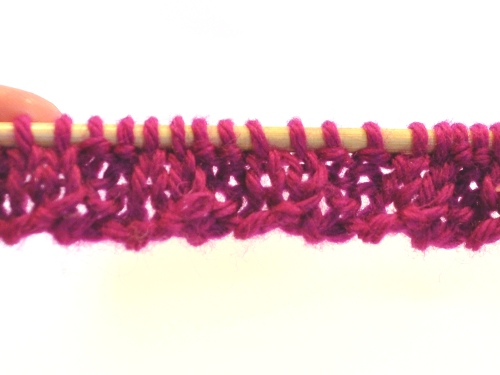
And here it is after a few rows. I didn't knit any more and ripped it out – no point in wasting yarn. And this is where we are reminded that sure, a knit stitch is a knit stitch, but how it looks is also affected by the stitches that surround it.
After that fail, it may seem that a 2 by 2 AC cast-on isn't going to be so easy, but really, it isn't so difficult. In fact, we do pretty much the same with the AC 1 by 1 cast-on as we would other tubular cast-ons to get a 2 by 2 effect – we juggle stitches.
For this blog post, I won't start from scratch with the basics of the Alternate Cable cast-on – I'll direct you to the main tutorial for that, else we'll have way too many photos in this post!
So, we'll start with our 1 by 1 Alternate Cable cast-on:

As you'll have noted from the Alternate Cable Cast-on tutorial, I treat the first slip knot of the cast-on as a purl stitch, and after casting on the required number of stitches (including that first knot), the last stitch cast on will be a knit stitch. I then work the first row flat, and join after that. It makes the first round sturdier, less likely to twist, and makes a much neater rib, as well as putting a knit stitch at the beginning of the round, which we're most familiar with.
For a 2 by 2 rib, if we're working in the round, we want a multiple of 4 stitches.
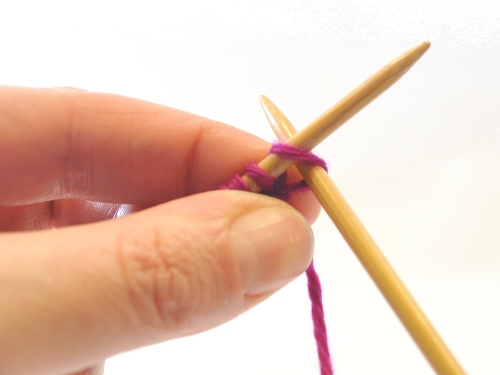
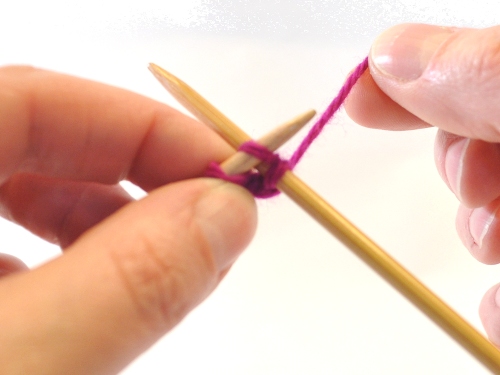
Our first flat row: knit the first stitch.
The next stitch we come to is a purl stitch, so before we do anything else, we want to swap that stitch around with the knit stitch following it.
This is a simple trick to do – you could use a cable needle but that would get way too fiddly. Instead, we'll do it with the tips of our needles. Simply insert the tip of the right needle into the second stitch along, from the front, and slip both stitches off the needle. As you do this, use the tip of the left needle to grab the purl stitch from behind as it falls off the needle – once that's safely back on, we can slip the knit stitch back onto the left tip, where it will now be in front of the purl stitch.
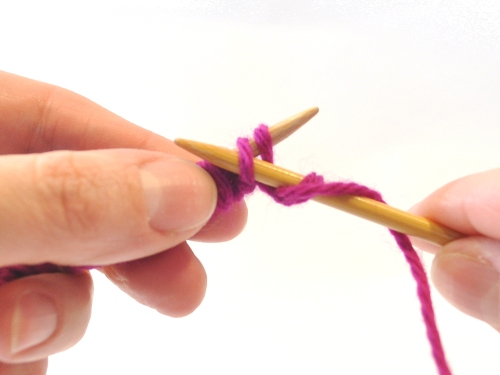
In short, you've just performed a “slip one stitch onto a cable needle and hold at back of work, knit the next stitch and purl the stitch from the cable needle” on your cast-on. Which is cool. But if cables make you wary, it's best not to think of it like that. You've simply repositioned a purl stitch and a knit stitch to be in a better place!
(My yarn got a bit wayward when I took these photos, and it wouldn't normally be hanging between the stitches like that. I'll try and get fresh shots for the PDF. In this photo the yarn is in position to purl, whereas we really want it at the back, to be in position to knit.)
Then proceed to knit the next stitch....
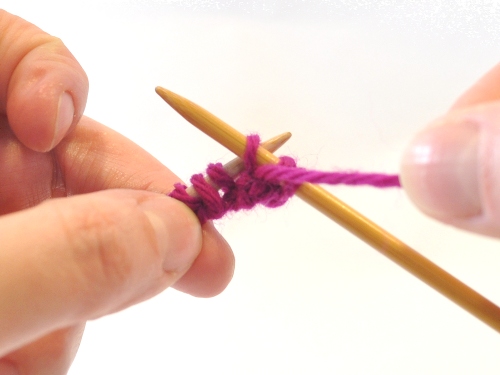
...and purl the following 2 stitches. The first 4 stitches of your 2 by 2 rib have now been worked! And already it's starting to take form, can you see?
You'll then want to start the repeat all over again by knitting the next stitch, swapping the next 2 stitches, knitting 1 then purling 2. It's pretty simple once you get the hang of it, especially if you learn to identify how the knit and purl stitches look in the cast on (not dissimilar to how they normally look, which helps!)
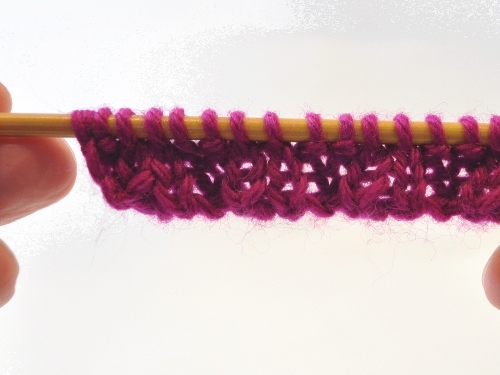
And here it is after a couple of rows, looking much more like the sort of edge we'd like. As with a regular AC 1 by 1, I'd join after the first row if you're knitting in the round. Depending on your tension, you may find you prefer the look of one side to the other, but they generally even up once your body of work grows.
In case that pink yarn is a little too pink and doesn't really show the detail, here is the AC 2 by 2 rib on a Hat I knit recently for a new collection:

Looks pretty good, huh? Under duress you may find the 2 by 2 isn't quite as stretchy as the 1 by 1, but you really won't notice that when you're wearing it – the difference is hardly noticeable. It provides more than enough stretch for a ribbed brim and looks pretty nifty, too.
And I'll leave you with that for today! If there's anything you're not sure about here, or would like further clarification with, leave a comment and I'll do my best to answer your questions.
Enjoy!
Support
As always, if you have a question about this technique or need some help with it, leave a comment below! I’m afraid I’m unable to offer help via email or private message, but you’re welcome to post in our forums.


