
The image shows the crown of my Castiel Hat pattern. It features the post title “Hat Masterclass - Shape, Structure and Fit”.
In my previous article about crown shaping, I mentioned how various multiples - and their subsequent decrease ratios - affected the overall structure and style or shape of a Hat. The reason I start at the crown when I start a new Hat design is to ensure that the overall structure will work, and that the design will have continuity throughout. To be able to understand structure, shape and fit, we need to think about the different parts of a Hat and the numbers that determine them.
First though, let's look at the anatomy of the Hat and how each part affects shape.
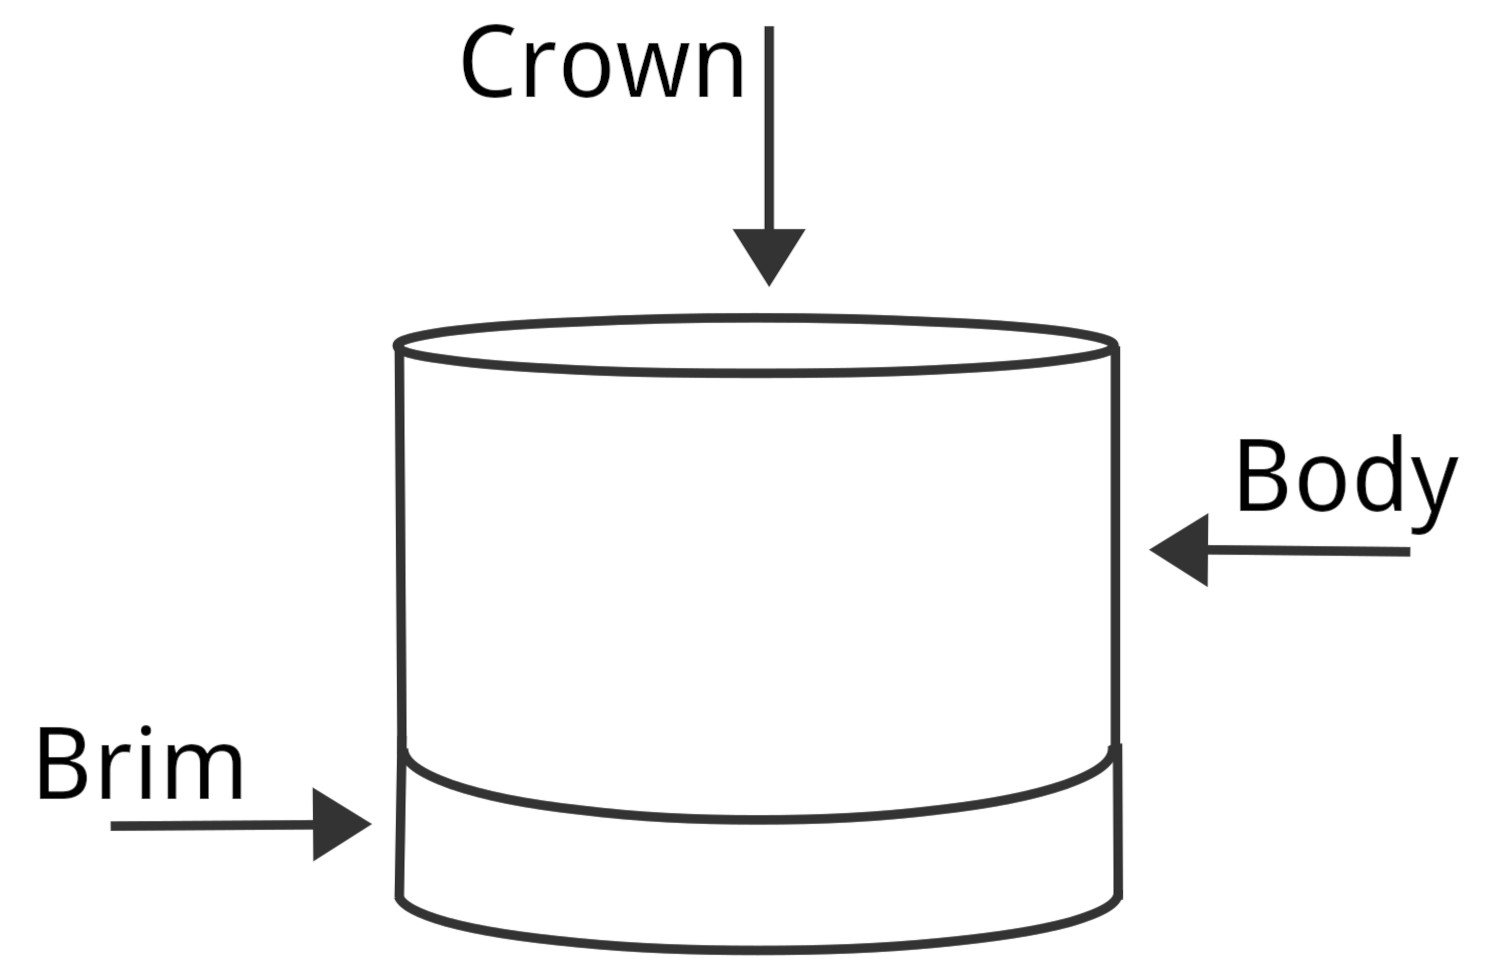
Schematic labelling the 3 main parts of a Hat - the Brim, the Body and the Crown
The Brim – has limited determination on shape and structure compared to the crown and body, but is crucial for fit. How snug would we like our Hat to be, how much negative ease?
The Body – works with the crown to determine overall shape, and is the link between the structures of the brim and the crown. Will it be lose and slouchy or snug and fitted? Tall and tapered?
The Crown – this is the area that determines shape and structure more than anything else. Will it be pointy, square, gathered, flat or round?
About Ease
Ease is really important when it comes to fit, and we can't talk about Hat shape without mentioning it!
To keep a knitted Hat on our heads, it needs to be smaller than our head. Make your Hat the same size and it'll likely fall off. This is what's known as negative ease – when a garment or accessory is smaller than the body part it will fit.
For a Hat, I would usually recommend somewhere between 2in to 3in/5cm to 7.5cm, or around 12.5%. But it depends. A beanie with 4in/10cm of negative ease or more is going to look very sporty, whereas a slouchy Hat with 2in/5cm of negative ease or less is going to appear very casual. Overall intent of style plays a part, as does comfort. Accommodating hair plays a big part too; those with short hair and/or simple styles may be more comfortable with a closer fitting Hat, whereas a looser Hat often preserves hair styles better (i.e. avoid Hat-head). Purpose, too, is another important factor – keeping out wind chill and endurance in rougher climates demands more negative ease.
The Crown in relation to shape
We've learnt that different decrease ratios will affect the crown, and the crown is one of the key parts of the Hat that determines the style. For instance, a slow decrease ratio of less than 3 sts decreased per round (on average) will give us something pointy, like a pixie Hat. The less stitches decreased on average, the steeper the slope gets and the pointier the Hat.
The same is true when we decrease more rapidly. Decrease on average 4 sts per round and you'll get a flat circle that sits perfectly on top of a close fitting Hat like a beanie. Up the ratio slightly, and you'll move through berets and then into gathered crowns, with the latter working on anything above an average of 8 sts decreased on average, and which would work perfectly for a slouchy Hat.
Once we know the shape of crown that we'd like, and the ratio of decreases to create that, we treat that as our structural multiple, and if we're working bottom up we would work backwards. If we don't know yet how we'd like the Hat to finish then we'll work with a number that allows different options (a multiple of 12 gives us all the possibilities, with a 24 being the ultimate magic number!)
Working backwards – considering the Brim in relation to the Crown
The brim will have a solid relationship with the crown, and it's this area where we first consider fit. The brim of a knitted Hat is the most important part as far as gauge and ease is concerned, as it's the part that keeps the Hat on the head!
If we're working towards a beanie style Hat, a half-dome or watch cap style, then the brim will work on the same multiples as the crown. With this style of Hat we are simply creating a tube with a circle on top, with no other shaping besides that of the crown.
If we're working towards a beret style, then the crown multiple is relevant for the start of the body, for the increase round immediately after the brim, and so to determine the brim multiple we need to take our working backwards one step further. In the previous article I mentioned that the common increase formula for a beret from the brim into the body is K2, M1 (where M1 is a lifted bar increase), i.e. an increase of 50% from the brim into the body – berets always seem to follow this rule. To work backwards from the crown, we want to reduce the crown multiple by 33% to get the same ratio. So for instance, if our crown works on a multiple of 6, the brim will work on a multiple of 4. This is where it gets awkward with some numbers, and we might need to go back and reconsider our crown structure, as not all number will happily lose 33%! There are of course ways around this, and we can invent a multitude of formulas to make it work, but to fully understand the concept we want to try and keep the numbers straightforward.
If we're working towards a slouchy style, something that has a little room in the body but not as much room as a beret, and something less hugging than a beanie, then the same applies – the crown multiple is relevant for the body, immediately following the increase round after the brim.
This time though we won't need to increase as many stitches after the brim, and I would normally increase somewhere between 20% up to 33%, depending on how lose I'd like the fit and shape of the Hat to be. Again, we would work backwards but we have room to adjust the figures to our needs here – a crown multiple of 8 could equate to a brim multiple of 6, for instance. That's a 33% increase from brim to body/crown. A slouchy Hat is much more flexible in numbers, and is a lot easier to design and knit because of this. Or a multiple of 9 at the crown could be a multiple of 7 at the brim (and that combination makes for a pretty interesting Hat structure...)
Bringing it all together in the body
Having determined our brim and crown structures, we can start to think about the body shape. Although the crown determines the overall structure, the body still plays an important part in determining style. Yes, the crown will determine whether we have a pointy, flat or gathered finish, and will determine the mathematical structure of the whole Hat, but the body determines whether we will have slouch or length or height.
Slouch is determined by two things – length, width, or both. We either increase after the brim (hence a beret automatically looks slouchy, as we increase 50%), work a longer length than normal before starting the crown decreases (extra long beanies are a good example of this) or we do a little of both (the slouchy Hats currently in fashion generally follow this rule). By knitting for longer, you're creating more fabric, just as you would be in your increased stitches, only in a different place. How and when you create that extra fabric determines your style.
Conclusion – common themes and differences
The main differences between beanies, berets and slouchy Hats are determined by the different parts of the Hat, as described.
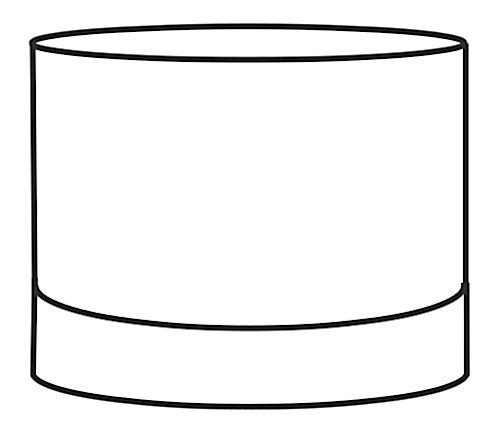
Diagram 2: schematic of a beanie
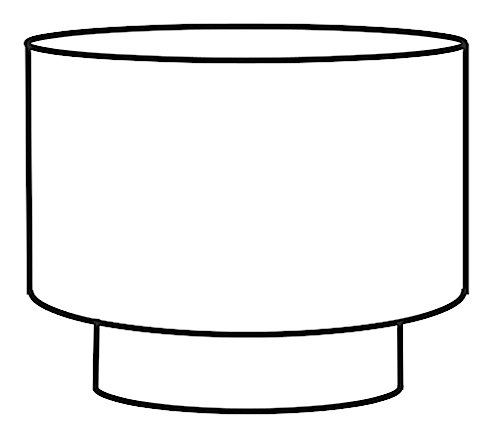
Diagram 3: schematic of a beret
A beanie, shown in diagram 2, will flow smoothly and simply from the brim into the body, which then flows into the crown. All parts of the Hat work on the same mathematical structure, and a good design will make the most of this. The brim and the body together form the cylinder of the Hat, and the circle atop is the crown. The length of the cylinder generally works out to be about two thirds of the overall length, although row gauge will affect this. The brim and body of a beanie will both have negative ease.
A beret, shown in diagram 3, shares some structure with a beanie – although it is two cylinders of different diameters (the brim and the body) the total length of the those together will be the same as a beanie. What makes a difference is the much larger circle at the crown, due to the 50% extra stitches. This adds extra length to the Hat, and the additional stitches add the room. The brim of a beret has negative ease and the body has positive ease.
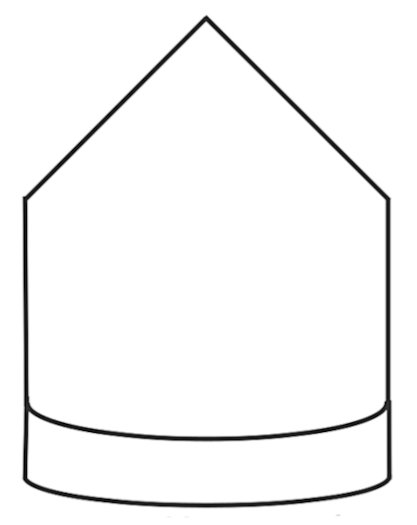
Diagram 4: schematic of a pixie Hat
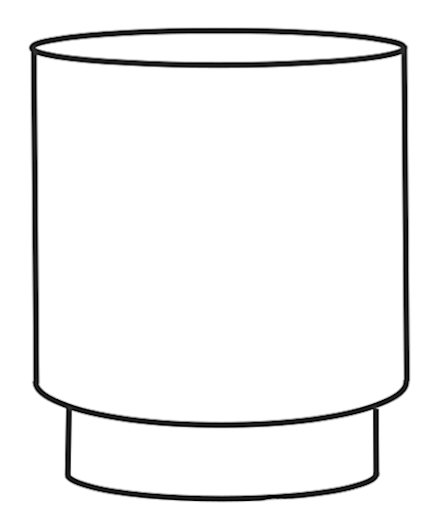
Diagram 5: schematic of a slouch Hat
A pixie Hat too shares a similar structure with a beanie, with the key difference being the crown. Invariably the brim and body form the cylinder (although they can of course be different stylistically, and use different stitch patterns) but instead of a circle at the top of the cylinder, we have a cone. Personally, I tend to make the length of the Hat before starting the crown shaping (the cylinder) shorter than that of a beanie, so that the point on the Hat is softer, and it will also be less likely to flop over. The brim and body of a pixie will both have negative ease.
A slouchy Hat can be any of the above, or none of them. It can be two cylinders or one, it can have a flat crown (a circle) or a gathered crown or even a pixie Hat – I have designed and published more than one pattern for a slouchy pixie Hat! The brim of a slouchy has negative ease and the body has positive ease, but not as much as a beret. It's not really surprising that slouchy Hats have become so popular; they're easy to wear, but they're also easier to design as the maths is more flexible and forgiving, and they allow for much more experimentation. They don't fit the traditional rules of knitted Hats.
this article was originally published in issue 98 of the Knitter, Spring 2016
There's a lot more involved in designing a Hat than I've shared here! If you’re interested in learning more, I’ve a number of self-paced, downloadable online classes all about Hat design, and you can find them all in my Hand Knit Hat Academy!

Description
The Caterpillar Slouch is a squishy soft, slightly slouchy beret. It starts with a twisted rib brim and the body is worked in fisherman’s rib. The body is fairly long and the crown decreases evenly for a casual and cozy fit.
Availability
My Patreon supporters and members of The Woolly Hat Society get exclusive early access to new free patterns and tutorials. Once the exclusive period is over it’s published here on the blog.
Support
If you have a question about this pattern, pop it in a comment below. Sorry, but I’m unable to help with my free patterns or tutorials via email or private messages.
Social Media
Share your hand-knit Hats online with these hashtags!
#WWCaterpillarSlouch
Yarn
246yd/225m/100g
DK weight, plied yarn.
Needles & Notions
Set 3.75mm/UK9/US5 DPNs/Circular or size needed to obtain gauge
Stitch marker as necessary
Tapestry needle
Sample details
Shown in Martin's Lab Comfy DK, shade 'Caterpillar' [246yd/225m per 100g; 100% Superwash merino]
Shown in size 22in/55.75cm on model with 21.75in/55.25cm circumference head
Gauge
24 sts x 32 rows to 4in/10cm on 3.75mm needles over Twisted Rib
Sizes
To fit sizes: 18 [22] in/45.75 [55.75] cm
Finished size: 16 [18.75] in/40 [46.75 ] cm
Not sure which size to make? Check my handy size and measuring guide!
Skills required
Knit & purl sts
Knitting in the round
Knitting into the row below (brioche)
Abbreviations
K: knit
P: purl
rpt: repeat
st(s): stitch(es)
K1tbl: knit stitch through the back of the loop
K1bl: knit stitch through row below
SSK: slip next 2 sts knitwise, then knit these 2 sts together through backs of the loops
Note
This Hat is easily adjusted for size. The design works on a multiple of 16, and you can cast on more or fewer stitches, depending on your gauge – as long as the number is divisible by 16.
Additional length can be added before the crown shaping for more slouch. As the fisherman's rib is a wide cosy stitch, there is no need to add additional stitches after the brim for width – the stitch pattern does this naturally.
How to
Using Alternate Cable cast-on method, cast on 96 [112] sts. Join in the round, being careful not to twist sts. Place stitch marker to indicate start of round.
Brim
Now work K1tbl, P1 rib until work measures 1.25 [1.5] in/3.25 [3.75] cm.
Next Rnd: Purl all sts
Body
Rnd 1: Knit all sts
Rnd 2: *K1bl, P1; rpt from * to end
These 2 rounds form the fisherman's rib pattern.
Work in pattern until body measures 3.5 [4.5] in/9 [11.5] cm, excluding the brim, ending after a Rnd 1.
Crown
18in size jump to Rnd 5, 22in size start at Rnd 1.
Rnd 1: *ssk, [K1bl, P1] 6 times; rpt from * to end [104 sts]
Rnd 2 & all even rounds: Knit all sts
Rnd 3:*ssk, P1, [K1bl, P1] 5 times; rpt from * to end [96 sts]
Rnd 5:*ssk, [K1bl, P1] 5 times; rpt from * to end [88 sts]
Rnd 7: *ssk, P1, [K1bl, P1] 4 times; rpt from * to end [80 sts]
Rnd 9: *ssk, [K1bl, P1] 4 times; rpt from * to end [72 sts]
Rnd 11: *ssk, P1, [K1bl, P1] 3 times; rpt from * to end [64 sts]
Rnd 13: *ssk, [K1bl, P1] 3 times; rpt from * to end [56 sts]
Rnd 15: *ssk, P1, [K1bl, P1] 2 times; rpt from * to end [48 sts]
Rnd 17: *ssk, [K1bl, P1] 2 times; rpt from * to end [40 sts]
Rnd 19: *ssk, P1, K1bl, P1; rpt from * to end [32 sts]
Rnd 21: *ssk, K1bl, P1; rpt from * to end [24 sts]
Rnd 23: *ssk, P1; rpt from * to end [16 sts]
Rnd 24: *ssk; rpt from * to end [8 sts]
Break yarn and draw through remaining 8 sts, tighten to close.
Finishing
Weave in all ends. Blocking isn't necessary but is recommended to help the crown shaping settle - block gently to avoid stretching the Hat.
Enjoy!


Earlier in the year I mentioned some yarn that was sent my way from a new indie dyer. Well, during our travels over the summer I was able to (gently) knit a new Hat for Aran with the brightest of the yarns; a cosy comfy Hat that he could grow into.
A fisherman's rib Hat is the perfect Hat for a lively yarn like Marcin's Caterpillar, and it'll make for perfect TV or travel knitting. One skein is all you need for any of the sizes, and there's enough left in the skein to add a bit of extra length, should you prefer.
Fisherman's rib is very room and yardage thirsty, hence it'll make a very stretchy Hat - this one is a little big for Aran I think, and it fits me, so there's plenty of room for him to grow into it! And as Fisherman's rib naturally adds width, there's no need to add extra stitches to encourage the slouch - it does it all by itself.
I really enjoyed working with the Comfy DK from Martin's Lab - it has a generous yardage and is soft and pliable. I'm slowly hatching plans for the other skeins in my stash... I'm thinking something more for Aran and Ivy-Mae, given that the bright colours and superwash yarn hint towards kids Hats.
Don't forget though that even thought I design kids Hats and model them on kids, they nearly always go up to adult sizes! Aran will be 9 in March, and he has a 21.75in circumference head - that same size as the average adult female - so if it fits him, it'll likely fit you, too.
Photoshoot responsibilities are firmly in Tom's corner for the foreseeable future, thanks to my frozen shoulder, and yesterday afternoon saw us shooting a few shots with him trying to emulate my style. Tom's often done photography work for me, and now that the camera is very much in his hands I think he's starting as he means to go on!

This Hat in need of a name will be published in December. The sample is knit in Snail Yarn aran, which I picked up at the Swiss Wolle festival last year. It's a squishy, cosy yarn with lovely deep and subtle colouring, and is just right for the brioche and garter combo.


Can you help name this Hat? There'll a free copy of the pattern for you when it's published, and another single pattern of mine of your choice.
Only thing is, is that I need to get the pattern to the printers sunday night, monday morning at the latest! Although it's not due for release for another 4 weeks, I need some pattern samples in a couple of weeks for an event, and that means getting it to the printer sharpish.
I'll leave this open for 48hrs - simply leave a comment on this blog post (not Twitter, IG or FB - sorry!) and I'll pick a winner sunday evening (about 6pm GMT). Don't forget to tell me your Ravelry name, your choice of 2nd pattern, and in the email field (which won't be public) let me know where I can get hold of you.
Fire away, and I look forward to hearing your suggestions!
Indeed you can pop over and listen to myself and Nadia chatting about all sorts!

We recorded the interview in the magnificent ballroom that I taught in, which does give it a bit of an echo, but don't let that put you off. We had a good laugh whilst recording, and it really was a fun thing to do.
(shall I confess that we sat on the floor inside a large wardrobe unit within the ballroom to reduce the echo? We tried sitting in every part of the room, and it was really the only room available to us! It's certainly a day to remember ;)
After I returned from teaching my workshops in Dublin a few weeks ago, I was asked whether a guest blog post might be of interest, to offer insight to the fabulous location (hint: it's one of my fave places to teach) and offer some feedback from workshop participants. And here we are!
----------------------------------------------------------------------------------------------
Hello Everyone! Today's blogpost is a guest post by me, Nadia (Bunnyt on Ravelry) and I'm going to take you on a journey behind the scenes at two of Woolly's Workshops. For those of you who don't know me, I have the wonderful job of working in This is Knit in Dublin, where Woolly recently held her workshops. This was Woolly's fourth time teaching with us, and we're always so excited when she comes to visit! Our customers are always eager to learn from her too, and both workshops were sold out well in advance.

Inside This is Knit.
For those of you who haven't been to This is Knit, the shop is based in the gorgeous location of Powerscourt Townhouse on South William street in Dublin 2, which is also part of Dublin's Creative Quarter. This is a striking Georgian building with both rococo and neo-classical styles under one roof and the Georgian Society tells us, that it was once used to store the wool from the Powerscourt Estate in Wicklow, before it was to be exported. With such rich history, it's a fantastic location for a family run LYS . We hosted the workshop in the old ballroom of the house, complete with antique drop glass chandelier. Oh yes, nothing but the best for our Woolly!
See, she loved the circle spotting:
Woolly filled the space with stunning Hat samples, beautifully presented notes and oodles of energy and creativity and all before the knitters came to join us. I can tell you that there was a lot of effort put into those class notes and reports from the students have been fantastic. The first 3 hour workshop kicked off with an early start and the knitters were quickly drawn in by the swatch samples of Reversible Cables. The students quickly became engaged and creative by planning how to work their reversible cables into shaping and garments. There was such a buzz, in fact, that there were people peering in the huge windows and wanting to join in!
Woolly had shared some friendly advice with our afternoon students: sugar would be required! This session was a very mathematical look at the magic behind rotating stitch patterns. "Turning Sideways" covers how turning our knitting through ninety degrees affects stitch patterns and increases/decreases, and how that we can be used to our advantage. It's not for the faint of heart, but us Irish Knitters, we are brave! Armed with chocolate, coffee and trusty needles we worked on swatches that came alive into 3 dimensional forms.
One of the best reasons to attend a Woolly Wormhead workshop (other than meeting her fabulous self) is being able to get your knitterly paws on some of Woolly's beautiful Hat samples. There were samples from Painted Woolly Toppers and the recently published Painted Woolly Toppers for Kids , in which Ivy-May steals the show for me! Go on, it's ok to stroke the screen no one is looking:
We had a little modelling show of our own too! We just couldn't help ourselves - you only get this chance once right?
How do you bring a day like this to a close? Well the lovely ladies Lora and Deirdre from Olann and Magazine popped by and had a lovely chat with Woolly and they modelled two of their personal favourites from the collection. These are the ladies behind Ireland's first dedicated fibre and craft magazine - don't they look great with their Woolly Toppers?
From left to right Lora and Deirdre from Olannand Magazine wearing Vortice and Gallone. Photocredit from Olannand with permission.
So you've heard enough from me, but what did the students themselves have to say? I nabbed a knitter, Surfguna to be exact, and here is what she had to say about her workshop:
I did the sideways knitting workshop, and I loved it. It was really fascinating to think about turning my knitting and also working out the maths to make a hat to fit me and work with the yarn I had brought. For me, one of the big "ah-ha" moments was measuring my head correctly and learning how to pick a hat size to suit. My hats tend to always end up too big, so hope that works better for me know.
I've actually cast on a hat using my maths from last weekend, and I am nearly finished. I think it's the first time I've done a workshop and actually used the skill immediately. Woolly is a fascinating and patient teacher. She took her time to explain, and explain again her concepts. Really enjoyed the whole experience.
If you want to catch one of Woolly's Workshops I hear she is going to be teaching at Edinburugh Yarn Festival in 2017, and there might be a space or two available on her workshops at Countess Ablaze and The Knit Studio this November. If you want to hear more from me, you can catch me over on CottageNotebook.ie.
If you are ever in Dublin, do stop in to meet us all in This is Knit. We'd be delighted to chat all things Woolly!
Thanks for reading and if you want to get in touch you can find me on Twitter, Instagram as @cottagenotebook and Ravelry as Bunnyt and you can catch my podcast over here too.


