It's suddenly all go around here, huh?

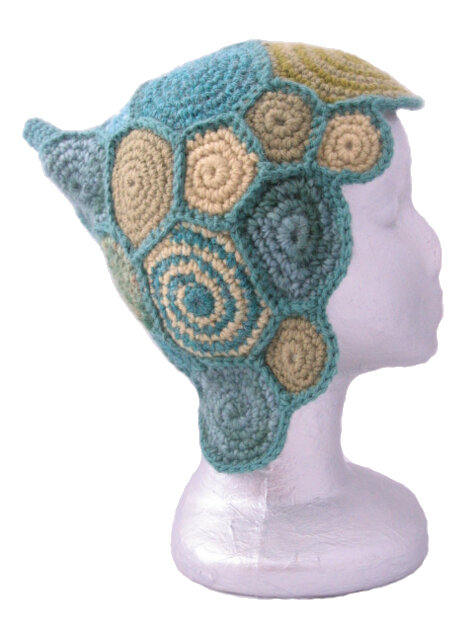
Long time readers may remember this pattern from the first time around, but don't beat yourself up if you don't, 6 years is a long time! And it looks different now too, with it's fresh modelled shots.

Indeed, Mushroom Cap was designed 6 years ago, and after only being out in the wilds for a few months, it was pulled (along with the couple of other crochet patterns I had) so I could devote time to them and bring them up to the same standard as my knitting patterns. During that time, my knitting patterns have evolved and they've all been updated/reformatted etc more than once, which meant that the standard to which the Mushroom Cap had to reach just kept rising. And in turn, it just kept waiting and waiting... I never meant for it to wait that long but it was much easier to keep going with knitting patterns, being as my understanding of crochet pales by comparison.

During that time my friend Clair of Flower Pot Tots helped me understand what my pattern needed, as she's much more proficient at crochet than most folks I know, but timing wasn't right, and it embarrassingly fell by the wayside again.

Last summer, during one of my workshops at Fibre & Clay, I had the pleasure of meeting Valerie, who tech edits for Amanda at the Natural Dye Studio. We talked, and realised that Mushroom Cap may have another chance, and may just get to see the light of day again. The other crochet patterns were no concern, but this one has stuck with me because I like it so.

This was of course during all the Bambeanies madness, yet I was good, and as soon as there was a little headspace, I got in touch with Valerie and we took it from there. And she was fantastic, especially with her patience whenever I wasn't able to respond to queries for a week or so. Crochet still isn't 2nd nature to me in the way that knitting is, and I still find it tricky to switch between the two in my head. (I've waffled at length before how languages and me don't get on... I figure this is the same kinda thing?)

And now, Mushroom Cap has been published, in all it's new spangly glory. I just love that shape, a beret-pixie hybrid! Sending the files off to Valerie was exciting enough but to see it published and ready again - amazing. This pattern sat at the bottom of my to-do list for years, and the feeling off ticking something off that's been there that long really can't be beat.

Originally the pattern had only 2 sizes, and with Valerie's help, there are now 3. She's helped me with my pattern writing and notation (I have a tendency to write crochet patterns on knit pattern style...) and improved my overall approach to crochet patterns. The pattern also comes in 2 flavours - UK and US - so everyone is catered for. It doesn't include charts, that's a whole other minefield, but we both felt that for this pattern, written format was sufficient.

I am thinking about maybe resurrecting some of my other old crochet patterns, if only to try them out and see how they work with all this new insight. I'm also keen to start playing around with a hook again (not in a freeform sense, I'm totally ok with the less disciplined nature of freeform ;) to see if I can design some more Hats with patterns in mind. But no promises - my work load is heavy enough as it is. But I am v.tempted to play, and now I know there's a fantastic crochet tech editor that I get on with, then the incentive is greater.

Posted
AuthorWoolly Wormhead
3 CommentsPost a comment

Ok, 2008 wasn't an unproductive year ;)

Whilst I was playing around looking at all the designs I did in 2008, I got a bit carried away and organised all the others by year too. It turned out to be a useful exercise - helping me keep track of what I've done and when, and also giving me something constructive to blog about!

So here's the breakdown year by year....
(Listed by the year they were written, not published, and not chronological within the year)

2007

35 designs:-  1) Arbacia, 2) Baby Tri-Peak, 3) Baby Rollin' Beret, 4) Baby Jester, 5) Baby I-Cord, 6) Coldharbour Twist, 7) Bridget, 8) Sideways Bobble Hat, 9) Pixie Flora (v1), 10) Pixie Flora (v2), 11) Lucy, 12) Windward, 13) Twinkle, 14) Trinity, 15) Sweet Winkie, 16) Strudel, 17) Strawberry Joe, 18) Reverser, 19) Rainbow Warrior, 20) Pickelhaube, 21) Marrow Joe, 22) Guimauve, 23) Gyroscope, 24) Enroule, 25) Dulcie, 26) Dryad, 27) Daisy, 28) Curlicue, 29) Centuria, 30) Carousel, 31) Candy Pi, 32) Bob Cap, 33) Bella, 34) Alfie, 35) Abalone


2006

30 designs :-  1) Bobba Hat, 2) Bobble Beret, 3) Cabled Cap, 4) Igloo, 5) Loopy Bonnet, 6) Runnin' Beanie, 7) Roadsta, 8) Trellis Beret, 9) Ribba (v1), 10) Playboy, 11) My Dear Stalker, 12) Scrappy Flapper, 13) Funky Flapper, 14) Spring Cap, 15) Sloppy Joe, 16) Spiral Play, 17) Pleated Beret, 18) Ribbed Beanie, 19) Loopy Flapper, 20) Flappy Cabler, 21) Jester Hat, 22) Handspun Beanie, 23) Tudor Cap, 24) Whirly Rib Cap, 25) I-Cord Beanie, 6) Ribba (v2), 27) Hex Hat, 28) Urchin Cap, 29) Hat of Horns, 30) Hexed


2005

4 designs:-  1) Tri-Peak, 2) Tea-Cozy Hat, 3) Slightly Loopy, 4) Rollin' Beret


Interesting, huh? 2007 yielded the most designs but I did write a book! 2005 the least, but I'd only just started and was still teaching full time. Kinda cool for me to see them all listed like this - helps my head get in order. There are a couple of crochet ones that I took down ages ago and haven't included those... I wasn't happy with the way they were written and suspected they may have an error or two. I am planning to revisit them and rework them, but that's near the bottom of a very long and impossible list.

It's taken me quite a while to compile all this so I really should get on and do something, although it's been worth it. I do really need to get focused and make good use of my time. My head's not in a good place, hasn't been for a while (could you tell?) so let's hope 2009 is year when I can finally shake the depression. At least for long enough so that I can remember what it's like not to have the dark illness...

Posted
AuthorWoolly Wormhead


The Samhain edition of the AntiCraft is up - go check it out. Such pleasure, being able to submit my weirder patterns ;)

Thanks to Amy and Carina for modelling these, for coping with being stared at in the midst of Brighton and for keeping a straight face for all of 47 seconds. More photos going up on Flickr.

Posted
AuthorWoolly Wormhead
6 CommentsPost a comment
button for patreon
All of the free patterns and tutorials on this website are supported by my amazing Patreons! If it wasn't for them I wouldn't be able to continue to produce or host freebies. We'd love to have you join us, and in return, you get exclusive behind-the-scenes material, members-only discounts and early access to new free content. Membership starts at $1 per month. You can also say thanks for the freebie via the Tip Jar.
SpiralPlay.Square.Border.BlogMain.jpg

I was meaning to do this last week, post a more in-depth read of how I've been making my spiral Hats... There isn't really a pattern as such, more a technique or way of working. Then I started umming and ahhing... did I really wanna share my secret? Not that it is really a secret, but y'know what I mean. I kinda feel a little protective of these Hats, as I reckon they're my best work to date... and would feel absolutely gutted if I found any others floating around on Etsy or wherever. But hey, sharing comes naturally.... I'd feel selfish if I didn't. Anyhow, a technique is just that; it's the creative interpretation that counts. And in the famous words of Bananarama & Fun Boy Three....

"It ain't what you do, it's the way that you do it"

Siren.Spiral.Hat.LR.jpg
Red.Spiral.Hat.LR.jpg

Right then.

Basically, the whole spiral making bit is easy. Easy peasy lemon squeezy. Use up stash oddments, go for the whole blended look, whatever. Just do keep the yarns you're using within a similar gauge range – mine are all made with either a 4, 4.5, or 5mm (US G/6 or US H/8 ; there is no equivalent to the 4.5mm) hook. If you've never made a crochet circle before, try looking here for some tips. Basically, instead of joining at the end of each round with a slip stitch, and then starting a fresh round, just keep working continuously. That way, you get the spiral look and it makes things much simpler. What appeals to me about these is that they don't have to be perfect. I do all mine in DC (US – sc)… start with a 4 chain, join, work about 8 or 9 DCs into the centre and go from there. Honest, it's easy. And it don't matter if you don't get the increases even either – blocking is a great rectifier ;)

Spiral.Tutorial.1.jpg

So. You've got some spirals made. You'll need a fair few of them, more than you think. You've gotta cover a whole head (or bag, whatever) and believe me, I always end up needing more (there are 32 on the green, 26 on the red). They take anywhere between 5 and 20 mins to make, so ideal for those times when your head just won't focus on a bigger project. I make mine all different sizes, as I like the eclectic look. The random or eclectic way suits me, as there's less brain activity involved ;)

Spiral.Tutorial.4.jpg

Now, the real trick to getting this to work is how you join them together. I tend to join them with a visible DC seam (US = SC), which ties all the colours in nicely, or you could slip stitch on reverse. What you will need though, is a bit of savvy about making them slot together to get the shape you want. Being as I'm a bit of a woolly Hat aficionado, I've got a few polystyrene heads knocking around, which really are the best tool for this job. Otherwise, join a few, try it on, adjust, etc. Or work with something else round… if you can stick pins in it, even better. Joining the shapes whilst they are on your model/mould will make a huge difference – there is a tendency to sew or join the pieces flat otherwise, so working on the model will demonstrate much clearer where pieces need to be joined (unless of course the intended wearer has a 2-dimensional head). Do juggle the pieces around to see how they fit before joining – saves you having to undo and rejoin. If you have a gap and nothing to fit it, just make another spiral.

Spiral.Tutorial.2.jpg

Now, from this point, it's up to you really. No real formula, just some tips and tricks to share. Firstly, don't worry if you have to stretch and tug to get the shapes fitting snuggly - unless you're going for a really neat look (in which case you would be working much more precisely anyhow) blocking rectifies all glitches... wool has a wonderful memory (jealous? me?). If you do end up with an accidental corner, use that to your advantage by slotting it in where you have a bigger gap.

Spiral.Tutorial.3.jpg

When I made the first red one, the Hat felt a little lumpy before blocking, and now it's so smooth and ripple free. This is another reason for keeping the yarns to a similar gauge... if you range from 4ply to chunky, some areas will distort more than others and so it won't be as smooth after blocking. Also, if you are using one of these head model thingees, it's safe to make the Hat fit the head.... normally I wouldn't suggest this, as these models are bald and so a Hat fitting these would be a little on the small size. However, as you will be blocking, the Hat will stretch enough not only to smooth out any unevenness in joining, but also to fit an adult properly. Whilst I'm rambling about blocking, I block mine flat until semi dry, and then pop it onto a larger head model. You could keep it flat until dry if you haven't got anything the right size laying around.

Sorry, these instructions aren't in any particular order – just typing as I think! OK... what else? Oh yeah.... if you go for the mixed up spiral formation, make many more smaller ones than larger ones - you'll need them to fill in the gaps. Smallest are about 1 inch in diameter, largest go up to 3 or 4 inches. You will have a lot of ends to sew in, too, sorry. Counted 119 for the red Hat. Which is a lot. Don't forget to do a round of DC all the way around the finished Hat to neaten the edges... also helps tie in the colours, and I use the same yarn that I used for the DC seams. Actually, I'd put aside the best part of 50g of DK or Aran for the joining and the finish trim – that's the one bit that eats more yarn than you'd think.

Think my gibberish is over, and everything is here that I can remember for now. Any questions, leave a comment and I'll do what I can. It's all about geometry, shapes and form, so play around and see what you get.... I fancy trying triangles next.

LilDevil.Spiral.Hat.LR.jpg
Green.Spiral.Hat.LR.jpg
Purple.Spiral.Hat.LR.jpg

Have fun!

(And if I ever see any Hats for sale made a la Wormhead Spiral style, I'll point my finger and never talk to you again!)

Support

As always, if you have a question about this technique or need some help with it, leave a comment below! I’m afraid I’m unable to offer help via email or private message but you’re welcome to post in our forums.

Posted
AuthorWoolly Wormhead
22 CommentsPost a comment