

This tutorial was filmed to support my Parallelo pattern, but it’ll also be helpful with several of the Elemental hat patterns, too.
Short row colourwork, which the Elemental Hats and Parallelo feature, is a type of intarsia. It’s not just intarsia, as sometimes stranded techniques are used and of course it’s all about the short rows. But having some intarsia skills under your belt will be a useful skill indeed.
There’s a slight difference in the method between changing the colours on the right side and wrong side, and the two videos below cover them both for you.


Support
As always, if you have a question about this technique or need some help with it, leave a comment below! I’m afraid I’m unable to offer help via email or private message but you’re welcome to post in our forums.
Today I'm introducing a new design that I've worked on with Ripples Crafts yarns. Together we thought it'd be pretty cool to do something special for Loch Ness Knit Fest and here it is.


Scourie is sideways knit, with short row colourwork. With this design I wanted try something different with this technique to show that short row colourwork isn't just intarsia - it can be stranded, too. Several of the Elemental Hats use stranded techniques but not obviously so and not to this extent, and so I started to explore shapes and details that could look effective as well as not be too tricksy to knit!
This pattern will have you changing colours at short row points, but given a little practice with tension, it's not something that should trip anyone up. Don't tug the yarn too hard, but similarly don't let it slacken off too much - firm and gently is the right approach, and you'll find it easier than you think.


The instructions are provided as a panel map - a method I first put to use with the Elemental Hats that has proved to be pretty popular. It's a directional map, so the symbols show you which direction you're knitting and how many stitches are worked in any given row, to make it easier to keep track of the short rows. I've a blog post about this method of charting in the works, so do keep an eye out for that.
Scourie will be available in print only initially. As this is a special project for LNKF, we thought it best to offer it in print only for a limited time. Helen will have plenty of yarn on her stand to put together for kits, and I'll be ordering plenty of copies of the pattern.


Fear not, though - Scourie *will* be available as a digital single pattern in due course! I've the MKAL coming up (our 10th!), and another special pattern for another KAL (busy is an understatement) and I don't want to release Scourie and have it lost in the crowd. I will let you know as soon as it's available, I promise (and if you haven't already, do sign up to the newsletter)
Did I introduce you to Molly yet? We've only started working together in this last week and it's already clear that not only does the camera love her, but also that she's a natural at modelling. Molly grew up around these parts and I'm really pleased to able to work with her.


Scourie uses Ripples Crafts merino sport weight, which is such a lovely yarn - such bounce and definition, and it takes the dye beautifully. Different sizes in the pattern are achieved via panel repeats, but gauge can also help play a part - with a finer gauge, a short Hat can be achieved, and vice versa. The panel width is pretty narrow so you can repeat it until it fits just so (that try-it-on-as-you-knit aspect of sideways Hats is pretty dandy)
And there we have it! See you at LNKF?
ps/ there are still some places on my workshops, so do sign up now if you want to take a class with me - all events need a minimum number of bums on seats to run classes and it helps everyone to book in advance.
This is a method I’ve taken to using rather a lot with modular designs, especially those that have a bit of sideways Garter Stitch in them.
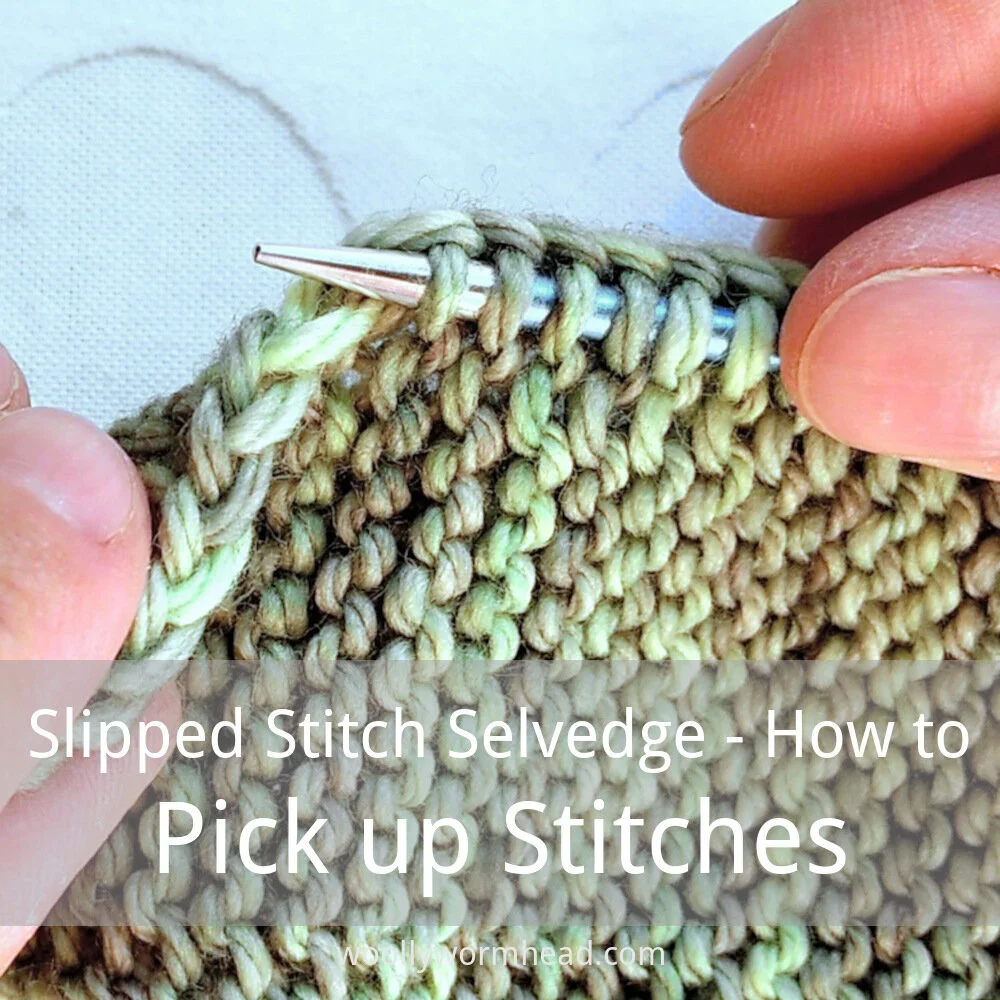
The Slipped Stitch Selvedge gives a really nice edge to Garter Stitch and creates a distinct and lovely border when the stitches are picked up from the reverse. If you find your selvedge is a little on the loose side then this deals with that, too.

1) On the reverse of the selvedge you’ll be wanting to pick up the vertical loop that sits closest to the chain. It is part of the V chain that sits along the edge.

2) Insert the needle tip behind the loop

3) And slide it onto the needle. Make sure the yarn doesn’t split, and don’t wiggle the needle too much else it’ll affect the tension of the chain.

4) Continue until all of the stitches have been picked up. If the strip of Garter Stitch has been grafted be mindful to not miss any stitches at the graft point.

5) and this is how the chain and picked up stitches look from the right side.
When you’ve picked up all of the stitches, flip your work back over so the right side is facing, then rejoin your yarn and knit as instructed.
I don’t pick up and knit for this method, I only pick up, and that’s because we’re working from the wrong side. You can pick up knit but do bear in mind that it’ll leave a ridge on the right side, and that might not be the effect you’re after. I’ve generally found it neatest to join the yarn after the stitches have been picked up and knit the first row or round - it leaves a little breathing room between the chain and the body of the knitting.
The technique shown in this tutorial is really simple and very effective. I've used this method a few times in my patterns - most recently in my new Campello design and previously in my Swinton and Hadleigh designs in Painted Woolly Toppers for Kids. It creates a wonderful edge along which to rejoin work for multi-directional knitting, and has plenty of uses beyond Hat brims!
Support
As always, if you have a question about this technique or need some help with it, leave a comment below! I’m afraid I’m unable to offer help via email or private message but you’re welcome to post in our forums.
The photos in this post were updated on 30/1/2021.
A few months ago Marcin of Martin's Lab Yarns got in touch to ask if I'd be willing to contribute a design to a new book he was curating. It was just at the point where I'd decided to say no to all commissions going forward, but fortunately I had a design already mapped out that suited the yarn, and with a bit of arm twisting I was in.
The collection is called Stillness, and is launching this weekend at Yarndale. Fret not if you can't get there - they ship worldwide and will be catching up on orders after the show.


The Hat is designed for squishy Aran weight yarn, and is perfect for showcasing hand-dyed yarns. Throw in 2 buttons, a bit of sideways knitting and a classic texture and you have yourself a very gratifying Hat.
As I know you'll ask, the rights revert back to me later in December. Martin's Lab are only selling the book in print, so if you'd prefer digital you'll need to wait a little longer. If you like your print books though, especially ones with beautiful photography and layout, you may want to check out the other fab designs (and designers - there's quite the line up!) then place yourself an order.

I've a few exciting workshops lined up this autumn, and one weekend will see me heading up towards the Scottish Highlands!

I've never taught this far north, and I'm pretty excited about it. I'm also not sure if I've a warm enough coat...! (thankfully I should have a Hat or two)
I'll be teaching four workshops: Knitting in the Round, The Art of the Knitted Circle, Turning Sideways and Reversible Cables. These are some of my most popular workshops, especially the sideways knitting, circles and reversible cables (all of them, then?) and it's not often I get the chance to teach these skills - definitely worth booking up. As always, I'll have professionally printed workshop notes for everyone and plenty of samples and swatches to share.
There are still a few places available for classes, so do go ahead and book in advance to be sure of a place! You can find the full list of classes by clicking here.
The marketplace is shaping up pretty nicely, too, with some of my favourite yarnies attending. These last few weeks have seen me working away on a special collaboration with one indie dyer, which we'll be releasing at the show, and I'll reveal more about that very soon. (tease)


