

The Crochet Cast-on is one of those flexible cast-ons that allows you to cast on mid row, or at the end or beginning of a row.
If you need to extend your knitting at one end of your work it’s best done at the end of the previous row. This means that we can use the existing stitches to start the cast-on, and it also means that the chain edge will usually be leaning towards the right side of your work (not always, depending on what you’re doing, but most of the time).

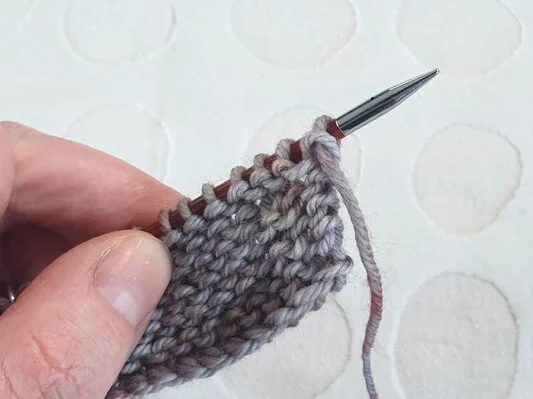
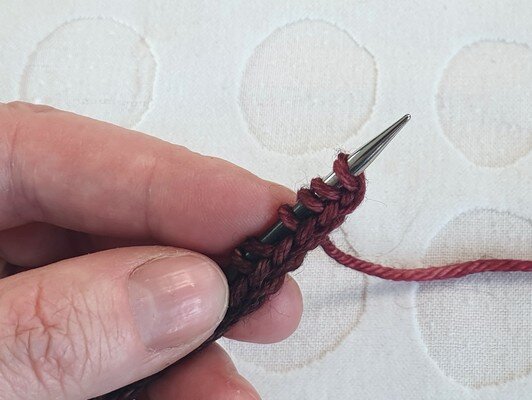
1) Insert your hook into the last stitch worked on the needle, or the last stitch that was worked if you’re extending mid-row.
2) Slip that stitch off the needle and onto the hook, then take your working yarn around the back of the needle.

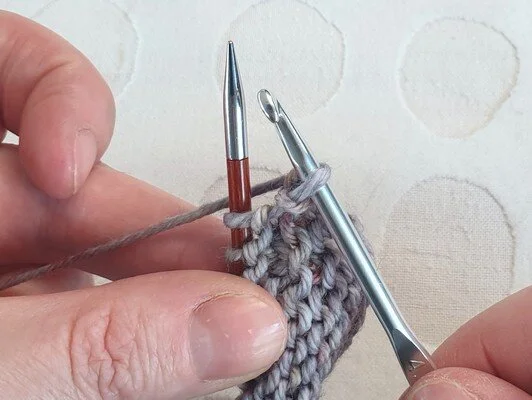
3) Then take your hook across the front of the needle and grab the working yarn.

4) and pull the yarn through the stitch on the hook, then take the working yarn around the back of the needle again. You’re doing exactly the same here as you did for the first method, the only difference being that there’s no slip knot, and instead we use a live stitch.

5) Repeats steps 3 and 4 until you have the desired number of extra stitches, then slip the stitch that’s on the hook back onto the needle. Don’t forget that the stitch that’s on the hook is counted in the existing section of knitting, and that you’ll want to cast-on the exact amount of extra stitches, not less one like before.

6) In this example I cast-on at the end of a right side row, so that I could extend the knitting to the left when viewed from the right side. That meant that I needed to have my yarn in position to purl. Here it is when the first row of purl stitches has been worked across the freshly cast on stitches.
Support
As always, if you have a question about this technique or need some help with it, leave a comment below! I’m afraid I’m unable to offer help via email or private message but you’re welcome to post in our forums.
I do hope you find this useful, it creates such a lovely edge!

Description
G-cubed is a square top Hat worked from the bottom up in garter stitch. It's worked flat and uses invisible seaming methods at the side and at the crown.
Availability
My Patreon supporters and members of The Woolly Hat Society get exclusive early access to new free patterns and tutorials. Once the exclusive period is over it’s published here on the blog.
Support
If you have a question about this pattern, pop it in a comment below. Sorry, but I’m unable to help with my free patterns or tutorials via email or private messages.
Social Media
Share your hand-knit Hats online with these hashtags!
#WWGCubedHat
Yarn
100g/109yd/100m
Handdyed chunky yarn
Needles & Notions
Pair 5mm/UK6/US8 straight needles or size needed to obtain gauge
Stitch marker as necessary
Tapestry needle
Sample details
Shown in Devon Sun Yarns Hand Dyed Chunky [109yd/100m per 100g; 100% Superwash Merino]
Shown in size 22in/56cm on model with 21.25in/54cm circumference head
Gauge
14 sts x 28 rows to 4in/10cm on 5mm needles over Garter St.
Sizes
To fit sizes: 16 [18, 20, 22] in/ 40.75 [45.75, 50.75, 56] cm
Finished size: 14.25 [16, 17.75, 19.5] in/ 36.25 [40.75, 45, 49.5] cm
Not sure which size to make? Check my handy size and measuring guide!
Skills required
Garter stitch
Mattress Stitch for Garter Stitch
Support
If you have a question about this pattern, pop it in a comment below. Sorry, but I’m unable to help with my free patterns or tutorials via email or private messages.
Social Media
Share your Hats online with these hashtags!
#WWGCubedHat
Pattern notes
This pattern is deceptively simple – it’s simply a length of garter stitch worked flat! With careful attention to the cast-on and cast-off techniques (to ensure they match) and with clever use of garter stitch seaming techniques, this Hat can be made in any gauge, in any yarn. And it’s absolutely perfect for beginners.
How to
With main yarn and using Crochet Provisional cast-on method as a permanent cast-on, cast on 25 [28, 31, 34] sts. Try to leave a tail of around 7 [8, 9, 10] in/ 17.75 [20.25, 22.75, 25.5] cm
Body
Row 1: Knit all sts
Row 2: Knit all sts
These two rows create garter stitch. Repeat these two rows until work measures approximately 10.5 [12, 13.5, 15] in/ 26.75 [30.5, 34.25, 38] cm from the cast on edge, with the garter stitch relaxed.
Cast-off loosely using the regular cast-off method. Using a larger needle can help stop the cast-off becoming too tight. Leave a tail of around 7 [8, 9, 10] in/ 17.75 [20.25, 22.75, 25.5] cm
Finishing
Fold work in half length-ways.
Using the yarn tails, and using the mattress stitch method for garter stitch, close each side seam. You may wish to either duplicate stitch or use the ends of the yarn to otherwise tidy up the bottom edge at the seam points and keep the chain continuous.
If your yarn tails both end up on the same side, use a scrap of remaining yarn to close the seam.
Weave in all ends. A gentle wash and blocking is required to help the stitches settle.
Custom any gauge version
Should you wish to use a different yarn at a different gauge, you’ll need to know your head measurement and how many stitches across 4in/10cm your yarn gives you, which in turn will tell you how many stitches per inch or centimetre.
Armed with your head size, you’ll want to subtract 2in/5cm or 12% - this allows for negative ease (how much smaller the finished size compared to the to fit size) and it’s negative ease that helps keep the Hat on your head.
Now that you have the finished size of your Hat, divide that by 2 – this will tell us how wide the strip of garter stitch needs to be.
Then multiply this by the number of stitches per inch or centimetre – this tells us how many stitches to cast on. Round that number to the nearest whole stitch and grab your needles!
Example: your head size is 21in, and so an ideal finished size is 18in. That means our strip of garter stitch needs to be 9in wide.
Your yarn is a worsted weight yarn that gives 5sts per inch. We then multiply 9 (width in inches) by 5 (no. of sts per inch) to give us the cast-on number.
Simply knit the length of garter stitch until it’s double the Hat length and voila! Finish as above.


It's fair to say that I've too many projects on the go. All in various stages, they're sat there waiting for me to either get my brain in gear, or my body.
One such project is the Absolute Range. I can't remember whether I've talked about it here or not, I know I've mentioned it to quite a few people in person. Anyhows, the point of the project was to create an alternative line of Woolly Wormhead Hats, one that was aimed at absolute beginners.
I worked on quite a few Hats for this, and they sat there waiting for me to have the time to sit and write them in non-knitting pattern speak. What I wanted to do was to write a pattern without the usual knitting pattern code, something that someone who knows nothing about knitting could pick up and make a Hat from. And I wanted to design things a little more interesting than scarfs - get clever with a bit of folding kinda thing.
Now, writing a pattern that is suitable for non-knitters AND that would be suitable for teaching new knitters takes a whole other set of skills to writing a regular knitting pattern. If you ever fancy giving it a try, it's quite a useful exercise to undo your learning and think in terms of someone who knows nothing of which you speak. And it really does require a change in mindset.
I know exactly how I want to write these patterns and what I want to say, but I haven't had the headspace to give them.
The whole range would make good business sense, as the knitter that learns with you stays with you, but I've had to admit defeat on this one. Well, more that in my head I've moved on and I'm having loads more fun with more complex construction methods.
So... as most of these are already written in standard pattern writing for basic Hats, I figured I might as well make use of the work I've already done and offer them as free patterns.!
This last week I've knitted another new Hat; sent 4 new patterns to my test knitters and finished writing a handful of free patterns for the coming season. I've closed doors on some projects and frogged a bunch of patterns in progress and reskeined/washed the yarn.
It feels SO good to tidy up this way. I'm not very good at having loose ends, they eat away at my brain and I'd sooner have that brain space to focus on the projects that I'm looking forward to, not back. And all this tidying up is helping to keep me busy, pottering, while I wait for my shoulders to be ready to dive into the thing that I've been working on for what feels like too long. The maths is all done, I just need to be able to knit at a decent rate!
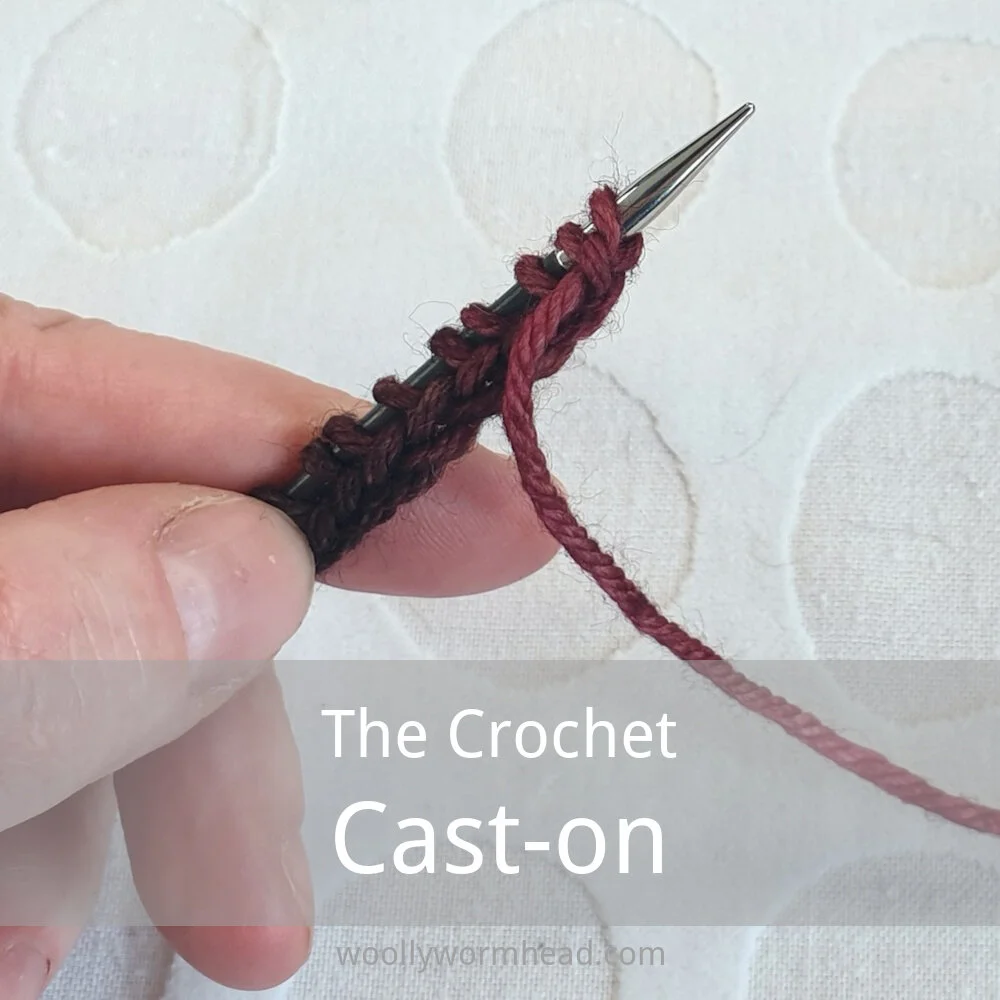
This method is essentially the Crochet Provisional cast-on, only as a main or permanent cast-on. It’s one of those that can be used mid-row or to extend a piece of knitting at the beginning or the end, and I like these methods - it makes them mighty versatile!
I first used this method in Going Straight as a way to cast on for sideways knit earflaps - what’s special about it is that it perfectly mirrors a standard bind-off. So as well as it being suitable for casting on in the middle of or at the end of a row, it can be sued where mirrored cast-ons and cast-offs are needed. Even more reason to like it!

1) To work the cast-on you’ll need a crochet hook one or two sizes bigger than your needle size. This helps make sure the cast-on edge has enough stretch in it. Here my needles are 3.5mm and the hook is 4mm.
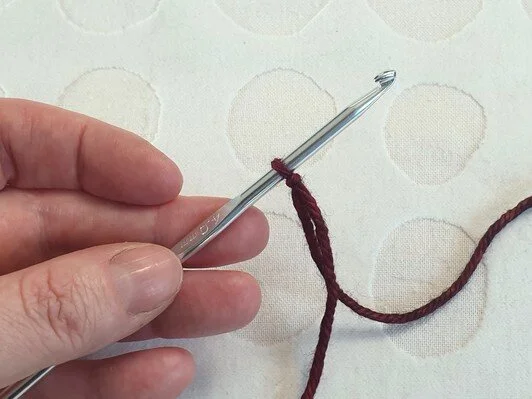
2) Make a slip knot in your yarn and place it onto the hook.

3) Hold the yarn tail in the same hand as the hook and take the working yarn around the back of your needle. I find it easiest to have the hook to the right hand side of the needle.

4) Take your hook across the front of the needle and grab the working yarn with it.

5) Then pull the yarn through the stitch already on the hook, creating the first chain stitch.

6) Then take the working yarn around the back of the needle again

7) Take the hook across the front of the needle again and grab the working yarn, ready to make the next stitch

8) and pull the yarn through to make the next stitch.

9) Continue in this manner, repeating steps 6 to 8, until you have the desired number of stitches, less one.
10) Then pop the stitch that’s on the crochet hook onto the needle, making the last stitch and completing the cast-on.
In my experience this first stitch is often a little loose, especially if I’m going straight into garter stitch, which is where I use this cast on method most. To avoid it looking saggy, I slip this first stitch on the first row. Doing this also maintains a continuous chain should you also be adding a slipped stitch selvedge.

11) If the first row worked will be a purl row, and if you want to maintain an even tension and the chain stitch at the edge, then you’ll want your yarn to be in a different position after finishing the cast-on. To do this bring your yarn forward before placing the stitch that’s on the hook onto the needle.

12) Your yarn is then in the right position to start purling!
Support
As always, if you have a question about this technique or need some help with it, leave a comment below! I’m afraid I’m unable to offer help via email or private message but you’re welcome to post in our forums.
I do hope you find this useful, it creates such a lovely edge!
This week I'm slowly getting caught up with pattern writing, & going through everything that needs to be done so that I can focus on The Big Project. That also means organising my publishing schedule for the coming months!
I'm going slowly, naturally, as some days it's still too painful to knit but I can manage a few hours at the PC. Having become quite detached from my work I'm appreciating the slow build up and the tidying of loose ends.


This pattern is York Slouch, and will be the next free pattern exclusive to members of The Woolly Hat Society for a limited period before going live on the Free Patterns page. I designed it almost 4 years ago (!) but somehow hadn't got photos I was happy with.
As much as it's a heavier weight yarn and maybe not ideal knitting for those of us heading into the warmer months, it's a great quick knit that is ideal for gifts or charity knitting or simply stocking up on woolly Hats before the cold season kicks in!
After sending out my most recent newsletter, about GDPR, I had a *huge* clean up of my subscriber list. If you didn't confirm the new GDPR consent then you'll need to resubscribe. No worries, as you can sign up again and we'd be happy to welcome you back. If you've never signed up then you might be interested in the perks of being a member, such as access to this pattern a month before anyone else!
The next newsletter is due to go out after I get back from Woollinn at the end of May.
The sample is worked in Noro and will work comfortably an an aran weight yarn of similar gauge. The pattern will be exclusive to members of The Woolly Hat Society until the end of June.
Techniques wise, it's a little more challenging that many of my Free Patterns - there are short rows on the brim to help shape that bonnet style fit. After that, its garter stitch in the round with a soft gathered finish.
I'm considering myself pretty lucky to have been able to continue to work through the worst of my right shoulder freeze, and throw together both Circled and Elemental, the two collections I'm proudest of.
To do so, I needed to change my knitting style. I'm an English Thrower, and a very sloppy one at that. According to articles I've read my knitting style is meant to be the slowest and the messiest yet it's served me well for 44 years (I am very far from being slow or messy). To make things more comfortable for my right shoulder I changed ever so slightly so that more of the throwing motion was managed by the left hand, or at least, more of the movement was. And thus I could knit pretty easily and still keep my right shoulder from too much repetitive action.
Fast forward to my left shoulder being seriously grumpy and my right shoulder reminding me it's not ready for a return to our old ways, and knitting is difficult.
I picked up my interest in wanting to learn the Continental method, and also the Combined method, but I very quickly found that the motion required by my left hand, in particular that one finger (that in turn made the wrist grumpy) was too much - knitting this way was actually more painful than trying to throw. So I gave up (the knit stitch is easy but the purl stitch is all kinds of illogical and definitely more work that my hands wanted to do).
And so I was stuck.
My throwing style isn't wild, and I can throw quite easily without finger tensioning and without moving my shoulders all that much. (I literally drop everything - needle and yarn - as I wrap a stitch) That in turn though puts more pressure on the elbow and wrist which my right arm is fine with but my left very much isn't. But because of the way I do it, it doesn't take too much effort to tweak things. I don't need to ask a joint to lean something new, just ask it to do a little more or less.
I'd been hunting for some affordable decent supports (of the splint non-compression variety) and eventually found some, so ordered myself one for each hand and one for the elbow. I only need the elbow one at night, and my right hand doesn't need it most of the time. The left hand one has been crucial - and it has made all the difference.
When I wear the wrist support, I can knit. My right shoulder is still doing as little as possible and my left side is still sharing the load, but my left wrist is supported. I knit a whole Hat in one day on worsted yarn and my arm ached a little the next day, but that was it. No deep nerve pain or screaming joints. And this can only improve.

Today I'm pattern writing, and that feels like such a huge jump from where I've been at these last few months! Finishing these two Hats, and being happy with them, is a turning point.
I'm pretty organic in my designing, in that I always have an idea of what I want to do before I start, but it's very much done on the needles, with an awful lot of tweaking going on. I can design it all up front and then knit, but I find the work I produce that way very dry - as far as I'm concerned, it's those details that I change when it's on the needles that make the difference. Even when I'm knitting sideways, which means I have the whole thing charted before I even cast on, I go back and change things. My Hat is my swatch, it's a live test for my ideas, and I enjoy working this way. But it does mean more knitting.
I think, subconsciously, I've put more effort into getting as much planned as possible before I cast on. That said, I'm very much about the process and even if I did get it all perfect before casting on, I'd have to go and reknit some aspect just to satisfy that part of my brain. I'm not satisfied until I've corrected something, otherwise it seems too easy? But I'm pretty certain that I've streamlined this side of things, too. Because I've had to.
Invariably I find pattern writing the least enjoyable bit of the design and publishing process, but right now I'm feeling lifted by the knowledge that there's something to write down.
I'll reveal more about the yarn and these patterns later in the year - someone's bound to ask so that's all I'm saying for now! I can say that the stitch pattern is very enjoyable to knit and an awful lot simpler than it looks (we like those ones).


