

Knitting into the row below is a variation of Brioche knitting, and creates a wonderfully textured stitch pattern on what is a garter stitch ground. It is used in my Muratura, Kourserb and Rainbow Warrior patterns, and it isn't as yarn thirsty as other brioche stitches (knitting into the row below doesn't use quite as much yarn as creating a yarnover)
The usual abbreviation for knitting into the row below is 'K1b'. This stitch is usually worked on alternate stitches, and is offset on RS rows to create the pattern.
1) Knit up to the stitch that has the K1b instruction.
On a piece of knitting worked flat, the 1st row is usually *K1, K1b; rpt; the 2nd & 4th rows are knit across. The 3rd row would then be *K1b, K1; rpt.
When working in the round, the 2nd & 4th rounds would be purl across.

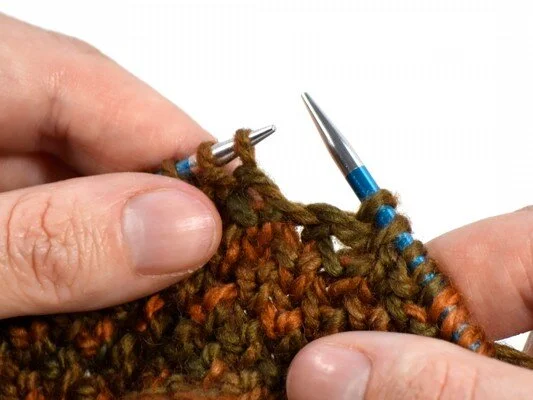
2) Insert your needle into the stitch below the one on the left hand needle, as shown.

3) Bring your yarn around and perform a knit stitch
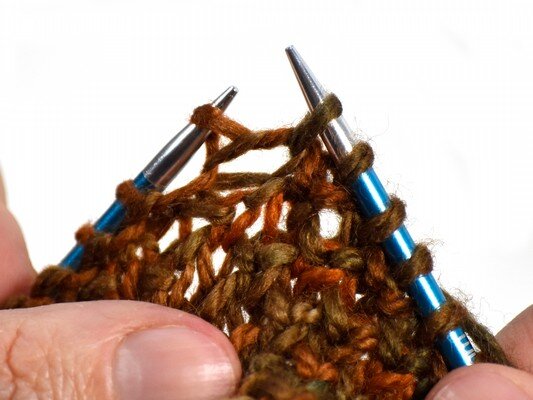
4) This is the completed knit stitch, with the worked stitch still on the left hand needle – here you can see clearly how you have knit through both loops together.

5) Then slip the worked stitch off the needle, and done! It's much simpler than it first seems.
Support
As always, if you have a question about this technique or need some help with it, leave a comment below! I’m afraid I’m unable to offer help via email or private message but you’re welcome to post in our forums.
Muratura is the last Hat of 2016 to be published, and I reckon it's a good finish to the year!


Muratura is knit sideways in aran weight yarn. The pattern is garter stitch based, and so the brim is ribbed (as that's what garter stitch becomes when it's turned sideways), and it uses a garter stitch graft to finish.
The stitch pattern is a variation of brioche, which provides warmth and texture without making the Hat too thick or heavy. And given that it's knit in aran weight, you can make one in afternoon - ideal for gifts! (worth mentioning, as gifting season is here ;)


The yarn the Hat is featured in is BFL Aran from Snail Yarn. I first met her at Swiss Wolle the other year, and her colours are gorgeous - she was fairly new on the scene then and did a roaring trade! It's worth having a browse through her Etsy shop.
If you're not able to get hold of any of the featured yarn, you can use any aran weight yarn that gives the same gauge - given it's texture I think Muratura will look just as lovely in a plain dyed yarn or lightly variegated colourway.
If you are thinking of subbing yarn, you might be interested to know that a KAL for this Hat starts this Friday (9th December) and runs through to 31st December! There'll be lots of advice on hand, tips and tricks, and adjusting the pattern for size or gauge is one of the things we'll be discussing. There will be a few special prizes, too.
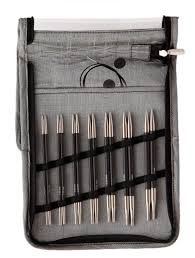
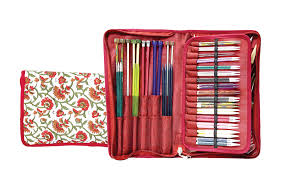
The folks at Knitters Pride have very generously offered some prizes for the Muratura KAL! First prize is a Karbonz Deluxe Interchangeable Set and the second prize is an Assorted Needles Case in Aspire. Pretty tasty prizes, I'd say!
All you have to do to qualify is knit-a-long with us in my Ravelry group, post your project to Ravelry and tag it with 'knitterspride'. They're happy to ship internationally, and everyone is welcome to join in.
The code 'knitterspride' will also not only get you 20% off the pattern (applicable on my website in ££ and Ravelry in $$) but it will also give you 20% off any other single patterns you might want to buy at the same time! In theory, the promotion should also give you 20% off any single patterns you buy during the promotion period, even if you buy them after purchasing Muratura. Promotion is valid until midnight 21st December GMT.
Look out for the fresh tutorials that I'll be posting on Instagram, to the Tutorials section and on the Knitters Pride blog.
Our 9th annual Mystery Hat-a-Long came to a close last weekend when I was in Lyme Regis for the final stop of my teaching tour. Full copies of the patterns were duly sent out, and the name and photographs revealed to MKALers.

Armley Beanie, front view
This year's MKAL consisted of 3 styles, split across 2 patterns. The first pattern consists of the beanie (shown above) and the slouchy beanie (shown below), which is best described as a comfort fit rather than full on slouch.

Armely Shouch, front view
The 3rd design, and the 3nd pattern, is the Armley Beret, shown below.

Armley Beret, front view
The beret is the original design, and the beanie and slouchy came into being some time after. The name comes from the day I spent at Armley Mill with Ann Kingstone and Susan Crawford, on the photoshoot for Ann's Lace Knits book.
During this time, Babylonglegs was facing one of the hardest things life can throw at you. As most of you know we're very close, and she wanted to spend some time with woolly friends and I wanted to give the hugs I could offer. And so she came along to our shoot, and with her she bought the skein of Mesmerino DK that you can see used in the beret design above. It was a brilliant day. It rained some (hey, it's Yorkshire in October!), we laughed, and between us we took some great photos. The series of Hats is named for that day spent with 3 friends at what was once the world's largest woollen mill, supporting each other, and giving Sarah the love she needed.
As well as Babylonglegs offering yarn support, Fyberspates were very kind to offer support for the beanie and slouchy versions of the pattern. Their Vivacious DK is the perfect weight for the pattern and the colour blends lend themselves perfectly to the design.
The patterns are now available at the regular price, and if you put both in your cart (or if you've already bought one) the system will detect this and charge you the bundle price (if you've already bought one, the system will deduct what you've already spent - clever!)
This MKAL has been really enjoyable, and I hope everyone is happy with their new Hat - rather seasonal, wouldn't you say? I'll also add that Tom did the photos for these, and I think he did a cracking job (that beanie shot is my favourite :D)
I've been resistant to increasing prices on any of my products, but sometimes needs must. The single patterns will remain the same, and from the 1st January the eBooks will have a new pricing structure:
eBooks with >10 patterns: £15/$24
eBooks with 10 patterns: £12.50/$20
eBooks with <10 patterns: £10/$16
eBooks with <4 patterns: £7.50/$12
Single patterns will remain priced at: £3.75/$6
There are a few reasons for the need to increase - some of it is to do with the exchange rate and currency fluctuations, which doesn't look to settle or improve any time soon and this has a knock-on effect on my costs (sometimes this works in my favour, other times not). This increase also allows me to add in an extra price point, as I've a few collections planned that have less than 10 patterns and I want to maintain a good balance between value of the collection vs the value of the singles. I also want to keep my prices generally in line with market price, as I don't want to feel like I'm undercutting, underpricing or undervaluing. When the EUVat kicked in I didn't change the prices of the eBooks that much, and I'm now earning less on these as I was (eBooks are the most costly items to produce). And given my current health my costs are increasing overall, even without these additional factors, as I'm outsourcing more and more work, and I have to try to keep things balanced this end.
Pricing is hard.
I still believe the eBooks offer excellent value, given the amount of patterns and tutorials included, and especially given the market as it is. The current set up that allows you to buy the bundle and have the amount you've already spent be deducted will continue, and I will still continue to offer both currencies to give you the choice and best value for money.
I know I don't have to justify any of this, but I do like to be transparent so you can see how your money is being spent!
The image shows the crown of my Castiel Hat pattern. It features the post title “Hat Masterclass - Shape, Structure and Fit”.
In my previous article about crown shaping, I mentioned how various multiples - and their subsequent decrease ratios - affected the overall structure and style or shape of a Hat. The reason I start at the crown when I start a new Hat design is to ensure that the overall structure will work, and that the design will have continuity throughout. To be able to understand structure, shape and fit, we need to think about the different parts of a Hat and the numbers that determine them.
First though, let's look at the anatomy of the Hat and how each part affects shape.
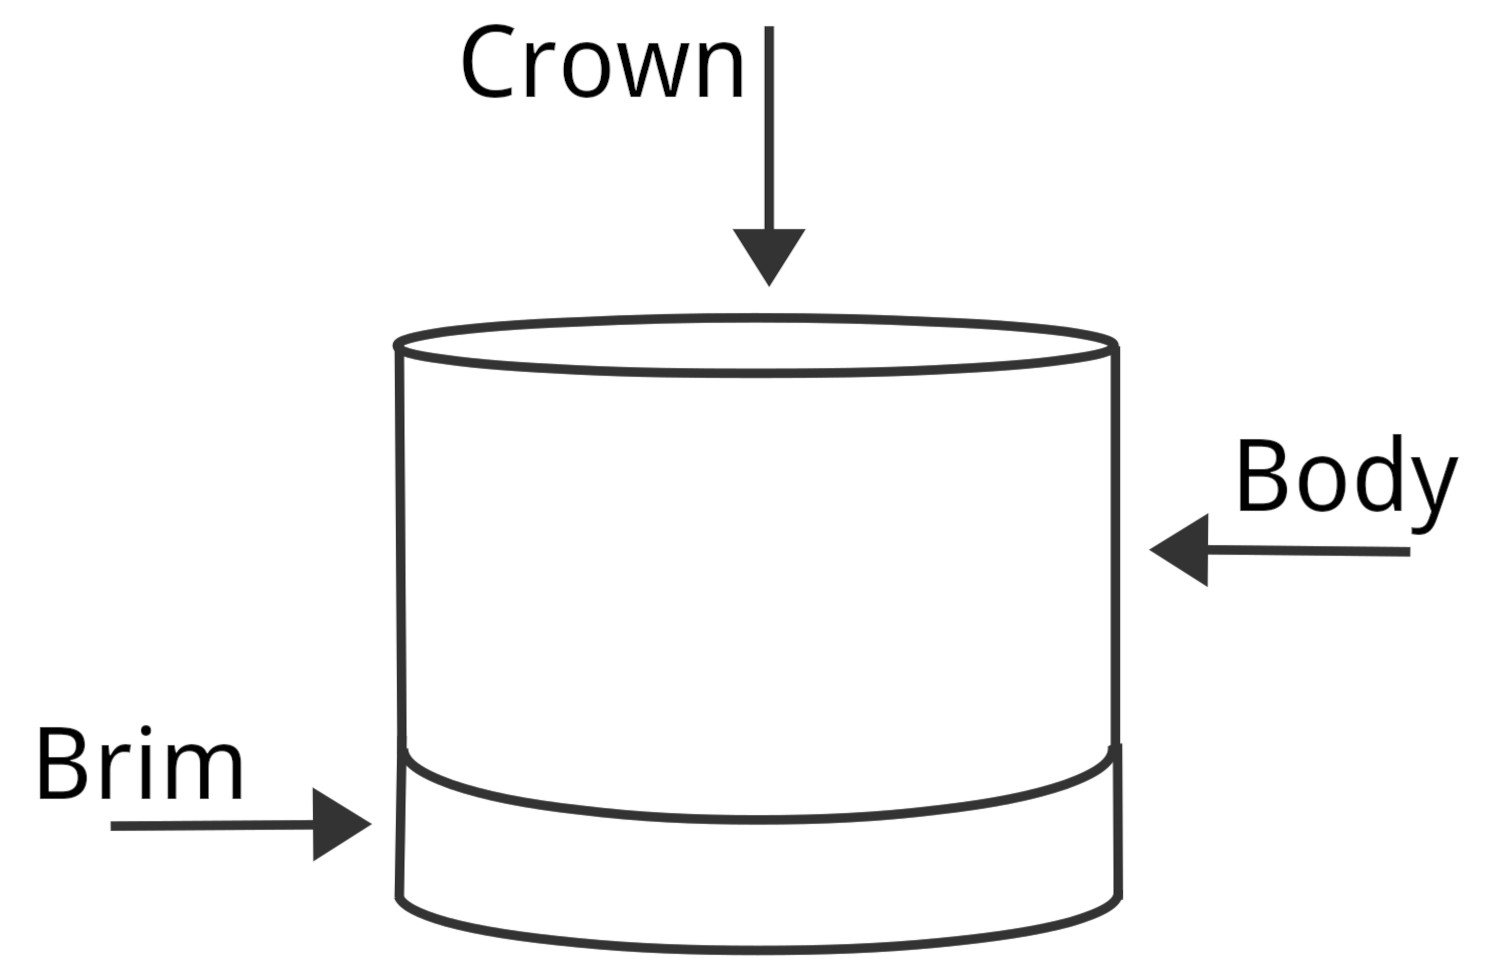
Schematic labelling the 3 main parts of a Hat - the Brim, the Body and the Crown
The Brim – has limited determination on shape and structure compared to the crown and body, but is crucial for fit. How snug would we like our Hat to be, how much negative ease?
The Body – works with the crown to determine overall shape, and is the link between the structures of the brim and the crown. Will it be lose and slouchy or snug and fitted? Tall and tapered?
The Crown – this is the area that determines shape and structure more than anything else. Will it be pointy, square, gathered, flat or round?
About Ease
Ease is really important when it comes to fit, and we can't talk about Hat shape without mentioning it!
To keep a knitted Hat on our heads, it needs to be smaller than our head. Make your Hat the same size and it'll likely fall off. This is what's known as negative ease – when a garment or accessory is smaller than the body part it will fit.
For a Hat, I would usually recommend somewhere between 2in to 3in/5cm to 7.5cm, or around 12.5%. But it depends. A beanie with 4in/10cm of negative ease or more is going to look very sporty, whereas a slouchy Hat with 2in/5cm of negative ease or less is going to appear very casual. Overall intent of style plays a part, as does comfort. Accommodating hair plays a big part too; those with short hair and/or simple styles may be more comfortable with a closer fitting Hat, whereas a looser Hat often preserves hair styles better (i.e. avoid Hat-head). Purpose, too, is another important factor – keeping out wind chill and endurance in rougher climates demands more negative ease.
The Crown in relation to shape
We've learnt that different decrease ratios will affect the crown, and the crown is one of the key parts of the Hat that determines the style. For instance, a slow decrease ratio of less than 3 sts decreased per round (on average) will give us something pointy, like a pixie Hat. The less stitches decreased on average, the steeper the slope gets and the pointier the Hat.
The same is true when we decrease more rapidly. Decrease on average 4 sts per round and you'll get a flat circle that sits perfectly on top of a close fitting Hat like a beanie. Up the ratio slightly, and you'll move through berets and then into gathered crowns, with the latter working on anything above an average of 8 sts decreased on average, and which would work perfectly for a slouchy Hat.
Once we know the shape of crown that we'd like, and the ratio of decreases to create that, we treat that as our structural multiple, and if we're working bottom up we would work backwards. If we don't know yet how we'd like the Hat to finish then we'll work with a number that allows different options (a multiple of 12 gives us all the possibilities, with a 24 being the ultimate magic number!)
Working backwards – considering the Brim in relation to the Crown
The brim will have a solid relationship with the crown, and it's this area where we first consider fit. The brim of a knitted Hat is the most important part as far as gauge and ease is concerned, as it's the part that keeps the Hat on the head!
If we're working towards a beanie style Hat, a half-dome or watch cap style, then the brim will work on the same multiples as the crown. With this style of Hat we are simply creating a tube with a circle on top, with no other shaping besides that of the crown.
If we're working towards a beret style, then the crown multiple is relevant for the start of the body, for the increase round immediately after the brim, and so to determine the brim multiple we need to take our working backwards one step further. In the previous article I mentioned that the common increase formula for a beret from the brim into the body is K2, M1 (where M1 is a lifted bar increase), i.e. an increase of 50% from the brim into the body – berets always seem to follow this rule. To work backwards from the crown, we want to reduce the crown multiple by 33% to get the same ratio. So for instance, if our crown works on a multiple of 6, the brim will work on a multiple of 4. This is where it gets awkward with some numbers, and we might need to go back and reconsider our crown structure, as not all number will happily lose 33%! There are of course ways around this, and we can invent a multitude of formulas to make it work, but to fully understand the concept we want to try and keep the numbers straightforward.
If we're working towards a slouchy style, something that has a little room in the body but not as much room as a beret, and something less hugging than a beanie, then the same applies – the crown multiple is relevant for the body, immediately following the increase round after the brim.
This time though we won't need to increase as many stitches after the brim, and I would normally increase somewhere between 20% up to 33%, depending on how lose I'd like the fit and shape of the Hat to be. Again, we would work backwards but we have room to adjust the figures to our needs here – a crown multiple of 8 could equate to a brim multiple of 6, for instance. That's a 33% increase from brim to body/crown. A slouchy Hat is much more flexible in numbers, and is a lot easier to design and knit because of this. Or a multiple of 9 at the crown could be a multiple of 7 at the brim (and that combination makes for a pretty interesting Hat structure...)
Bringing it all together in the body
Having determined our brim and crown structures, we can start to think about the body shape. Although the crown determines the overall structure, the body still plays an important part in determining style. Yes, the crown will determine whether we have a pointy, flat or gathered finish, and will determine the mathematical structure of the whole Hat, but the body determines whether we will have slouch or length or height.
Slouch is determined by two things – length, width, or both. We either increase after the brim (hence a beret automatically looks slouchy, as we increase 50%), work a longer length than normal before starting the crown decreases (extra long beanies are a good example of this) or we do a little of both (the slouchy Hats currently in fashion generally follow this rule). By knitting for longer, you're creating more fabric, just as you would be in your increased stitches, only in a different place. How and when you create that extra fabric determines your style.
Conclusion – common themes and differences
The main differences between beanies, berets and slouchy Hats are determined by the different parts of the Hat, as described.
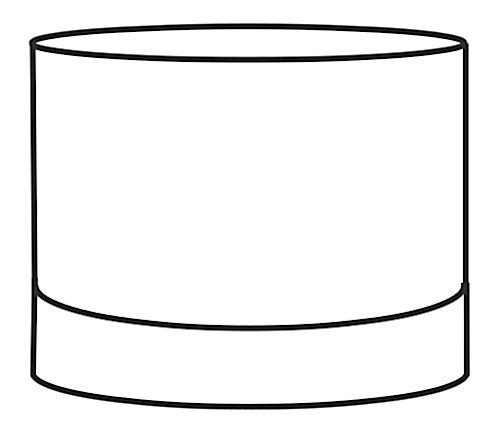
Diagram 2: schematic of a beanie
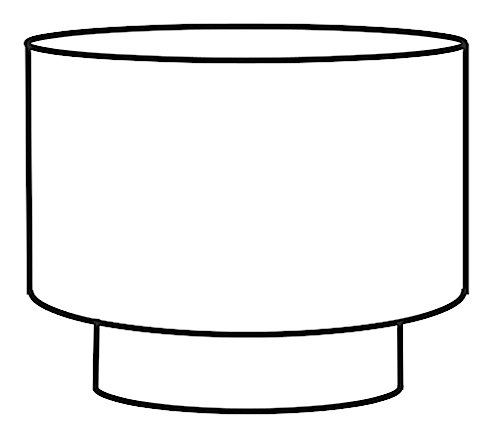
Diagram 3: schematic of a beret
A beanie, shown in diagram 2, will flow smoothly and simply from the brim into the body, which then flows into the crown. All parts of the Hat work on the same mathematical structure, and a good design will make the most of this. The brim and the body together form the cylinder of the Hat, and the circle atop is the crown. The length of the cylinder generally works out to be about two thirds of the overall length, although row gauge will affect this. The brim and body of a beanie will both have negative ease.
A beret, shown in diagram 3, shares some structure with a beanie – although it is two cylinders of different diameters (the brim and the body) the total length of the those together will be the same as a beanie. What makes a difference is the much larger circle at the crown, due to the 50% extra stitches. This adds extra length to the Hat, and the additional stitches add the room. The brim of a beret has negative ease and the body has positive ease.
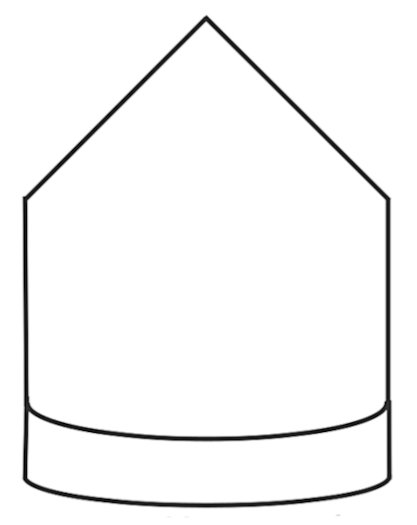
Diagram 4: schematic of a pixie Hat
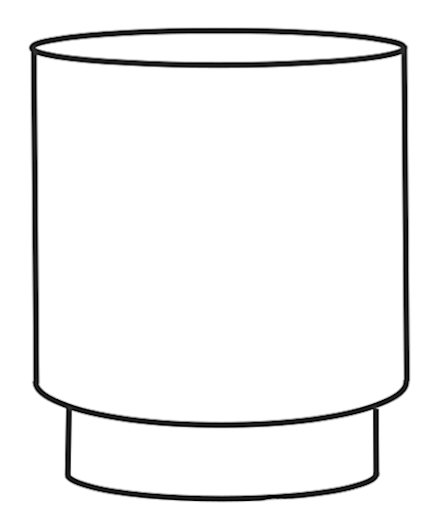
Diagram 5: schematic of a slouch Hat
A pixie Hat too shares a similar structure with a beanie, with the key difference being the crown. Invariably the brim and body form the cylinder (although they can of course be different stylistically, and use different stitch patterns) but instead of a circle at the top of the cylinder, we have a cone. Personally, I tend to make the length of the Hat before starting the crown shaping (the cylinder) shorter than that of a beanie, so that the point on the Hat is softer, and it will also be less likely to flop over. The brim and body of a pixie will both have negative ease.
A slouchy Hat can be any of the above, or none of them. It can be two cylinders or one, it can have a flat crown (a circle) or a gathered crown or even a pixie Hat – I have designed and published more than one pattern for a slouchy pixie Hat! The brim of a slouchy has negative ease and the body has positive ease, but not as much as a beret. It's not really surprising that slouchy Hats have become so popular; they're easy to wear, but they're also easier to design as the maths is more flexible and forgiving, and they allow for much more experimentation. They don't fit the traditional rules of knitted Hats.
this article was originally published in issue 98 of the Knitter, Spring 2016
There's a lot more involved in designing a Hat than I've shared here! If you’re interested in learning more, I’ve a number of self-paced, downloadable online classes all about Hat design, and you can find them all in my Hand Knit Hat Academy!


