
Slipped stitch columns are striking and decorative when used against a background of garter stitch, and they are also a useful technique; used next to the start of the round, and they will hide the jog that occurs with garter stitch worked in the round. Use them on two colour garter stitch to have the main colour travelling across the pattern. They provide structural support, too, as the slipped stitch is always a little tighter than the rest of the fabric.
Slipped stitches on garter stitch in the round are always created on the purl rounds. On the knit rounds they can be knit as usual, or twisted for a more decorative or structural effect.
To create a slipped stitch on garter stitch worked flat, you would work the slip stitch on the wrong side rows, and you would bring the yarn forward before slipping, and taking it back again afterwards to continue knitting.

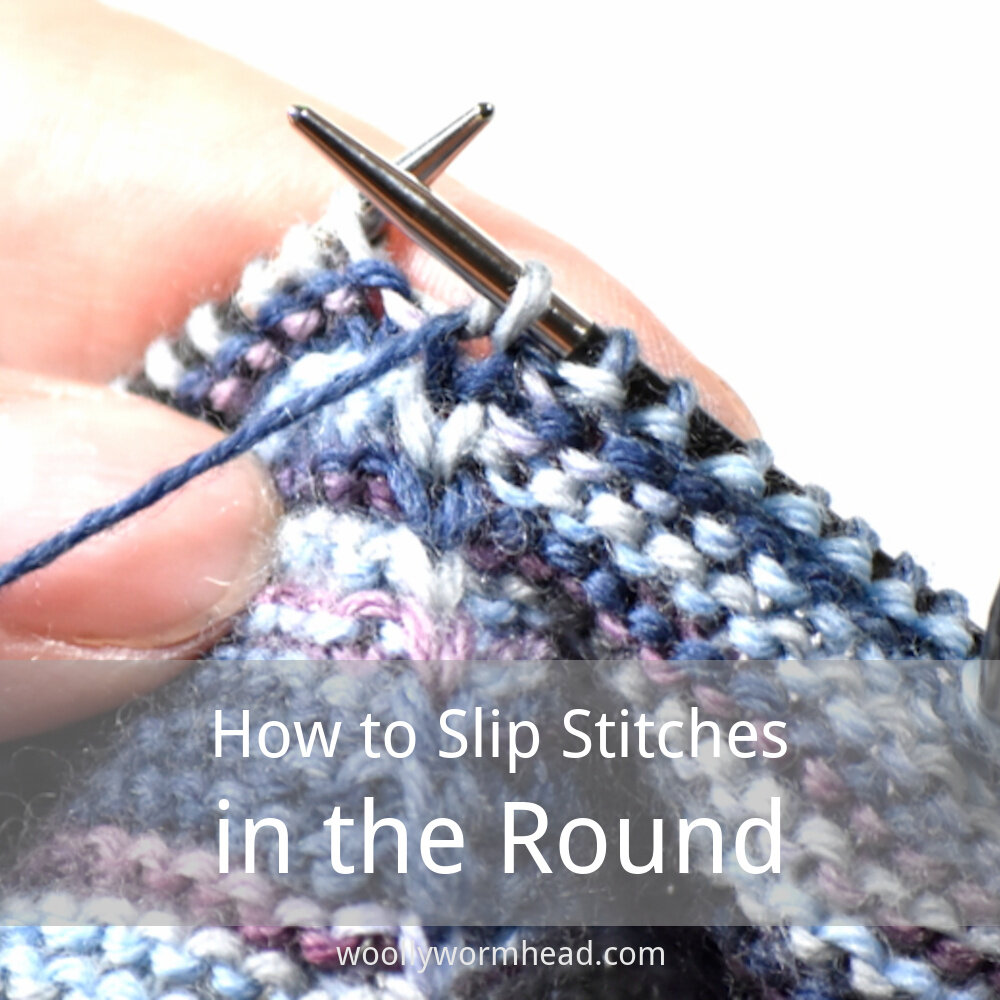
1) Purl until where you wish to place the slipped stitch

2) Take the yarn to the back

3) With the yarn at the back, insert the needle into the stitch that will be slipped purl-wise – this is done to maintain the stitch's orientation

4) Slip the stitch purl-wise to the right hand needle

5) Then bring the yarn around to the front again ready to work the next stitch

6) Continue purling until the end of the round of until another slipped stitch is required. On the knit rounds the slipped stitches will be knit as normal, or they could be twisted if you're working at a loose gauge and wish to stop the slipped stitches sagging, or if you want a tighter decorative effect on the fabric.
Support
As always, if you have a question about this technique or need some help with it, leave a comment below! I’m afraid I’m unable to offer help via email or private message but you’re welcome to post in our forums.
And now we're at the point where we think about how we're going to finish up our Hats!

The Crown shaping is the very last part of our #wwscrapalong Hats, and I've deliberately kept things simple. Usually when I design a Hat, and when I teach classes on how to design Hats, I'll always advocate starting with the Crown first, regardless of which direction you are knitting. The Crown is the part of the Hat that brings everything together, and if the maths doesn't work out, you have to go back to the beginning again and start over.
The #scrapalong Hat is simple in it's concept, and that means we can work with simpler methods and easier numbers!
The Wonky Square Top
This is the easiest finish to achieve.

To achieve this finish, fold your work in half and use a 3-needle bind-off, ideally in a contrasting yarn for effect. You could graft the top closed or use a crochet bind-off, but I think the 3-needle bind-off adds structure, which in turns adds to it's unique finish.
You'd want to ensure that the Body is long enough first, and you may wish to make it a little longer than I suggested for the gathered Crown version yesterday.
The Gathered Finish
Because we've worked on a multiple of 8, we should be able to work a gathered finish very easily by halving the number of stitches on each decrease round. If you've worked on a multiple of 16, even better!
Rnd 1: *k2tog; repeat from * to end (now have multiple of 4)
Rnd 2: Knit all sts
Rnd 3: *k2tog; repeat from * to end (now have multiple of 2)
Rnd 4: Knit all sts
Rnd 5: *k2tog; repeat from * to end (now have multiple of 1)
Depending on how many stitches you have left, you'll need to decide whether to do another decrease round (preceded by a plain knit round). If you have an odd number then you'll need to knit 1st then decrease across, with an even number (i.e. a starting multiple of 16) you can decrease right across again.
You'll want to end on a stitch count of somewhere between 8 and 16sts, ideally closer to 8 to ensure the hole at the top closes more easily.
In the example decrease pattern, I used k2tog only - by all means alternate between ssk and k2tog to give a balanced decrease pattern.
If you want your last section to be reverse stocking stitch, then substitute purl decreases and work plain purl rounds between!
The Regular Beanie Finish
This one wasn't written into the original tutorial, but I can quickly guide you through it here. Work one plain round of knit stitches, adding a stitch marker at each eighth point (i.e. divide your original stitch count by 8, then knit that number, place stitch marker and repeat)
Rnd 1: *knit to 2sts before stitch marker, k2tog
Rnd 2: Knit all sts
Repeat these 2 rounds until you have 8sts left, ending after a Rnd 1.
Finishing and Blocking
Break yarn and draw through remaining stitches, tighten to close, as you would any Hat worked in the round (naturally the wonky square top won't need this!)
And weave in all ends. This can be quite an arduous task, depending on whether or not you wove in the ends as you went, but you can use it to your advantage by using the ends to tidy up any little holes or uneven areas from the inside of your work.
And to block, simply wash gently, wring and remove excess water, and dry flat. I'd suggest rotating the Hat whilst it dries if you've worked the gathered or beanie versions, to avoid any crease marks occurring. You don't need to block over a balloon unless you want to. And if you can, try to avoid getting the Brim of your Hat wet or avoid stretching it out whilst you reshape it when wet.
And voila!
There are so many great #wwscrapalong Hats being shared on Instagram and Ravelry and seeing all of these is cheering me up no end. Thank you for joining in and knitting along - I very much appreciating my Woolly community x
Now that you've started knitting your stripes, it's time to think about how long the Body of your Hat should be.

The two Crown shapings I've written for this tutorial come recipe come pattern are short in their length - one is a gathered crown, the other a square (or wonky?) top - and this means that we can work the Body of the Hat to almost the desired overall length.
To measure the length on a wonky Hat with short row stripes, you'll want to take the average length - measure at the longest part and measure at the shortest part, add them together then divide it by two. You'd then treat this average length as you would any length when measuring the Body.
The overall length of your Hat, including the Brim, would be somewhere in this range:
14in: 5in - 5.5in/12.75cm - 14cm
16in: 5.5in - 6in/14cm - 15.25cm
18in: 6in - 6.5in/15.25cm - 16.5cm
20in: 6.5in - 7in/16.5cm - 17.75cm
22in: 7in - 7.5in/17.75cm - 19cm
24in: 7.5in - 8in/19cm - 20.25
I generally allow 1in/2.5cm difference between sizes when I write patterns for slouchy Hats, but it's important to remember that this is variable, and that it depends on how much slouch you want, how much extra width you added and more, and this is where it's uber helpful to know how well other (esp. Woolly Wormhead!) Hat patterns fit. If you know that you have a long face and quite a deep ear to Crown measurement, you'll want to make your Hat on the longer side. Conversely, if you've learnt that your ear to Crown measurement is shallower than average, don't knit it quite as long.
If you're still unsure, try thinking about it a different way: measure the depth of your head, from the base of your ear to your Crown (more info is on the Sizing page). Know that the Crown shaping of your #wwscrapalong Hat itself is short (a few rows, essentially - it's unlikely to be any more than 1in/2.5cm for the gathered version). This means that you can work the length of your Hat until it is the same length as your head, and allow the crown shaping to be that extra bit of depth needed for slouch.
Another way to approach it might be this: knit it to a length you like the look of. Place the Hat on your head, gather up the stitches on your circular needle (without taking them off it!) and see how it fits.
Or further still, knit until you think it's OK and if after working the Crown it isn't long enough, rip out those few rows and add in some extra length. We are only dealing with a few rows in each stripe after all, and that gives us the freedom to custom knit.
And of course if you're going for the wonky square top then you'll want to knit all your length into the Body!
Are you all following along on the Ravelry thread or via the hashtag on Instagram? Everyone's Hats are looking so creative and I can't wait to see how they develop!
Having worked your Brim, you're now ready to start the Body! There's a lot of info here so do take your time reading through, and ask away if you have any questions.

Yesterday I said in Pt2 that once you've finished your Brim, you should work one round in your 2nd yarn purl-wise. (or, if you're going for the slouchier-by-width version, you've worked an increase round purl-wise)
For many reasons, joining in a new colour for a new stripe with a knit round just never looks as effective as joining the new colour purl-wise. We're knitting ourselves a scrappy Hat, something wonky and fun, so why not highlight all the wonderful differences between yarns and textures and make a feature of the join?
For each scrappy Hat I made I joined each and every stripe with a purl round. Regardless of what stitch pattern I'd decided to use, I purled the first round in the new yarn, then moved on and worked the stripe. When I was ready to change yarn again, I'd purl the first round and so on.
And talking of stitch patterns...
Mixing up the Stripes
Invariably when you're mixing different stitch patterns together within a design, you'd normally be aiming to keep the overall tension the same, so as to not manipulate the fabric. But we're working on something different here, and it's fun to see how different stitch patterns intermix and play together.
I used stocking stitch, garter stitch, moss (seed) stitch, ribbing and probably a few more. Through in whatever stitch pattern you've always wanted to try. If it doesn't work out, there's only a small amount to rip out. It's kinda trial by error, but also pushing your own boundaries, too, and that's never a bad thing.
Ends and Joins
The ends can get a little pesky, to be sure, but there are ways of managing them. If you know you're going to use a yarn again, you can carry it up (by twisting it with the working yarn to stop it sagging or getting caught). Or you can simply break each yarn each time, and either work the ends in as you join, or leave them all to the end.
I don't have any top tips for joining in ends as you go, but we'd all love to hear from you if you've a method that works well for you! I prefer to leave them all to the end, as that allows me to neaten up any loose stitches that might occur at the joins.
And talking of joins, there are a number of jogless methods for working stripes. I don't have tutorials for any of these available outside of patterns or workshop notes, but here a couple of tips:
Slip stitch jogless stripes:
On colour change rounds, change colours by knitting the first stitch of the round in the new colour as normal, then work to the end of the round. At the start of the next round, slip the first stitch of the new colour, then knit to the end of the round. On every following round, knit every stitch as usual.
Travelling jogless stripes:
To further improve the transition between stripes, on the round when you change colour move the start of the round forward by one stitch and work the change as detailed above (i.e. slip stitch jogless) – this method is known as travelling jogless stripes. As you any shaping (e.g. crown shaping), moving the jog may not be necessary as the decreases would help hide the jog.
For me though, with these Hats, I didn't worry too much about jogless methods - I found that the change in yarn and stitch pattern and the purl round disguised most things.
Wonky Stripes
And this is where it gets really fun.
The wonky stripes are created by short rows. I've a few tutorials you can look at that, and there are a number of different methods and a whole host of different tutorials out there - use whichever method works for you.
One thing to be mindful of is that due to changes in gauge when working short rows in the round, you'll invariably find that using two different methods - one for the right side and one for the wrong side - gives you the best results. One trick though is to work the short row at the end of a stripe, so that the purl round hides any wobbly bits that may occur. Those purl rounds are very useful things!
There's a bit of maths involved with these short rounds, and there's a reason why we're working on a multiple of 8. Let me just throw the maths out there, then give you some examples with real numbers!
Starting at the beginning of the round, your short row round goes like this, where X is the total number of stitches:
Short Row Rnd: K 15/16X w&t, P 7/8X w&t, K3/4X w&t, P 5/8X w&t, K 1/2X w&t, P 3/8X w&t, K 1/4X w&t, P 1/8X w&t; knit across all sts, working short rows as you go (you would only work half the short rows; you work the remaining half on the next round)(where w&t = your short row method of choice)
Clear as mud? Because it's saturday night here are the short row formulas for the various stitch counts given in the chart for casting on in pt2:
48sts
Short Row Rnd: K45 w&t, P42 w&t, K36 w&t, P30 w&t, K24 w&t, P18 w&t, K12 w&t, P6 w&t; knit across all sts, working short rows as you go
56sts
Short Row Rnd: K53 w&t, P49 w&t, K42 w&t, P35 w&t, K28 w&t, P21 w&t, K14 w&t, P7 w&t; knit across all sts, working short rows as you go
64sts
Short Row Rnd: K60 w&t, P56 w&t, K48 w&t, P40 w&t, K32 w&t, P24 w&t, K16 w&t, P8 w&t; knit across all sts, working short rows as you go
72sts
Short Row Rnd: K68 w&t, P63 w&t, K54 w&t, P45 w&t, K36 w&t, P27 w&t, K18 w&t, P9 w&t; knit across all sts, working short rows as you go
80sts
Short Row Rnd: K75 w&t, P70 w&t, K60 w&t, P50 w&t, K40 w&t, P30 w&t, K20 w&t, P10 w&t; knit across all sts, working short rows as you go
88sts
Short Row Rnd: K83 w&t, P77 w&t, K66 w&t, P55 w&t, K44 w&t, P33 w&t, K33 w&t, P11 w&t; knit across all sts, working short rows as you go
96sts
Short Row Rnd: K90 w&t, P84 w&t, K72 w&t, P60 w&t, K48 w&t, P36 w&t, K24 w&t, P12 w&t; knit across all sts, working short rows as you go
104sts
Short Row Rnd: K98 w&t, P91 w&t, K78 w&t, P65 w&t, K52 w&t, P39 w&t, K26 w&t, P13 w&t; knit across all sts, working short rows as you go
112sts
Short Row Rnd: K105 w&t, P91 w&t, K77 w&t, P63 w&t, K49 w&t, P35 w&t, K21 w&t, P7 w&t; knit across all sts, working short rows as you go
120sts
Short Row Rnd: K113 w&t, P105 w&t, K90 w&t, P75 w&t, K60 w&t, P45 w&t, K30 w&t, P15 w&t; knit across all sts, working short rows as you go
128sts
Short Row Rnd: K120 w&t, P112 w&t, K96 w&t, P80 w&t, K64 w&t, P48 w&t, K32 w&t, P16 w&t; knit across all sts, working short rows as you go
136sts
Short Row Rnd: K128 w&t, P119 w&t, K104 w&t, P85 w&t, K68 w&t, P51 w&t, K34 w&t, P17 w&t; knit across all sts, working short rows as you go
144sts
Short Row Rnd: K135 w&t, P126 w&t, K108 w&t, P90 w&t, K72 w&t, P54 w&t, K36 w&t, P18 w&t; knit across all sts, working short rows as you go
152sts
Short Row Rnd: K143 w&t, P133 w&t, K114 w&t, P95 w&t, K76 w&t, P57 w&t, K38 w&t, P19 w&t; knit across all sts, working short rows as you go
160sts
Short Row Rnd: K150 w&t, P140 w&t, K120 w&t, P100 w&t, K80 w&t, P60 w&t, K40 w&t, P20 w&t; knit across all sts, working short rows as you go
Now, these short row rounds don't have to start at the beginning of the round. You could knit to the half way point and start there. Or the quarter way point. Or at any point, really - it's entirely up to you how wonky you want to make your Hat. You could stack a couple of short row rounds starting at the same point, work a regular stripe of two, then work a short row round from a different point to mix things up. It might help though to introduce a second marker to show the start of the short row round, to save too much confusion.
(think Brindled. Offset short row stripes can be pretty effective). But you don't have to work the short rows if you don't want to - it's your Hat :)
Mix up your stripes. Stick in a purl row when you feel like it. Have fun!
eta/lunchtime 3/7 - I found an error in some of the numbers, so I've corrected them. There's only a few stitches difference and your short rows will still have worked so don't worry, but the maths and calculations are now correct as per the fractions :)
Armed and ready with your oddments stash, let's get this Hat started!

We're going for something comfy with this Hat, something slightly slouchy, and the only area where gauge is important is the Brim. Pick yourself a firm yarn to work the Brim with, and don't be afraid to work at a slightly tighter than normal gauge – the Brim of a Hat gets a lot of abuse through wear and tear, and a good fit and reasonably tight fabric is important.
You'll want to have an idea of gauge before you cast on for your Hat. If you've used the yarn before you'll have an idea of how it behaves, but a swatch to check gauge is never a bad idea. You might also want to arm yourself with 2 sets of needles – one that will give you the fabric you want for the Brim, and one the next size up (going up a needle size will help give the fabric drape in the Body).
You will also want to know the size of your head! I have a very helpful page that guides you through how to measure yourself (or the recipient) and explains negative ease.
The Numbers
For this Hat, we want to work with a multiple of 8, as that's critical to the stripes in the Body and the structure of the Crown shaping. And because I like maths and numbers and like to be helpful, I've created this chart for you (and if all has gone to plan, you should be able to click on it to enlarge).....

Simply choose your yarn weight, read along the chart to your head size and bingo! there's your cast on number.
Now, if your gauge doesn't perfectly match any of those given I suggest swapping around your Brim yarn with something else, or trying a different (finer) needle size. It won't hurt you to cast on for the 28sts gauge if your yarn gives you 29sts - it'll give you a smidge more negative ease and that's no bad thing.
I'm going to suggest that using needle sizes to adjust gauge is the smoothest road, as it'll save you a maths headache. Going up a needle size after the Brim will add in a little slouch. If, however, you want to something more along the lines of Tangled River or Runway in fit, then I'll explain at the end of this post what you'll want to do. First though, let me talk about cast on methods!
Cast-on Methods
For my samples, I used the Alternate Cable Cast-on, and did a knit side twisted rib (K1tbl, P1) to give me a comfy, cosy fabric that will survive a fair bit of wear and tear. You can of course use any cast-on method that suits you, including a split Brim, garter stitch Brim or even a folded Brim - it really depends on what you want, and what suitable yarns you have.
I've been beavering away on the Tutorial pages, and the Cast-on page has lots of extra tutorials added, and the number of video clips are also growing. You'll know that I like to keep any videos short and to the point for folk with limited data packages and/or slow internet, or simply for those folk who prefer the info succinct, and I hope these will benefit you.
Don't forget that you're working in the round, so once you've cast on the required number of stitches, do follow all the usual practices - join in the round without twisting, and add a stitch marker. Use your preferred choice of needles for this job, whether that be DPNs, short circs, magic loop or two circs :)
Brim Depth
This will fall under the personal preference umbrella, but if you're really not sure, go for something like 1.5in/3.75cm. Or you could keep knitting until your yarn runs out!
If you reach the end of the Brim before I post the next instalment tomorrow, choose your next yarn, *purl* one round with it, then simply put it to one side and cast on another one ;)
And if you want more width in your Hat, here's the maths....
Slouch is achieved in a couple of different ways - more width, more length, or both. For my samples I knitted for longer to add length, and allowed the differences in fabric (firm rib in Brim, stocking stitch in Body) to add a little slouch. If you want more slouch though, you'll probably want to add more width, and that means increasing to more stitches for the Body.
So - we're working on a multiple of 8 for this Hat, as the Body stripes and Crown shaping rely on it. And if you want more width after the Brim, you have to think backwards and make your Brim work on a different multiple, so that after an increase round your Body section will have the right number of stitches.
I would suggest casting on with a multiple of 6, then increasing after the Brim. Working with a multiple of 6 for the Brim and then increasing to a multiple of 8 for the Body will give you an increase of 33%, which is not far off the numbers for the slouchy style Hats mentioned above. A multiple of 7 won't give you as much extra room, and a multiple of 5 will give you something closer to that of a beret.
Assuming then that a multiple of 6 is the best choice, I would use your gauge and head measurement on the chart above, find the relevant number, than round that down to the nearest multiple of 6 (we always round down, remember!). Cast on, work your Brim as directed, and when your Brim is the right length, what would be the first round of the first stripe will also be your increase round.
Your increase round would be:
Inc Rnd: *P3, M1P; repeat from * to end
where a M1P is a lifted bar increase, purlwise. I'll explain more about why your are purling tomorrow, but this will take your Brim on a multiple of 6 to the Body on a multiple of 8.
On your marks, get set....
Go cast on!
Don't forget that we've a #wwscrapalong KAL thread in my Ravelry group, and I'll endeavour to answer as many help questions as I can there and here.
Enjoy!


