
I like this cast-on – it's absolutely perfect for top-down Hats, as not only does it reduce the hole at the crown, but it also mirrors how you would cast off in a bottom-up Hat.
When you knit a bottom-up Hat and get to the last few stitches, the instructions will most often tell you to cut the yarn and thread it through the remaining stitches and then tighten to close. Doing this reduces the hole at the crown and effectively casts off all the stitches at once. This circular cast-on does just that, but the opposite way round! Mechanically it works in the opposite but same way to threading the yarn through and tightening – instead you are casting on the stitches over the yarn, which is what allows you to neaten up so easily. Once you've knitted a few rounds after casting on this way, you'll be able to pull the yarn end and the hole will close up and look perfect.
You will need a crochet hook, one as close as possible to the size you will be using for the knitting. You could use a slightly smaller hook, as the stitches will be tightened anyway, but a hook that is too small will make the first rounds knitted onto the cast-on tricky. Likewise, with a hook that's too big, the first few rounds will be a bit saggy until the hole is tightened.

1) With the end of your yarn, make a loop by wrapping the yarn around your finger, with the end tail hanging to the right in the photo.

2) Take your crochet hook and pass it through the loop you've just created and take it up to catch the working yarn.

3) Grab the working yarn with the hook and pull it through under the 1st loop.

4) Now take your hook over the 1st loop up towards the working yarn again. The 2nd loop will remain on the hook.

5) Grab the yarn with your hook.

6) Then bring the yarn down and through the second loop, and drop the second loop off the hook. You are left with one new stitch on your hook, and this is the first of the stitches you will be casting on. Repeat steps 2 to 6 until you have as many stitches as required for your cast-on.

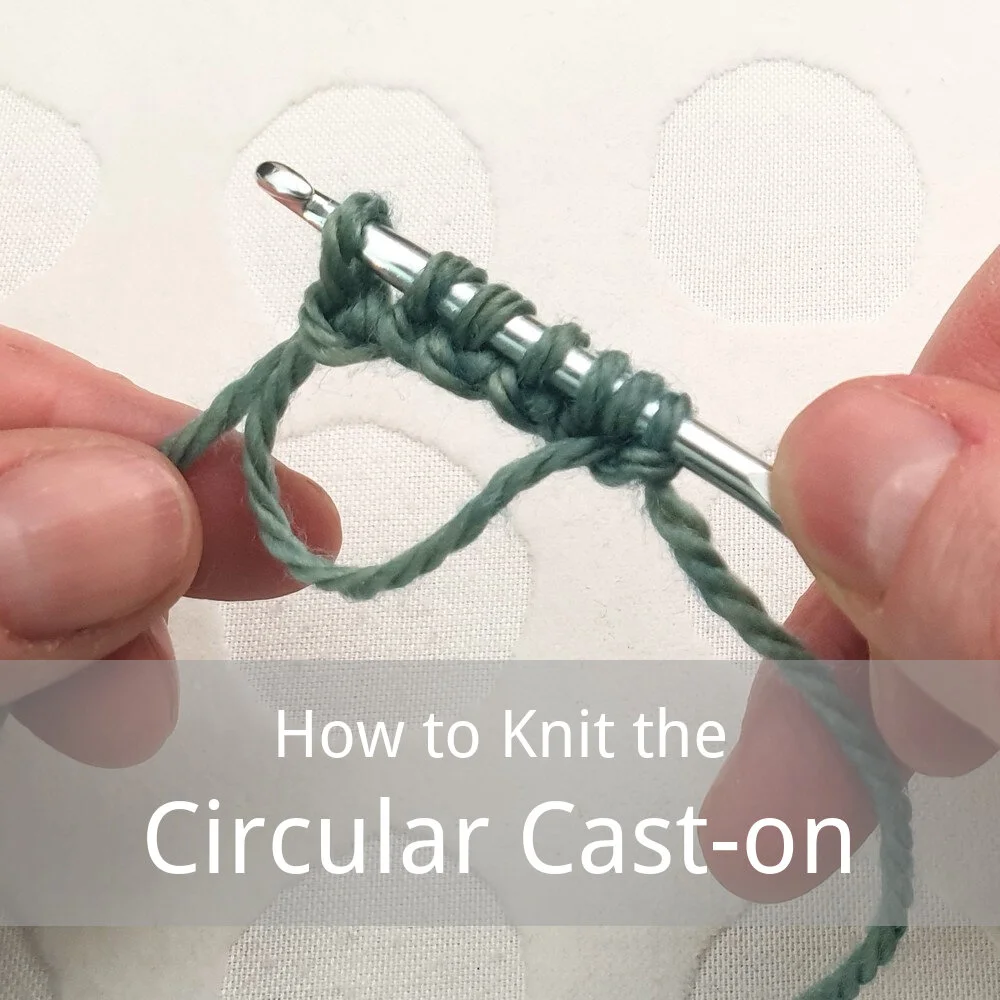
7) Once you have the required number of stitches on your hook, they will need to be transferred to one of the needles you will be knitting with (likely DPNs for a Hat in the round). Once on the needle, you can see the cast-on better – the central loop is the one around which the stitches will tighten. The working yarn is to the left and the end of the yarn is to the right.
Once you have worked a few rounds of your pattern, you will be able to tighten the loop and close the hole. To do this, gently pull the end of the tail yarn – this will close the loop and take up the slack. Some of the stitches may need a nudge to move along, depending on your yarn and pattern. Once the hole is closed, the yarn tail can be sewn in for finishing.
And there you have the perfect way to start a top-down Hat!
Support
As always, if you have a question about this technique or need some help with it, leave a comment below! I’m afraid I’m unable to offer help via email or private message, but you’re welcome to post in our forums.
The photos in this post were updated on 29 January, 2021.


