

Here’s a quick tip for neatly changing yarns when you’re working Garter Stitch stripes flat. It’ll help avoid having yarn floats or joins at the end of the row, and you could use the same method elsewhere should you need to change yarns right at the very edge.
Support
If you’ve a question about this technique, pop it in a comment below or visit the forum! I’m unable to offer help with patterns or techniques via email.

Scourie is my brand new pattern, a collaboration with Ripples Crafts. Here’s a wee video to help with changing colours in the short rows!
You can read more about the pattern in my previous post :)


Support
As always, if you have a question about this technique or need some help with it, leave a comment below! I’m afraid I’m unable to offer help via email or private message but you’re welcome to post in our forums.

This tutorial was filmed to support my Parallelo pattern, but it’ll also be helpful with several of the Elemental hat patterns, too.
Short row colourwork, which the Elemental Hats and Parallelo feature, is a type of intarsia. It’s not just intarsia, as sometimes stranded techniques are used and of course it’s all about the short rows. But having some intarsia skills under your belt will be a useful skill indeed.
There’s a slight difference in the method between changing the colours on the right side and wrong side, and the two videos below cover them both for you.


Support
As always, if you have a question about this technique or need some help with it, leave a comment below! I’m afraid I’m unable to offer help via email or private message but you’re welcome to post in our forums.
It's probably common knowledge by now that I'm not a fan of fairisle or stranded knitting, I know, I know, blasphemy and all. But, well, they're rather 2-dimensional. Nothing wrong with that, but I'm not a surface design sort; I never have been.
What I find with colourwork is that it demands the technique bends to create the colours; that the colours are more important than the construction. The colourwork techniques themselves don't manipulate the fabric per se but instead are are designed to ensure the pattern pieces on the surface fall into place (every knitting technique is a construction technique in the traditional sense a of constructed textiles vs surface design, but not every technique pushes construction beyond the surface). You can add other shaping to a stranded piece with increases/decreases/short rows, but the methods for creating the stranded knitting themselves aren't used to create the form. One exception might be where you deliberately pull the floats tight to create a vertical tuck like effect, although I'm not sure how structurally sound that would be.
Short row colourwork on the other handle demands that the colours bend with the technique. The technique is the dominant factor. Whilst there may be an intended surface design as a result, it's actually a 3D technique that is put to play and that means that it can be taken beyond the surface. And that's why it caught my interest.

an initial swatch for the Elemental Hats
When I first chatted with Carol and subsequently LoveKnitting about this project, my MO was to create short row colour patterns, to do in Hats what had been done in shawls. I'd set myself an engineering challenge.
There are some amazing short row colourwork patterns out there, and short row colourwork is inherently distinctive. But as with a lot of textiles that are 3D in a fabric manipulation sense (as apposed to a sculptural sense) they're invariably found on flat pieces. It's one challenge to manipulate the fabric enough to make it 3-dimensional in and of itself, it's another thing entirely to then form that fabric into a 3-dimensional item whilst still maintaining it's integrity.
Short rows do provide us with the means, though. And working through these designs I was able to create the 3D shape - crown and brim, but in particular the crown - by using the colourwork itself. The short rows that create the pattern also create the form.
To ensure a short piece works it wants to be balanced, which means that it wants to have the same amount of rows for each stitch, otherwise it becomes distorted. Once a balanced fabric is mastered, it can then be carefully and deliberately unbalanced. By omitting rows (or by adding more short rows) at any given point, we can ensure that our fabric has form (in a 3-dimensional sense, not in a "what's it been up to this time?" sense).

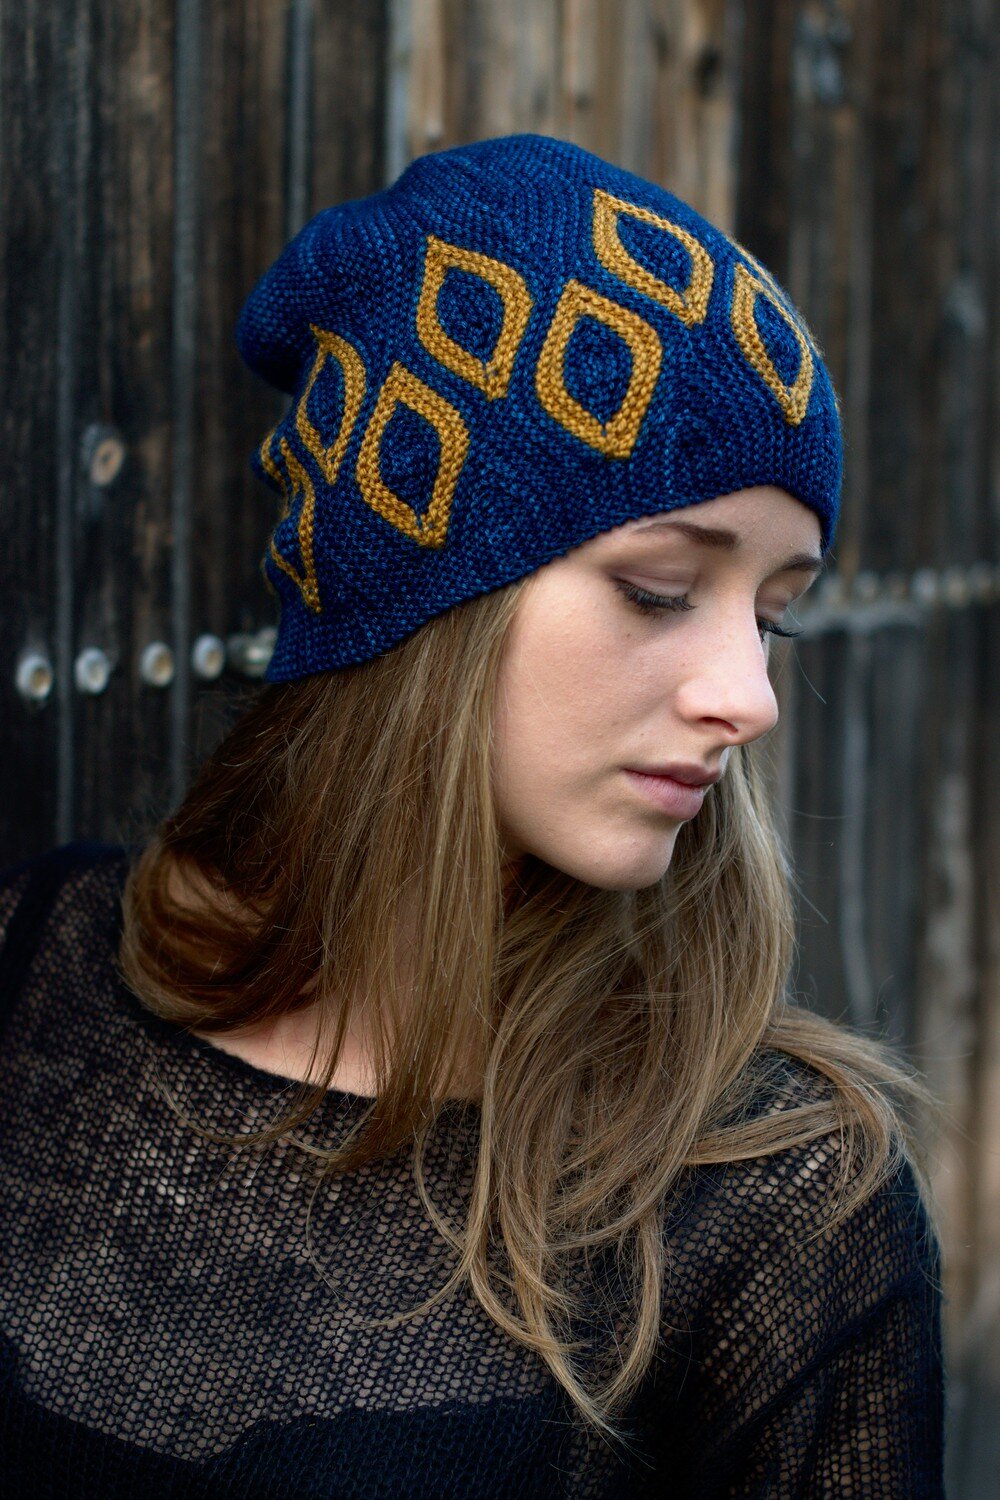
The design above is Toph, one of the 5 Elemental Hats. In this shot of the crown you can see how the short row forms, which represent leaves in this case, are used to create the crown. The entire Hat is knit sideways, consists entirely of short rows, without breaking either of the yarns. All of the Elemental Hats are created the same way.
It was quite an engineering challenge to achieve this, and I'm really pleased with the results. I have so many ideas now that I've got this cracked, so many things I want to create!
The image shows the crown of my Castiel Hat pattern. It features the post title “Hat Masterclass - Shape, Structure and Fit”.
In my previous article about crown shaping, I mentioned how various multiples - and their subsequent decrease ratios - affected the overall structure and style or shape of a Hat. The reason I start at the crown when I start a new Hat design is to ensure that the overall structure will work, and that the design will have continuity throughout. To be able to understand structure, shape and fit, we need to think about the different parts of a Hat and the numbers that determine them.
First though, let's look at the anatomy of the Hat and how each part affects shape.
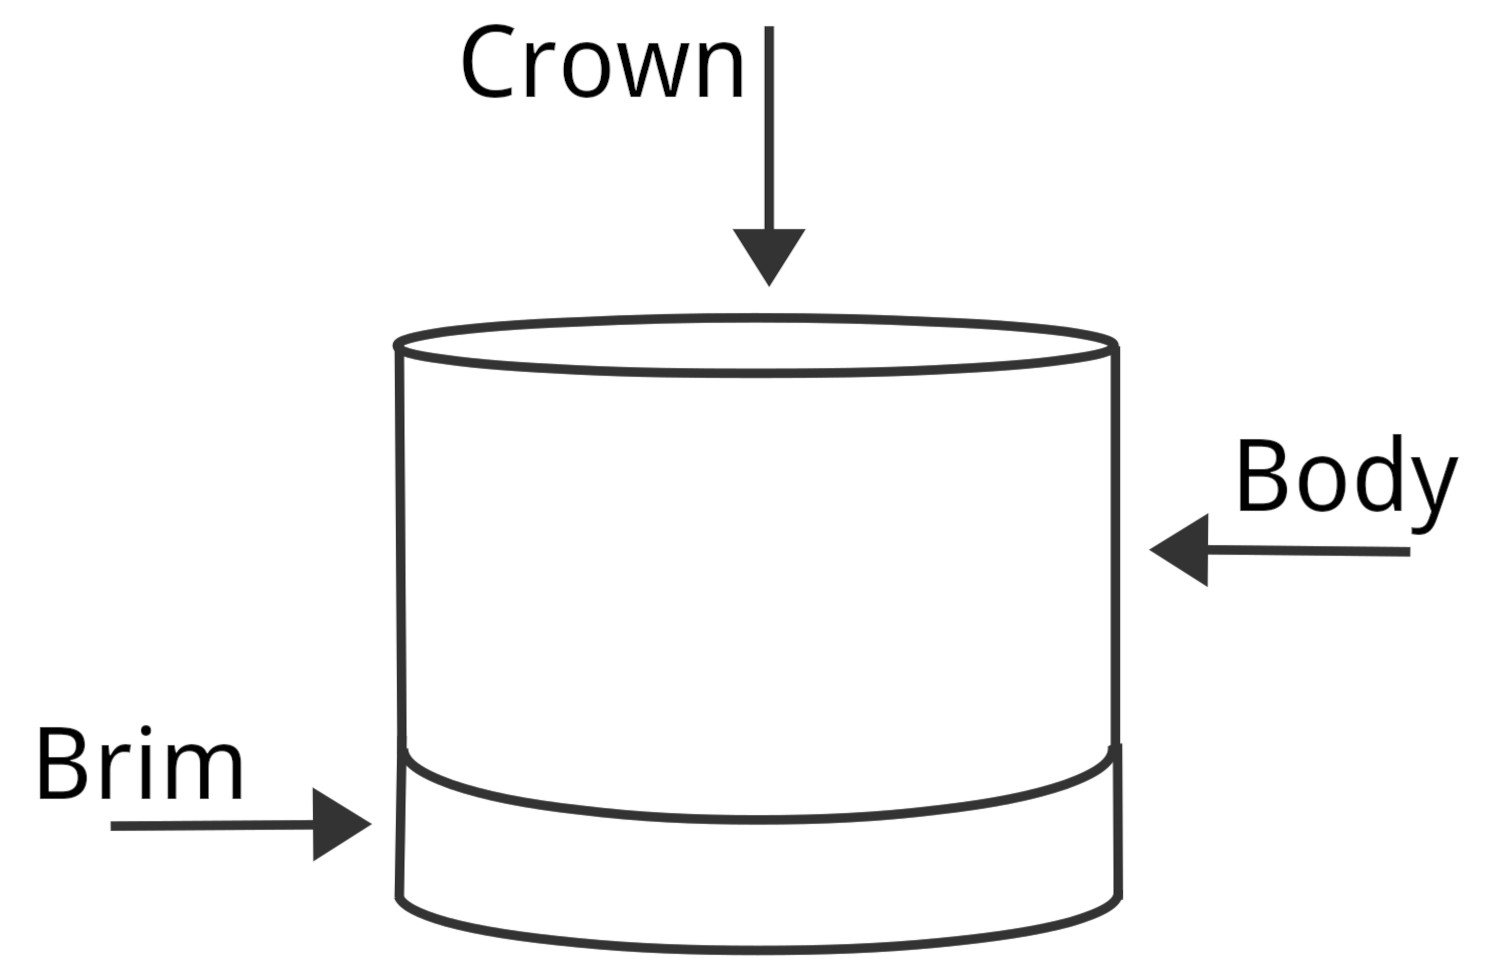
Schematic labelling the 3 main parts of a Hat - the Brim, the Body and the Crown
The Brim – has limited determination on shape and structure compared to the crown and body, but is crucial for fit. How snug would we like our Hat to be, how much negative ease?
The Body – works with the crown to determine overall shape, and is the link between the structures of the brim and the crown. Will it be lose and slouchy or snug and fitted? Tall and tapered?
The Crown – this is the area that determines shape and structure more than anything else. Will it be pointy, square, gathered, flat or round?
About Ease
Ease is really important when it comes to fit, and we can't talk about Hat shape without mentioning it!
To keep a knitted Hat on our heads, it needs to be smaller than our head. Make your Hat the same size and it'll likely fall off. This is what's known as negative ease – when a garment or accessory is smaller than the body part it will fit.
For a Hat, I would usually recommend somewhere between 2in to 3in/5cm to 7.5cm, or around 12.5%. But it depends. A beanie with 4in/10cm of negative ease or more is going to look very sporty, whereas a slouchy Hat with 2in/5cm of negative ease or less is going to appear very casual. Overall intent of style plays a part, as does comfort. Accommodating hair plays a big part too; those with short hair and/or simple styles may be more comfortable with a closer fitting Hat, whereas a looser Hat often preserves hair styles better (i.e. avoid Hat-head). Purpose, too, is another important factor – keeping out wind chill and endurance in rougher climates demands more negative ease.
The Crown in relation to shape
We've learnt that different decrease ratios will affect the crown, and the crown is one of the key parts of the Hat that determines the style. For instance, a slow decrease ratio of less than 3 sts decreased per round (on average) will give us something pointy, like a pixie Hat. The less stitches decreased on average, the steeper the slope gets and the pointier the Hat.
The same is true when we decrease more rapidly. Decrease on average 4 sts per round and you'll get a flat circle that sits perfectly on top of a close fitting Hat like a beanie. Up the ratio slightly, and you'll move through berets and then into gathered crowns, with the latter working on anything above an average of 8 sts decreased on average, and which would work perfectly for a slouchy Hat.
Once we know the shape of crown that we'd like, and the ratio of decreases to create that, we treat that as our structural multiple, and if we're working bottom up we would work backwards. If we don't know yet how we'd like the Hat to finish then we'll work with a number that allows different options (a multiple of 12 gives us all the possibilities, with a 24 being the ultimate magic number!)
Working backwards – considering the Brim in relation to the Crown
The brim will have a solid relationship with the crown, and it's this area where we first consider fit. The brim of a knitted Hat is the most important part as far as gauge and ease is concerned, as it's the part that keeps the Hat on the head!
If we're working towards a beanie style Hat, a half-dome or watch cap style, then the brim will work on the same multiples as the crown. With this style of Hat we are simply creating a tube with a circle on top, with no other shaping besides that of the crown.
If we're working towards a beret style, then the crown multiple is relevant for the start of the body, for the increase round immediately after the brim, and so to determine the brim multiple we need to take our working backwards one step further. In the previous article I mentioned that the common increase formula for a beret from the brim into the body is K2, M1 (where M1 is a lifted bar increase), i.e. an increase of 50% from the brim into the body – berets always seem to follow this rule. To work backwards from the crown, we want to reduce the crown multiple by 33% to get the same ratio. So for instance, if our crown works on a multiple of 6, the brim will work on a multiple of 4. This is where it gets awkward with some numbers, and we might need to go back and reconsider our crown structure, as not all number will happily lose 33%! There are of course ways around this, and we can invent a multitude of formulas to make it work, but to fully understand the concept we want to try and keep the numbers straightforward.
If we're working towards a slouchy style, something that has a little room in the body but not as much room as a beret, and something less hugging than a beanie, then the same applies – the crown multiple is relevant for the body, immediately following the increase round after the brim.
This time though we won't need to increase as many stitches after the brim, and I would normally increase somewhere between 20% up to 33%, depending on how lose I'd like the fit and shape of the Hat to be. Again, we would work backwards but we have room to adjust the figures to our needs here – a crown multiple of 8 could equate to a brim multiple of 6, for instance. That's a 33% increase from brim to body/crown. A slouchy Hat is much more flexible in numbers, and is a lot easier to design and knit because of this. Or a multiple of 9 at the crown could be a multiple of 7 at the brim (and that combination makes for a pretty interesting Hat structure...)
Bringing it all together in the body
Having determined our brim and crown structures, we can start to think about the body shape. Although the crown determines the overall structure, the body still plays an important part in determining style. Yes, the crown will determine whether we have a pointy, flat or gathered finish, and will determine the mathematical structure of the whole Hat, but the body determines whether we will have slouch or length or height.
Slouch is determined by two things – length, width, or both. We either increase after the brim (hence a beret automatically looks slouchy, as we increase 50%), work a longer length than normal before starting the crown decreases (extra long beanies are a good example of this) or we do a little of both (the slouchy Hats currently in fashion generally follow this rule). By knitting for longer, you're creating more fabric, just as you would be in your increased stitches, only in a different place. How and when you create that extra fabric determines your style.
Conclusion – common themes and differences
The main differences between beanies, berets and slouchy Hats are determined by the different parts of the Hat, as described.
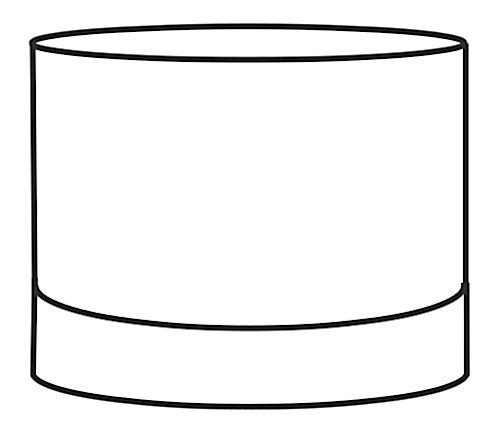
Diagram 2: schematic of a beanie
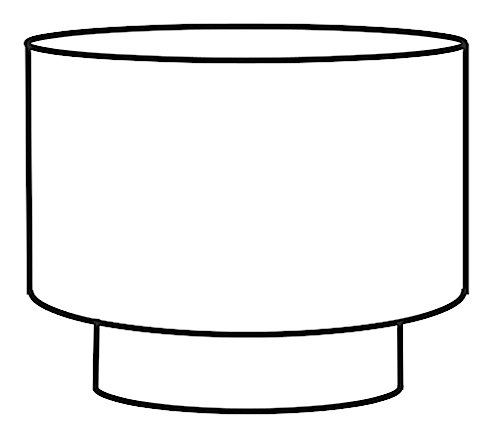
Diagram 3: schematic of a beret
A beanie, shown in diagram 2, will flow smoothly and simply from the brim into the body, which then flows into the crown. All parts of the Hat work on the same mathematical structure, and a good design will make the most of this. The brim and the body together form the cylinder of the Hat, and the circle atop is the crown. The length of the cylinder generally works out to be about two thirds of the overall length, although row gauge will affect this. The brim and body of a beanie will both have negative ease.
A beret, shown in diagram 3, shares some structure with a beanie – although it is two cylinders of different diameters (the brim and the body) the total length of the those together will be the same as a beanie. What makes a difference is the much larger circle at the crown, due to the 50% extra stitches. This adds extra length to the Hat, and the additional stitches add the room. The brim of a beret has negative ease and the body has positive ease.
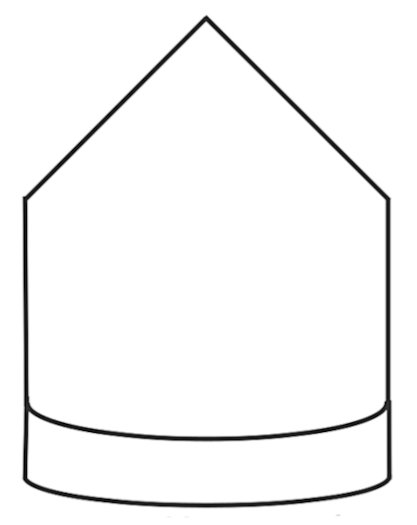
Diagram 4: schematic of a pixie Hat
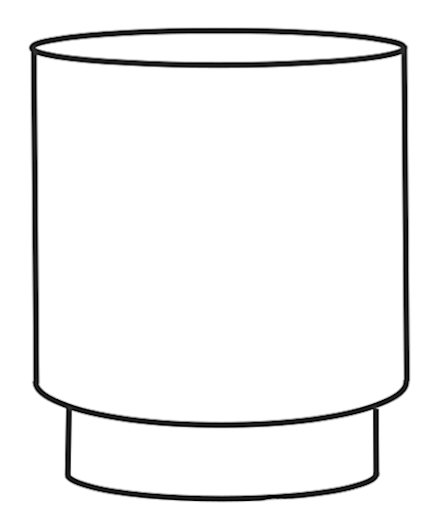
Diagram 5: schematic of a slouch Hat
A pixie Hat too shares a similar structure with a beanie, with the key difference being the crown. Invariably the brim and body form the cylinder (although they can of course be different stylistically, and use different stitch patterns) but instead of a circle at the top of the cylinder, we have a cone. Personally, I tend to make the length of the Hat before starting the crown shaping (the cylinder) shorter than that of a beanie, so that the point on the Hat is softer, and it will also be less likely to flop over. The brim and body of a pixie will both have negative ease.
A slouchy Hat can be any of the above, or none of them. It can be two cylinders or one, it can have a flat crown (a circle) or a gathered crown or even a pixie Hat – I have designed and published more than one pattern for a slouchy pixie Hat! The brim of a slouchy has negative ease and the body has positive ease, but not as much as a beret. It's not really surprising that slouchy Hats have become so popular; they're easy to wear, but they're also easier to design as the maths is more flexible and forgiving, and they allow for much more experimentation. They don't fit the traditional rules of knitted Hats.
this article was originally published in issue 98 of the Knitter, Spring 2016
There's a lot more involved in designing a Hat than I've shared here! If you’re interested in learning more, I’ve a number of self-paced, downloadable online classes all about Hat design, and you can find them all in my Hand Knit Hat Academy!


