

Ok folks, at last I'm gonna share the techniques that I picked up from my recent workshop with the KCG (Knitting & Crochet Guild UK). The workshop was run by Marjorie Needham and Winifred Shelton – Marjorie doing the teaching bit. Now, the techniques taught weren't all Marjorie's own... she'd picked a few things up along the way, added her own ingredients and presented her ideas of the best way to cut these little rascals up and work with them. Oh, and I do remember some folk at the workshop needing some tips re-explained after the demo, so I'm gonna try and make this as clear as I can without making you feel like a 2-year-old ;)
You will need
A variety of old knitting needles or crochet hooks (swatch dear, swatch)
Loads of plastic bags
Scissors
Paper clips
Initial tips
Now, I said 'old knitting needles etc.', 'cos I found that some of the ink on the bags can rub off, so you don't wanna ruin your best birch needles!
Some carrier bags carry a 'bio.....' sign/symbol. It's cool that finally manufacturers are thinking about the planet and making plastic stuff that bio-degrades, but for this purpose it ain't much help... your knitted/woven/crocheted items will start to disintegrate within 3 years. So let those bags do their stuff and save this project for the serious polluters.
You can use just about any plastic bag – bin liners, food bags... just use your judgement and make a swatch. Try giving the potential strips a bit of a tug when still in carrier bag mode – see if they tear easy or seem fairly strong.
Mega sticks aren't necessary – I've started my sample on 4mm (US 6) needles, after cutting the strips just under 2 centimetres (about 3/4 inch). Marjorie showed us a hat she'd made from strips 4 centimetres (about 1.5 inches) wide on 5mm (US 8) needles (it was pretty cool). This stuff curls and twists up – it'll surprise you – so unless you want a loose, open surface, stay with yer average pins.
Paper clips will seriously help you cut straight lines and give you an even yarn.
Dinky scissors or your best embroidery snips won't be much help – mid to large sized kitchen or paper shears will be just fine.
This is by far the quickest method of cutting up the bags into long, continuous strips. You can do it a bit like you'd peel an orange, on the diagonal, but practice this method and you'll find it a whole lot quicker. (Yeah!)
Post edit: Aye up, Sharon... good question, about why you'd wanna do this... and what you'd make from it all. Allotment/shopping bags, bath/door mats, and perhaps something for someone with a fetish for black rubber (think bin bags....) Anyone else tried making something different with this stuff? Must admit though, not sure I'm feeling inclined to finish my sample. It just ain't wool.
If anyone else shares any tips with me, or I think of any more, I'll add them. Otherwise, here we go...
The photo shoot (get cutting, baby)

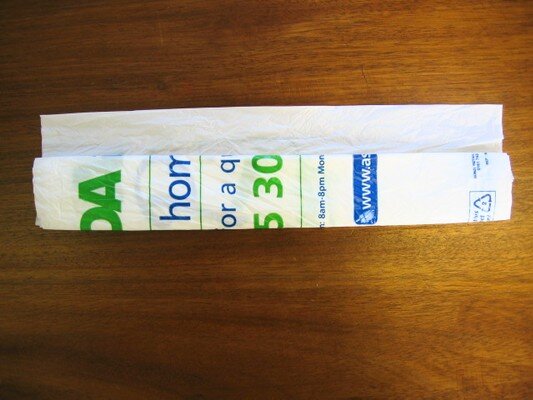
1) Lay the bag out nice and flat, smoothing out any creases, paying particular attention to those side gussets.

2) Cut off the handles and the sealed bottom edge. Leave the sides sealed and folded – you'll sort them out next.

3) Next up, open out the gussetted sides, lay the bag and smooth out any creases, with the folded edges top and bottom, cut/open edges to your side. Take the bottom and fold it up to about an 1.5inches/4 centimetres from the top, smooth again.

4) Fold the bottom edge again, up to the same point....
5) And again.... 3 folds in total should do it. Now get those paper clips ready.

6) You only need the paper clips to stop the plastic skidding around whilst you cut the strips. Trim up the edges, and decide how wide you'd like the strips to be. I cut mine to about 2 centimetres (3/4 inch) wide, and I'm knitting them on 4mm (US 6) needles – not too tight or too loose. Majory would recommend 3 or 4 centimetres (1.25 to 1.5 inches), but it's down to personal preference. If you go too thin, they're likely to rip easy.

7) When you start to cut the strips, don't cut all the way to the edge! Snip to just beyond where you've folded to – leave that top 1.5 inch/4 centimetres as it is. Cut the same width strips all the way along. When you're done, take the paper clips off and shake it all free.
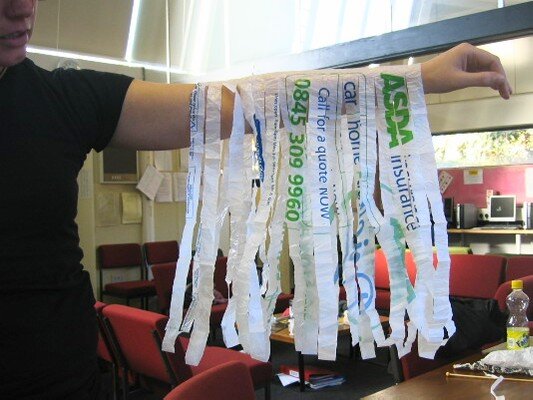
8) It should look a bit like this, with the strips still joined at the bottom.
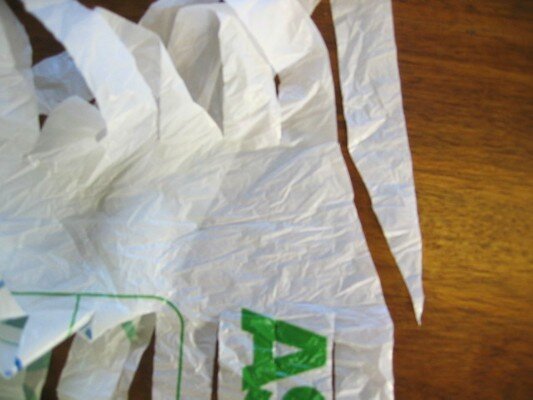
9) Now, starting at the outside edge, make a diagonal cut across to the next strip edge (bit tricky to put into words, this manoeuvre – hope the picture is clear!)

10) Keep going all the way across, making those diagonal cuts, which will turn this little lot into one long strip.
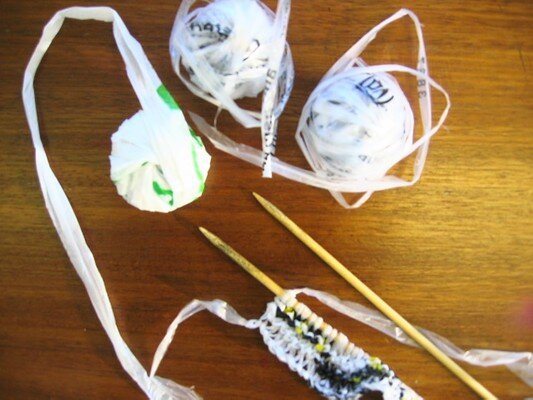
11) Now all you gotta do is wind it all into balls – and you're off! As you probably guessed, the balls get a touch springy and tend to unwind, making a bit of a mess.

12) If you look close enough, you can see how dirty my needles got just from a few rows... yep, that's all I managed, a few rows. I'm a busy soul, y'know.... it will be finished... I don't believe in UFOs.

Support
As always, if you have a question about this technique or need some help with it, leave a comment below! I’m afraid I’m unable to offer help via email or private message but you’re welcome to post in our forums.


