A few readers may remember my HitchHiker spinning wheel, that I imported to the UK several years ago, and hand painted....


Well the time has come to sell this wheel. I still love it and if we had all the space and money in the world, I would keep it. But we don't. And I have only spun 100g of fibre on her since I was pregnant with Aran, and he was 7 in March - this wheel really needs to belong to someone who will use her and love her, not keep her stored away in a bag! Last year I was lucky enough to get myself a Louet Hatbox wheel (which I took all the photos for but failed to blog about) and I've done more spinning on that than the Hitch - someone who spins as little as I do these days can't justify two wheels.


So yesterday we dusted her down, gave her a mini service and took lots and lots of photos. I've really no idea what to ask for her, as these don't come up 2nd hand very often, especially in the UK and Europe, and especially one with so much decoration. Shipping these over from the US isn't cheap and the import duty adds a hefty sum, and that's all been taken care of - this wheel was the first HitchHiker to come to the UK! After a lot of thought, I'd like to ask £250 plus shipping, and will list the wheel on eBay later today. I'd be more than happy to see her go to someone I know, so if you're interested send me a message!


Over the years I've had a lot of questions about the wheel, and Dave at Merlin Tree has developed quite a following, and there's a tonne of information now online. If you Google for the HitchHiker wheel there are many videos, demonstrating how the wheel works and it's own special charm, and there's an active group on Ravelry, too. Dave is incredibly helpful and hand makes all of these wheels!

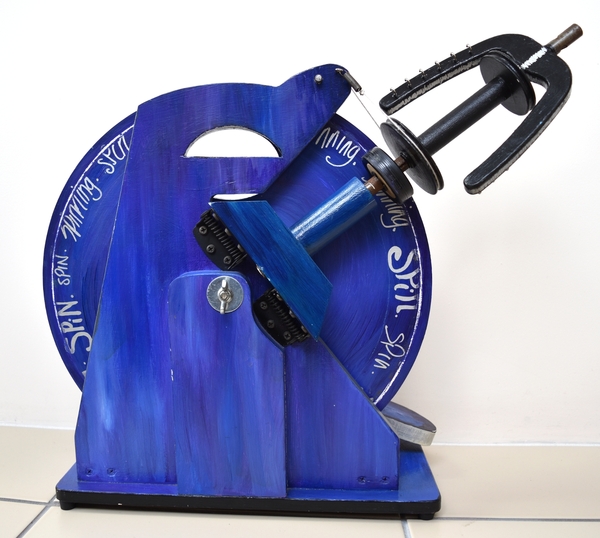
I've always said that spinning on a hitchHiker is akin to driving a vintage car - it has character. It isn't as smooth as my Louet straight out of the box, but given a short learning curve you'll soon learn her quirks and what she needs to spin well. The wheel is quite capable of spinning all sorts, you'll just need to know what adjustments to make (hence the link to the forum and using YouTube)


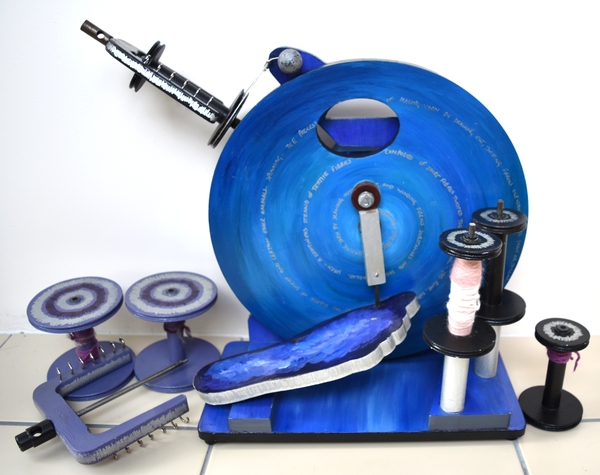
I took rather a lot of photos yesterday, so here goes....


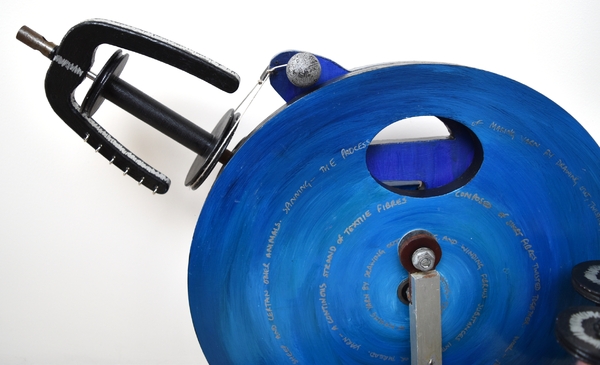
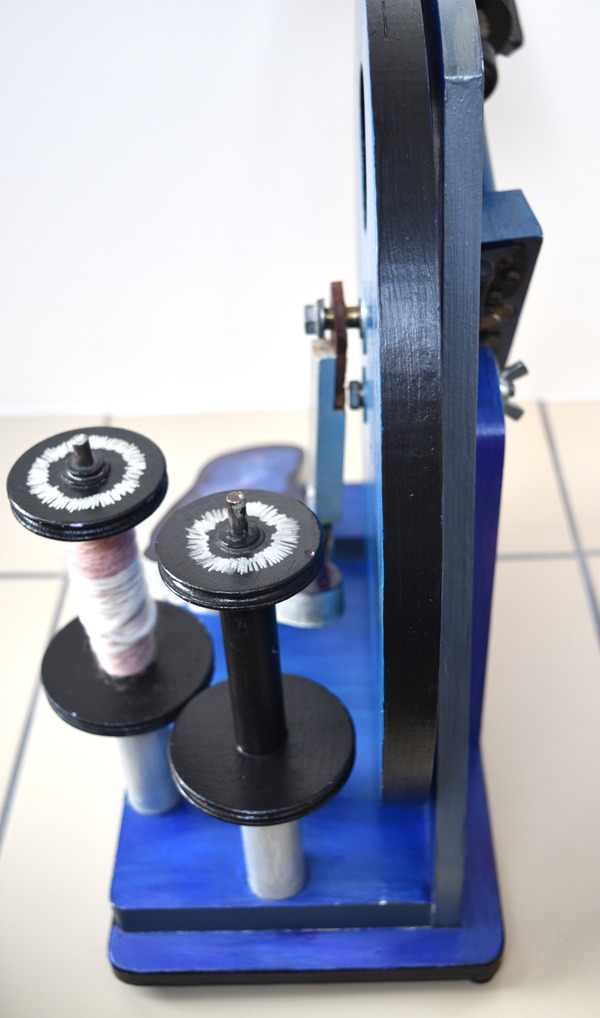
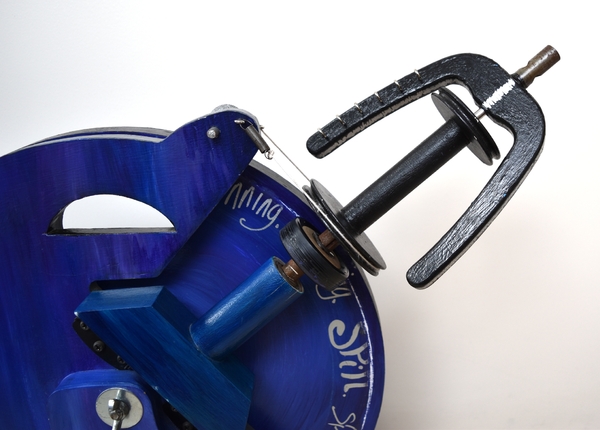
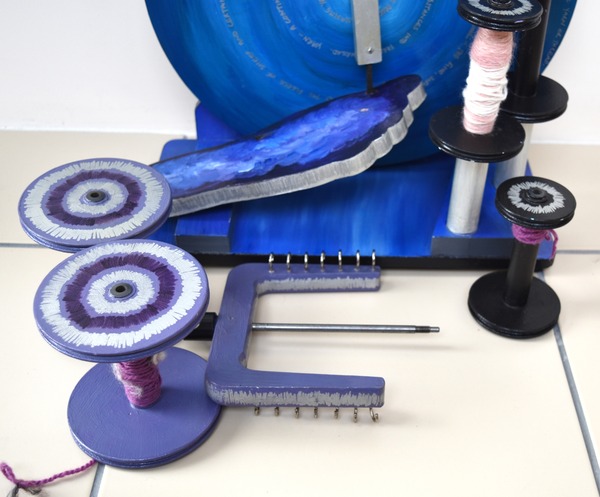
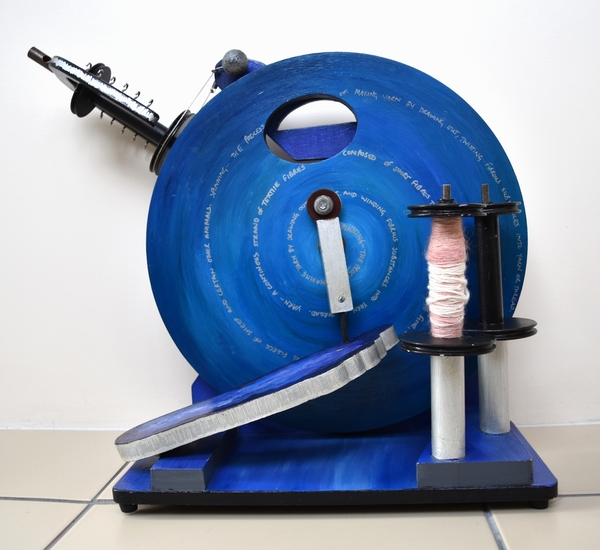
The standard flyer on the new wheels is slightly different to this one - this flyer is (I believe) from an Ashford, and there are 4 standard bobbins to go with it.  


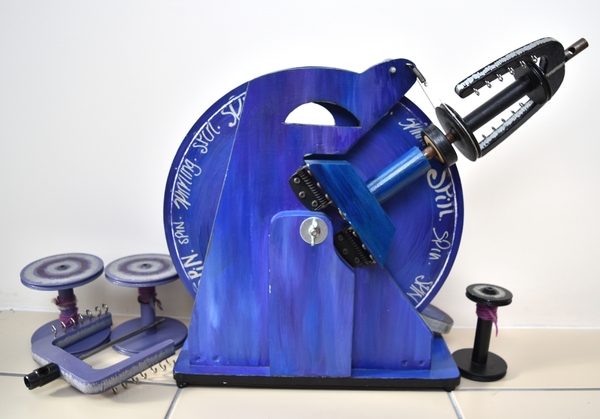
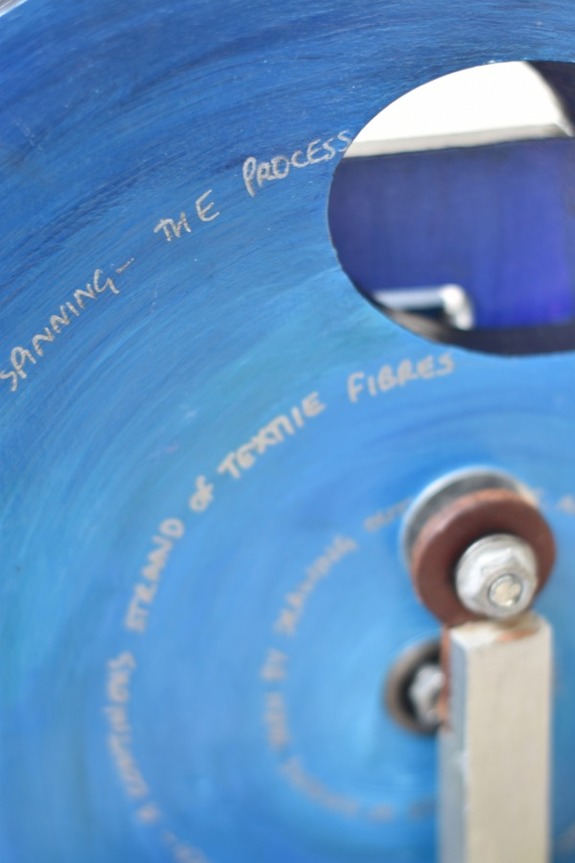
The only real damage to the paintwork is on the back of the wheel, where the whorl runs. This is to be expected really - the wood was primed and painted in acrylic and then varnished, but wear will show eventually. It's very easy to touch up - the background to the paintwork isn't a flat colour, and the writing is simply done with a permanent silver marker!


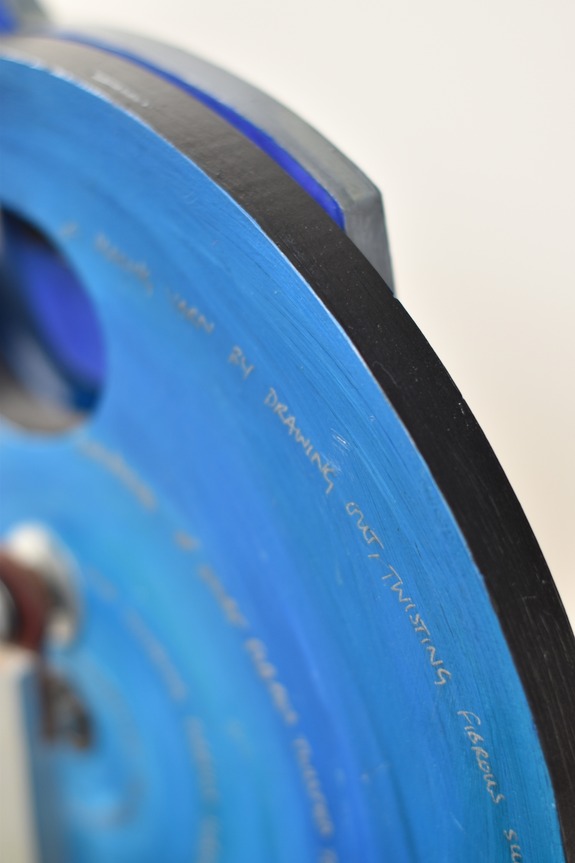
The writing on the front of the wheel spirals, and is a description of the spinning process.


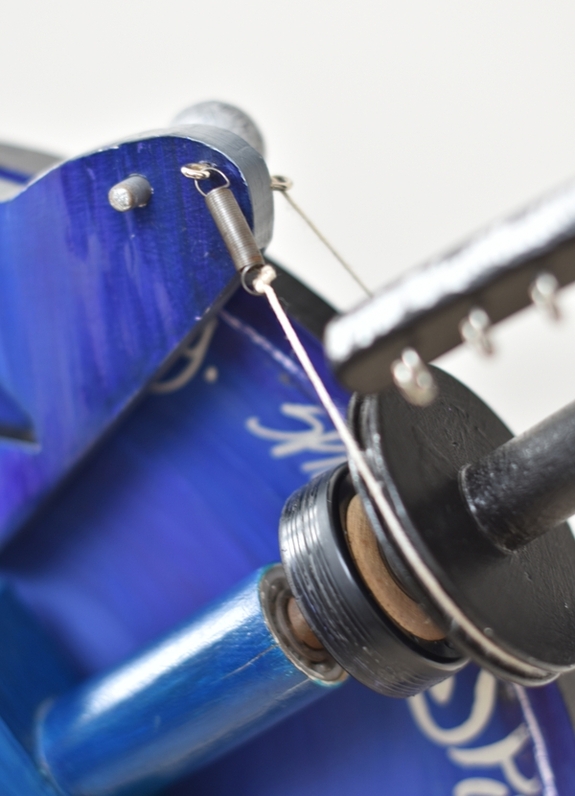
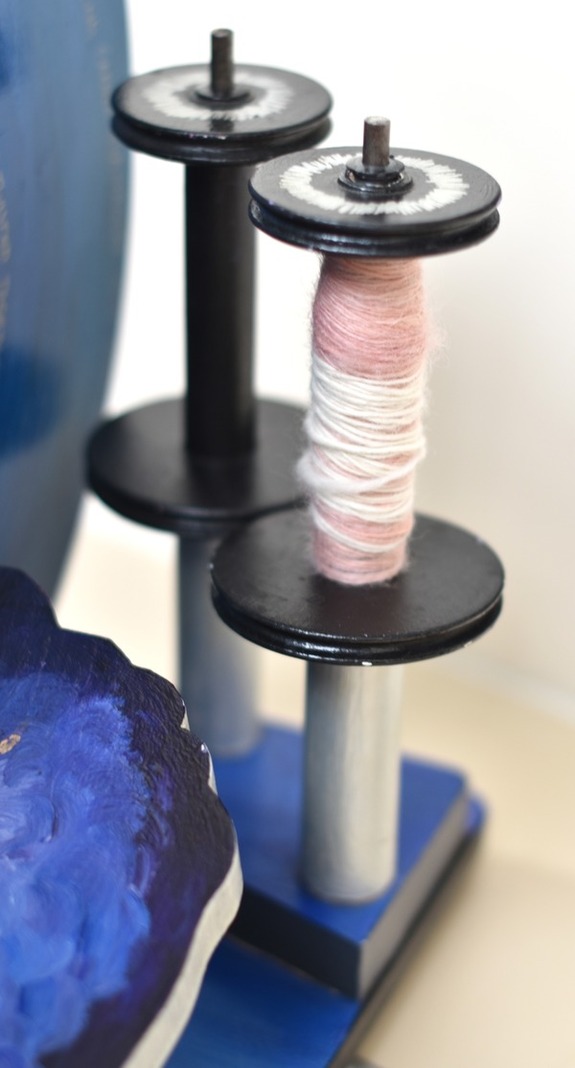
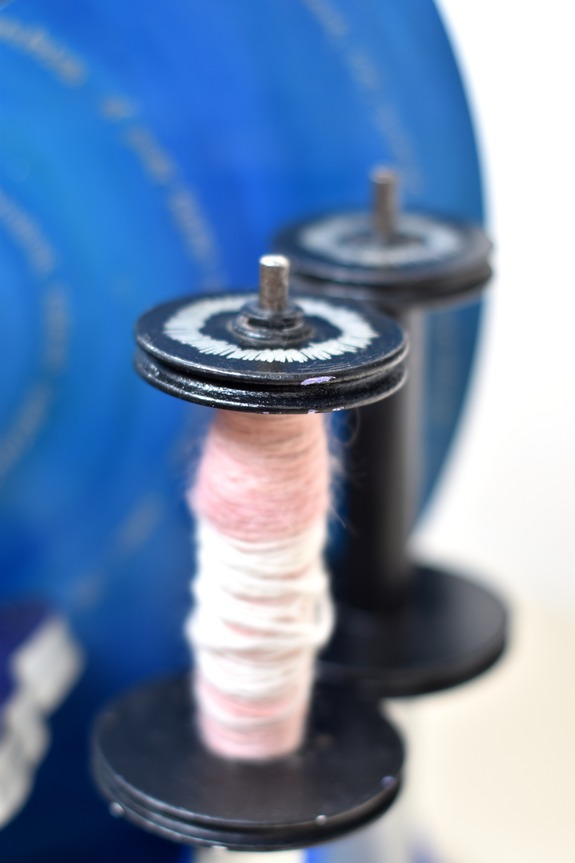
Anyone remember all the handspun yarns I used to sell? Well they were all spun on this wheel, and on this flyer. At the time there wasn't a jumbo flyer to go with the Hitch, so I made do. Since then, Dave developed a jumbo flyer, for which I was a tester, and that jumbo flyer with two jumbo bobbins is also included.


And there you have it! She's a beauty, isn't she? And rare. I'm open to offers but I can't afford to let her go too cheaply. If she doesn't sell for the right price I'd sooner hold onto her until we can find her the right home.

I'm still looking into courier options and shipping charges, and I don't see why shipping to mainland Europe would be a problem. I will also look into worldwide shipping, and if anyone interested uses a regular courier, I'm open to suggestions.

Once the eBay link is live, I'll link here. In the meantime, if you can help spread the word it'd be muchly appreciated!

(I'm feeling a little sad and nostalgic as I press the 'publish' button on this post... whoever owns her next, please look after her? Ta :)

eta/ I've found the original blog posts about the painting of my HitchHiker!

/blog/2006/6/28/its-arrived-its-arrived.html

/blog/2006/7/5/primming-and-flyer-indentification.html

/blog/2006/7/9/all-dressed-up-and-ready-to-go.html

(for the 'Spinning' tag below for more posts featuring this wheel and the yarns it created)


eta2/ the wheel is now listed on eBay!

http://www.ebay.co.uk/itm/121732745050


eta3/ the wheel has sold already! Wow! Thanks again for your support :)

Posted
AuthorWoolly Wormhead
CategoriesSpinning

I've been meaning forever to post some photos from my degree work - I did my main textiles degree at Goldsmiths, - Fine Art Textiles. (Prior to that I'd started a Textiles Bsc at Bolton, Industrial Textiles to be precise, but dropped out after the first year due to boredom. It was interesting indeed - learning about formulas for drape of fabric, industrial dyeing processes and so on, but zero creative input or scope)

It was during my time at Goldsmiths that I taught myself to spin, got my first wheel (an Ashford Trad) and got spinning in preparation for work for my final year degree show. I'd previously done some work with human hair, influenced by the artist Emily Bates who spun and knitted human hair into elongated, disproportionate dresses - they were incredibly daunting to see in the flesh. However, conceptually pet hair held different meanings, and that's what I wanted to explore.

The work I finished for my degree show was an installation comprising of a few related works. The main piece was a 6 foot square patchwork blanket, hand spun from cat and dog hair, that was draped over an armchair. The armchair itself was wired up with speakers - I'd recorded my previous cat Twiggy (who was identical to Minky looks wise yet much more like Spook in personality) purring, put it onto a loop and played it through the speakers. Basically, the whole installation was purring, yet at that level of amplification it closer resembled a deep, murmuring heart beat.

The blanket was at the heart of it all. It took over 6 weeks of solid work to make - spinning every day in my studio, knitting every knit when I got home. I was resourceful in how I collected the hair, and some of it had to be blended (mainly the cat hair) and this was when I first came across Wingham Wools. To add to the effect of the blanket, I deliberately didn't wash the dog hair - I wanted the smell to be part of it. And it stank! It was beautiful to look at... all those natural colourings and incredibly soft to the touch..... but it needed a repulsive element, and the smell did it.

Alongside this purring dog hair armchair was another piece of work, hanging on the wall. This comprised of 25 dog tags, each engraved with an emotion. Probably the quickest piece of work made! It's message was much more apparent - tags are used to label, identify ourselves, as are our emotions. Regardless of how we deal with our emotions, they make up who we are and how we deal with situations. Comfort, confliction, routine, it was all part of it. The work was intended to gain a different reaction from each viewer, and it did that.

In hindsight, I probably didn't pick the easiest subject to deal with. I'd had a really difficult time during my 2nd year at Goldsmiths - pivoting around the violent attempted rape by the alcoholic ex. It was horrific, and the only thing that got me through it all was my creative work. So, dealing with this issue - well mainly my recovery afterwards - may not have been the best work for a degree show, but it was what I needed to do as a person. Actually, the grades I got for my 3rd year work were the lowest of my whole degree.

But art reflects life, does it not?

Prior to Goldsmiths, after Bolton, I did my foundation course. For those not familiar with the British system, if you want to go to Art college, you are generally required to do a Foundation course, which is a prep year, to help break you out from the constraints of academic studies. Without this Art school can seem like a bit of a culture shock. I did mine at Southend, and this was where I started playing with hair as a sculptural medium. This piece was another exploration, probably into similar meanings as the work above but I may not have been fully aware of it.

Human hair doesn't felt in the same way wool does, yet it mats up a treat, particularly if you throw water into the mix. I built the mould from odd bits of wood, drilled drainage holes and proceeded to make everyone at college coil up in repulsion as I threw bags of hair into water and stuck my hands in! (fear not, I wore rubber gloves) I don't think I have this piece anymore, but it stayed in it's sculpted form without problem. It freaked a lot of people out, they hated it. Yet I found it quite charming... and considered the idea of it as a brick to be rather poignant.

It's interesting looking back on it all.... just goes to show that most of things I create these days are pretty tame by comparism. I've often thought about creating larger pieces of work and exhibiting, but as time goes on I've grown to be more comfortable with expressing myself in smaller ways.

Apologies for the poor image qualities - the originals are safely stored in the loft at my Mum's house in Sheffield; these are scanned from copied images in my portfolio. Do click to get a better view, though. I do still have the blanket, dog tags and the tape of purring... couldn't bear to part with them.

Posted
AuthorWoolly Wormhead
CategoriesSpinning
3 CommentsPost a comment
button for patreon
All of the free patterns and tutorials on this website are supported by my amazing Patreons! If it wasn't for them I wouldn't be able to continue to produce or host freebies. We'd love to have you join us, and in return, you get exclusive behind-the-scenes material, members-only discounts and early access to new free content. Membership starts at $1 per month. You can also say thanks for the freebie via the Tip Jar.
SpinningDrill.Square.BlogMain.jpg

Ok then folks, as promised I will detail below this 'secret' spinning gadget of ours. The original idea came from Tom, who saw my vain efforts and frustration at using a drop spindle for the first time after years of using a wheel (and then years of not using either). Together we've developed this, thinking about speed, direction, angle of spin, plying and so on. We do have plans for revision, but only because one of the main components is Tom's favourite toy and he's been feeling bereft of it lately. Yep, it's a drill. Simple as that.

A drill? Oh yeah, one of those electrical tools, commonly used as an aid to putting up shelves, and that causes the strangest vibrations of the hands and arm when used in hammer-action mode. A drill.

SpinningDrill.1.jpg
SpinningDrill.2.jpg

But not just any drill, as I'm about to explain. Being as I live with a drill connoisseur, I tend to forget some of the basic problems with cheaper ones. My singledom corded Black & Decker was reprieved from banishment to allow me to try it for this method, but it failed on 2 scores: a) the trigger/motor wasn't sensitive enough and jolted rather a lot on slower speeds, and b) it only had two gears – normal and hammer action. So back into its dark cupboard it went.

But that doesn't mean to say that you have to have a new, expensive drill. For some reason the modern cordless ones have far more sensitive triggers; probably because the manufacturers realised they have other uses (such as screwdrivers) and so put better switches and motors on them. And you don't have to have loads of gears either; if the trigger/motor is sensitive and smooth enough, one gear is plenty. Another handy fact about drills is that they will have a reverse, as well as forwards operation. Perfect for S and Z. Yep, plying is easy done on these things, too.

So the key to getting this right is trying out and finding a suitable drill. Maybe all potential drill-spinners should pop into their local tool shop with a drop-spindle in hand and try them all for size. Or maybe not. Now, lately I've been using the top-of-the-range Makita that I bought Tom for his birthday. Yet somewhere (he tells me) he has another decent cordless drill that sadly has a bent chuck... this renders it useless for drilling but ideal for this job. Salvage then, is another option.

The next thing you'll need is something to secure the drill. Rather essential, really. We've got a hefty table vice which is spot on or you could use a Black & Decker Workmate or similar. Your hands (or someone else's) are no good; it's gotta be really secure so that it doesn't start drifting across the floor. You need to position the drill so the chuck is pointing directly up, and that the trigger (switch) is accessible for your feet (or hands) (and this then starts to feel more like operating a sewing machine). Please do remember though – most vices that will be large and strong enough to hold a drill in place will have nasty teeth along the edges of their jaws. To protect the drill (and not offend the person you may have borrowed it from) you'll need some fabric, cardboard and/or gaffer tape placed between the edges of the jaws and the drill (which is visible in the above photos).

SpinningDrill.3.jpg

Finally, you'll need your bobbin device. This was actually the 'thing' we spent most time playing around with. To start with, I just stuck in my cheapy drop-spindle. Before long, the shaft snapped due to it being way too tall in the chuck and having a few problems with the various forces at play. So it got chopped down. It worked better, but still not perfect.

Eventually the bobbin design was achieved. The ends of the bobbins are quite large, so as to allow me to spin decent quantities of chunky yarns, but not so large as to cause problems (about the size of a CD). Having an end to the bobbin, rather than just the whorl of the spindle, adds balance; we found that once the spindle had an average quantity of yarn on it, it got top heavy and snapped again. Also, as greater speeds were achieved, (which is easy this way, trust me) the yarn wound a little too close to the chuck for my liking. So the bobbin idea works on several counts.

SpinningDrill.4.jpg

The bottom end of the shaft, the bit that goes into the drill, shouldn't be too long, again to avoid snapping. Also, you'll need a bit of tape around this section (although too much will make it too big for the chuck), as like the vice, chucks have teeth for gripping and will quite happily chomp away at your bobbin, shortening its life.

SpinningDrill.5.jpg

Variations of the top end of the bobbin were tried out, and we probably could spend a lot more time refining this, for different angles and so on. But this works fine for me. A simple hook, as you'd find in the top of a top-whorl spindle, is needed to guide the yarn. It can also act as a sort of brake, as spinning at speed did sometimes loosen the yarn from the hook; so just wind it round the hook a couple of times to avoid this. The other yarn guide which is rather handy is a tiny, smooth notch in the top edge of the bobbin, roughly behind the back of the hook. The notch shouldn't be too deep and should be very smooth, to avoid abrasion and snapping of your yarn. Of course, as spinners we know that the angle of your draw is important, and that applies here. Your draw/yarn being spun should sit above 45 degrees from the horizontal, else it catches on the hook.

SpinningDrill.6.jpg
SpinningDrill.7.jpg

Now, I think that's most of the technical stuff covered for the time being. Just a few more advantages to list before I leave you all to it. I mentioned before that the reverse option is great for plying. It also allows you to leave the bobbin in the chuck, yet still wind off directly to your niddy noddy, so long as you go slow enough. The bit that made me smile the most was the winding on aspect – one of the things I found most frustrating about the drop spindle was the need to stop your flow and wind on the yarn. All you do here is unhook it and operate the drill as if you were spinning - it winds on effortlessly. Mind you, will need to make sure that your initial feeder yarn is wound onto the bobbin in the same direction as you'll be operating, else it may tangle.

SpinningDrill.8.jpg
SpinningDrill.10.jpg
SpinningDrill.11.jpg

Obviously this method won't suit everyone, and I'm not gonna suggest you start buying drills and vices. But if you have them, it's worth giving it a shot. There's no need for wheel ratios, as the speed will vary depending on your feet and on the drill. It won't suddenly start spinning backwards as spindles and wheels do when you lose your flow. And it's fast, really fast. It's allowed me to concentrate on my draw, and so now I have producd the best yarns I've made in years. Nice one.

It's that easy, even Tom gave it a go. He's a bit of a genius, don't you think? (OK, I would say that, but I gotta thank him for developing all this, just so I can spin more yarn!)

JUST REMEMBER HEALTH & SAFETY! I'm not gonna be held liable for anything just 'cos I've shared it here, ok? Use your common sense; make sure the drill is firmly secured, tie loose hair back, don't go too fast, etc. Any questions, fire away.

Support

As always, if you have a question about this technique or need some help with it, leave a comment below! I’m afraid I’m unable to offer help via email or private message but you’re welcome to post in our forums.

Posted
AuthorWoolly Wormhead
10 CommentsPost a comment